Deviled eggs are a perennial favorite at any gathering, but why not add a playful Easter twist to this beloved dish? These Easter deviled egg chicks are not only adorable but also incredibly easy to make, making them a perfect activity for the whole family. With just a few simple steps, you can transform ordinary deviled eggs into charming little chicks that are sure to delight both kids and adults alike.
Step 1: Making the Hard-Boiled Eggs
If you don’t already have hard-boiled eggs on hand, start by boiling a pot of water seasoned with salt. Once the water reaches a boil, carefully add your eggs and cook them for 12 to 14 minutes until they are hard-boiled. Once cooked, transfer the eggs to a bowl of ice water to cool quickly and stop the cooking process.
Step 2: Peeling the Eggs
To peel the eggs, gently tap them on a hard surface to crack the shell, then carefully remove it. Rinse the peeled eggs under cool water if necessary. Next, use a sharp knife to slice off a small portion of the bottom of each egg to create a flat base, allowing them to stand upright.
Step 3: Preparing the Filling
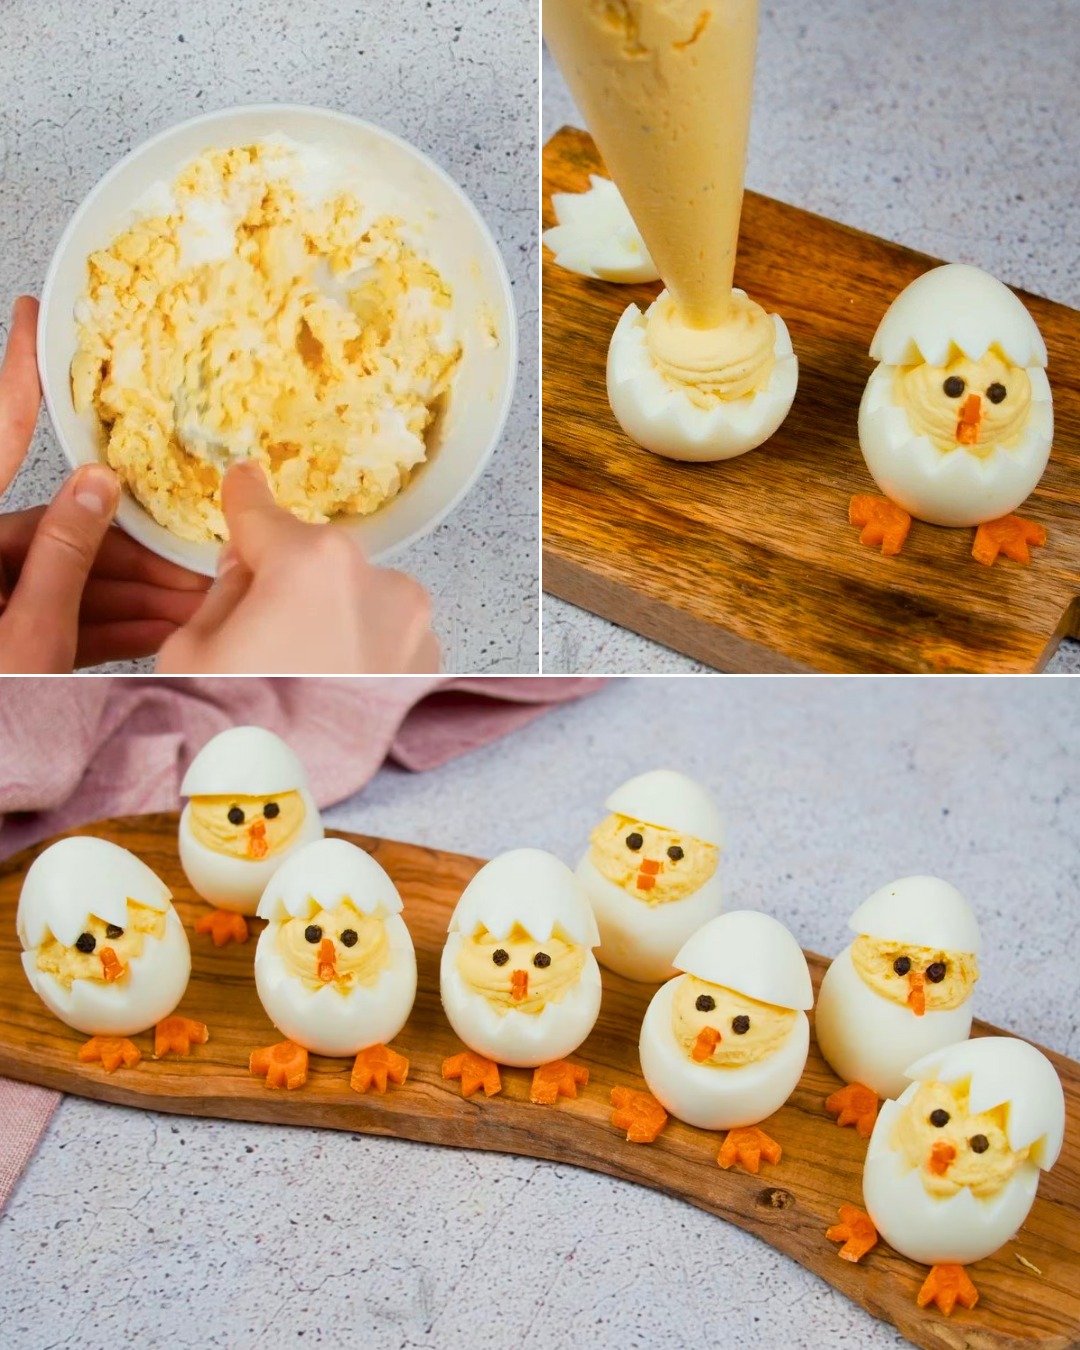
Carefully slice each hard-boiled egg in half lengthwise, then gently remove the yolks and transfer them to a bowl. To the yolks, add mayonnaise, mustard, apple cider vinegar, and a pinch of salt. Mash and mix everything together until smooth and creamy, adjusting the ingredients to taste if necessary.
Step 4: Assembling the Chicks
Transfer the yolk mixture into a piping bag fitted with a star tip, or simply spoon it into the egg whites. Pipe or spoon the filling generously into each egg white, mounding it slightly to create the chicks’ bodies. Place the top halves of the egg whites back onto the filled eggs, pressing them gently to secure.
Step 5: Adding the Details
To give your deviled egg chicks their adorable Easter look, use black peppercorns for the eyes and small pieces of carrot for the beaks. Simply press two peppercorns into each egg for the eyes and a small triangle of carrot for the beak. You can also get creative and add carrot or celery sticks for the chicks’ feet, using toothpicks to secure them if necessary.
Step 6: Serving and Enjoying
Once your Easter deviled egg chicks are assembled, arrange them on a platter and serve them as a fun and festive appetizer at your Easter celebration. Watch as your guests marvel at these charming little creations before devouring them with delight. These adorable deviled egg chicks are not only a delicious addition to your holiday spread but also a delightful way to add some Easter cheer to your table. Enjoy!
Conclusion:
With just a few simple ingredients and some creative flair, you can transform ordinary deviled eggs into adorable Easter deviled egg chicks that are as fun to make as they are to eat. Whether you’re hosting a festive Easter brunch or simply looking for a fun activity to do with the kids, these charming little chicks are sure to be a hit. So gather your ingredients, roll up your sleeves, and get ready to create some Easter magic with these delightful deviled egg chicks!
These Easter deviled egg chicks are indeed a delightful twist on the classic dish! Here are a few tips and variations to enhance your experience with making and enjoying them:
1. **Colorful Variations**: Add a pop of color to your Easter deviled egg chicks by incorporating food coloring into the filling mixture. You can create pastel shades by using a drop or two of food coloring in yellow, pink, or blue. Mix the coloring into the filling until you achieve your desired hue for a vibrant Easter presentation.
2. **Creative Decorations**: In addition to using black peppercorns for the eyes and carrot pieces for the beaks, consider other creative options for decorating your deviled egg chicks. Thin slices of black olives can also be used for eyes, while small pieces of red bell pepper can serve as beaks. Get creative with different ingredients to give your chicks unique personalities.
3. **Flavor Variations**: Experiment with different flavors for the deviled egg filling to suit your taste preferences. You can add ingredients such as minced herbs, finely chopped pickles, crumbled bacon, or grated cheese to the filling mixture for added flavor and texture. Get creative with your flavor combinations to make your deviled egg chicks even more delicious.
4. **Serve with Accompaniments**: Serve your Easter deviled egg chicks with a variety of accompaniments to enhance the presentation and flavor. Arrange them on a bed of lettuce or spinach leaves for a festive touch, or garnish the platter with fresh herbs such as parsley or dill. You can also serve them alongside other Easter-themed appetizers for a complete holiday spread.
5. **Storage and Make-Ahead Tips**: If you’re making these deviled egg chicks ahead of time, store them in the refrigerator in an airtight container until ready to serve. To prevent the filling from drying out, cover the container with plastic wrap or foil. Assemble the chicks shortly before serving to maintain their freshness and appearance.
6. **Get the Kids Involved**: Making Easter deviled egg chicks can be a fun activity for the whole family. Get the kids involved in decorating the eggs by letting them place the eyes, beaks, and other decorations on the filled egg halves. It’s a great way to spark creativity and involve everyone in the Easter festivities.
With these tips and variations, you can elevate your Easter deviled egg chicks and create a memorable holiday appetizer that’s as fun to make as it is to eat. Enjoy bringing a touch of Easter cheer to your table with these adorable little creations!