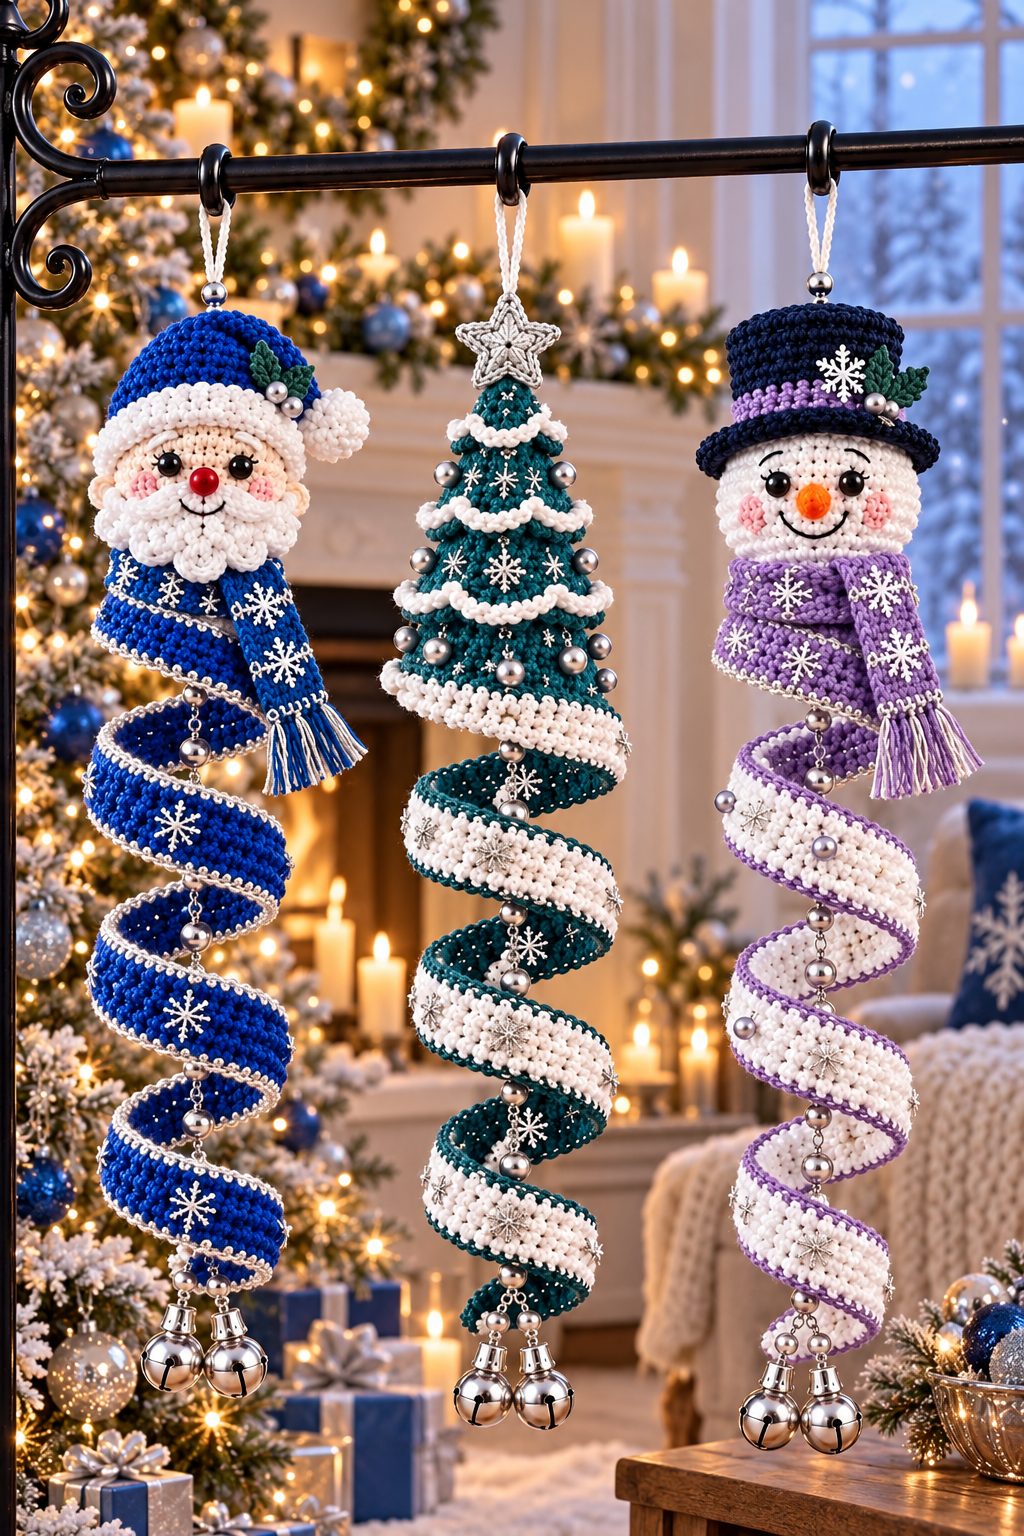

This original pattern is inspired by the image. It creates similar ornaments; the exact stitches and proportions in the generated picture may not be reproducible.
Written in US crochet terms.
Materials
- Sport or DK yarn: royal blue, teal, lavender, white, cream, navy and a little orange
- Silver crochet thread or thin silver yarn for decoration
- 2.5–3 mm crochet hook, appropriate for your yarn
- Polyester stuffing
- Black embroidery thread
- Yarn needle, scissors and stitch markers
- Small silver bells and optional beads
Use tight stitches for the stuffed pieces. Finished length will vary with yarn, tension and the length of your foundation chain.
Abbreviations
- ch = chain
- sl st = slip stitch
- sc = single crochet
- hdc = half double crochet
- dc = double crochet
- inc = 2 sc in the same stitch
- dec = single crochet 2 stitches together, preferably an invisible decrease
- MR = magic ring
- BLO = back loop only
Work the stuffed pieces in continuous rounds unless stated otherwise. Numbers in parentheses indicate stitch counts.
1. Spiral body — make one for each ornament
Colors:
- Santa: royal blue with white and silver edging
- Christmas tree: teal with white edging
- Snowman: lavender with white edging
The spiral is made by putting several stitches into each foundation chain, causing the strip to curl.
- With the main color, ch 62.
- Work 3 dc in the third chain from the hook.
- Work 3 dc in every remaining chain. You will have 180 dc; the skipped chains do not count as a stitch.
- Fasten off the main color.
- Join white at the beginning of the long outer edge.
- Work 1 sc in each dc across. Fasten off.
For a delicate scalloped edge, replace the plain white edging with: sl st in the first stitch, [ch 2, sl st in the next stitch] across.
Using silver thread, embroider a loose running stitch just inside the white border. Keep the thread relaxed so it does not pull the crochet tight.
Gently arrange the strip into an even corkscrew. Leave it hanging briefly to check the shape before adding decorations.
Adjusting the size: Start with fewer chains for a shorter ornament or more chains for a longer one. Always work 3 dc into each usable foundation chain.
2. Santa head
Using cream:
- Round 1: 6 sc in MR. (6)
- Round 2: Inc around. (12)
- Round 3: [Sc, inc] × 6. (18)
- Round 4: [2 sc, inc] × 6. (24)
- Round 5: [3 sc, inc] × 6. (30)
- Round 6: [4 sc, inc] × 6. (36)
- Rounds 7–12: Sc around. (36)
- Round 13: [4 sc, dec] × 6. (30)
- Round 14: [3 sc, dec] × 6. (24)
- Round 15: [2 sc, dec] × 6. (18)
Stuff firmly but without stretching the stitches.
- Round 16: [Sc, dec] × 6. (12)
- Round 17: Dec × 6. (6)
Fasten off and close the opening.
Embroider two black eyes between rounds 8 and 9, approximately 6 stitches apart. Add small white highlights if desired.
Santa’s nose
With cream or pale pink:
- Round 1: 6 sc in MR. (6)
- Round 2: Sc around. (6)
Fasten off, lightly stuff and sew centrally below the eyes.
Santa’s beard
With white, ch 12.
- Row 1: Sc in the second chain from the hook and across. (11)
- Row 2: Ch 1, turn; dec, 7 sc, dec. (9)
- Row 3: Ch 1, turn; dec, 5 sc, dec. (7)
- Row 4: Ch 1, turn; dec, 3 sc, dec. (5)
- Row 5: Ch 1, turn; dec, sc, dec. (3)
- Row 6: Ch 1, turn; sc3tog. (1)
To work sc3tog, draw up a loop in each of the next three stitches, yarn over and pull through all four loops.
Work a loose sc border around the beard, placing approximately one stitch in each row end. Sew the upper edge below the nose and tack the sides to the cheeks.
For a moustache, make two separate ch-5 chains and sew them in curved shapes directly below the nose.
Santa’s blue hat
Using royal blue:
- Round 1: 6 sc in MR. (6)
- Round 2: Sc around. (6)
- Round 3: [Sc, inc] × 3. (9)
- Round 4: Sc around. (9)
- Round 5: [2 sc, inc] × 3. (12)
- Round 6: [Sc, inc] × 6. (18)
- Round 7: [2 sc, inc] × 6. (24)
- Round 8: [3 sc, inc] × 6. (30)
- Round 9: [4 sc, inc] × 6. (36)
- Rounds 10–12: Sc around. (36)
Change to white.
- Rounds 13–14: Sc around. (36)
Fasten off with a long sewing tail. Fit the hat over the head and sew in place. Add a small white pompom at the tip and bend the tip to one side.
3. Snowman head
Follow the Santa head pattern using white throughout.
Embroider black eyes and a curved smile. Add a few small pink stitches for cheeks.
Carrot nose
Using orange:
- Round 1: 4 sc in MR. (4)
- Round 2: Sc around. (4)
- Round 3: [Sc, inc] × 2. (6)
- Round 4: Sc around. (6)
Fasten off with a sewing tail. Add a tiny amount of stuffing if needed, then sew the open end to the face so the pointed end projects outward.
Snowman’s top hat
Using navy:
- Round 1: 6 sc in MR. (6)
- Round 2: Inc around. (12)
- Round 3: [Sc, inc] × 6. (18)
- Round 4: [2 sc, inc] × 6. (24)
- Round 5: [3 sc, inc] × 6. (30)
- Round 6: Working in BLO, sc around. (30)
- Rounds 7–10: Working through both loops, sc around. (30)
Change to lavender.
- Rounds 11–12: Sc around. (30)
Change to navy for the brim.
- Round 13: Working in front loops only, [4 sc, inc] × 6. (36)
- Round 14: [5 sc, inc] × 6. (42)
- Round 15: Sc around. (42)
Fasten off. Lightly stuff the crown and sew the hat onto the head, stitching around the base of the crown.
4. Scarves — make two
Use royal blue for Santa and lavender for the snowman.
- Ch 46.
- Row 1: Hdc in the second chain from the hook and across. (45)
- Row 2: Ch 1, turn; hdc across. (45)
- Fasten off and weave in the ends.
Add short yarn fringe if desired. Wrap each scarf around the join between the head and spiral, then secure it with several stitches.
5. Christmas tree topper
Using teal, start at the top:
- Round 1: 6 sc in MR. (6)
- Round 2: Sc around. (6)
- Round 3: [Sc, inc] × 3. (9)
- Round 4: Sc around. (9)
- Round 5: [2 sc, inc] × 3. (12)
- Round 6: Sc around. (12)
- Round 7: [3 sc, inc] × 3. (15)
- Round 8: Sc around. (15)
- Round 9: [4 sc, inc] × 3. (18)
- Round 10: Sc around. (18)
- Round 11: [5 sc, inc] × 3. (21)
- Round 12: Sc around. (21)
- Round 13: [6 sc, inc] × 3. (24)
- Round 14: Sc around. (24)
- Round 15: [7 sc, inc] × 3. (27)
- Round 16: Sc around. (27)
- Round 17: [8 sc, inc] × 3. (30)
- Round 18: Sc around. (30)
Fasten off, leaving a sewing tail.
Tree base
Using teal:
- Round 1: 6 sc in MR. (6)
- Round 2: Inc around. (12)
- Round 3: [Sc, inc] × 6. (18)
- Round 4: [2 sc, inc] × 6. (24)
- Round 5: [3 sc, inc] × 6. (30)
Fasten off. Stuff the cone lightly, then sew the base to its opening, matching the 30 stitches.
Snowy tree garlands
Make four white chains long enough to fit loosely around the cone at rounds 6, 10, 14 and 18.
For each garland, sl st back along the chain for a narrow trim, or sc back along it for a thicker trim. Sew in place with shallow scallops, checking the fit as you go.
Small star
Using silver or white:
- Make an MR.
- Repeat [ch 3, sc in the second chain from the hook, hdc in the next chain, sl st into the ring] five times.
- Pull the ring closed and fasten off.
Shape the five points and sew the star to the tree’s tip.
6. Embroidered snowflakes
Decorate the spirals and scarves before final assembly.
- Sew three straight stitches crossing at their centers to create six arms.
- Add two tiny diagonal stitches near the end of each arm.
- Alternate larger snowflakes with small stitched stars or French knots.
Keep the reverse side neat because both sides of the spirals may be visible.
7. Assemble the ornaments
- Sew one short end of the blue spiral securely beneath Santa’s head.
- Sew the lavender spiral beneath the snowman’s head.
- Sew the teal spiral beneath the center of the tree base.
- Add the scarves to cover the head-to-spiral joins.
- Sew one or two small bells to the lower end of each spiral.
- Make a hanging loop with a ch-25 chain or strong doubled yarn.
- Anchor the loop securely into the topper, passing through several stitches rather than attaching it to a single strand.
- Hang the ornaments and arrange their curls evenly.
Use lightweight bells so the spirals retain their shape. These are decorative ornaments; keep beads, bells and hanging loops out of reach of small children.