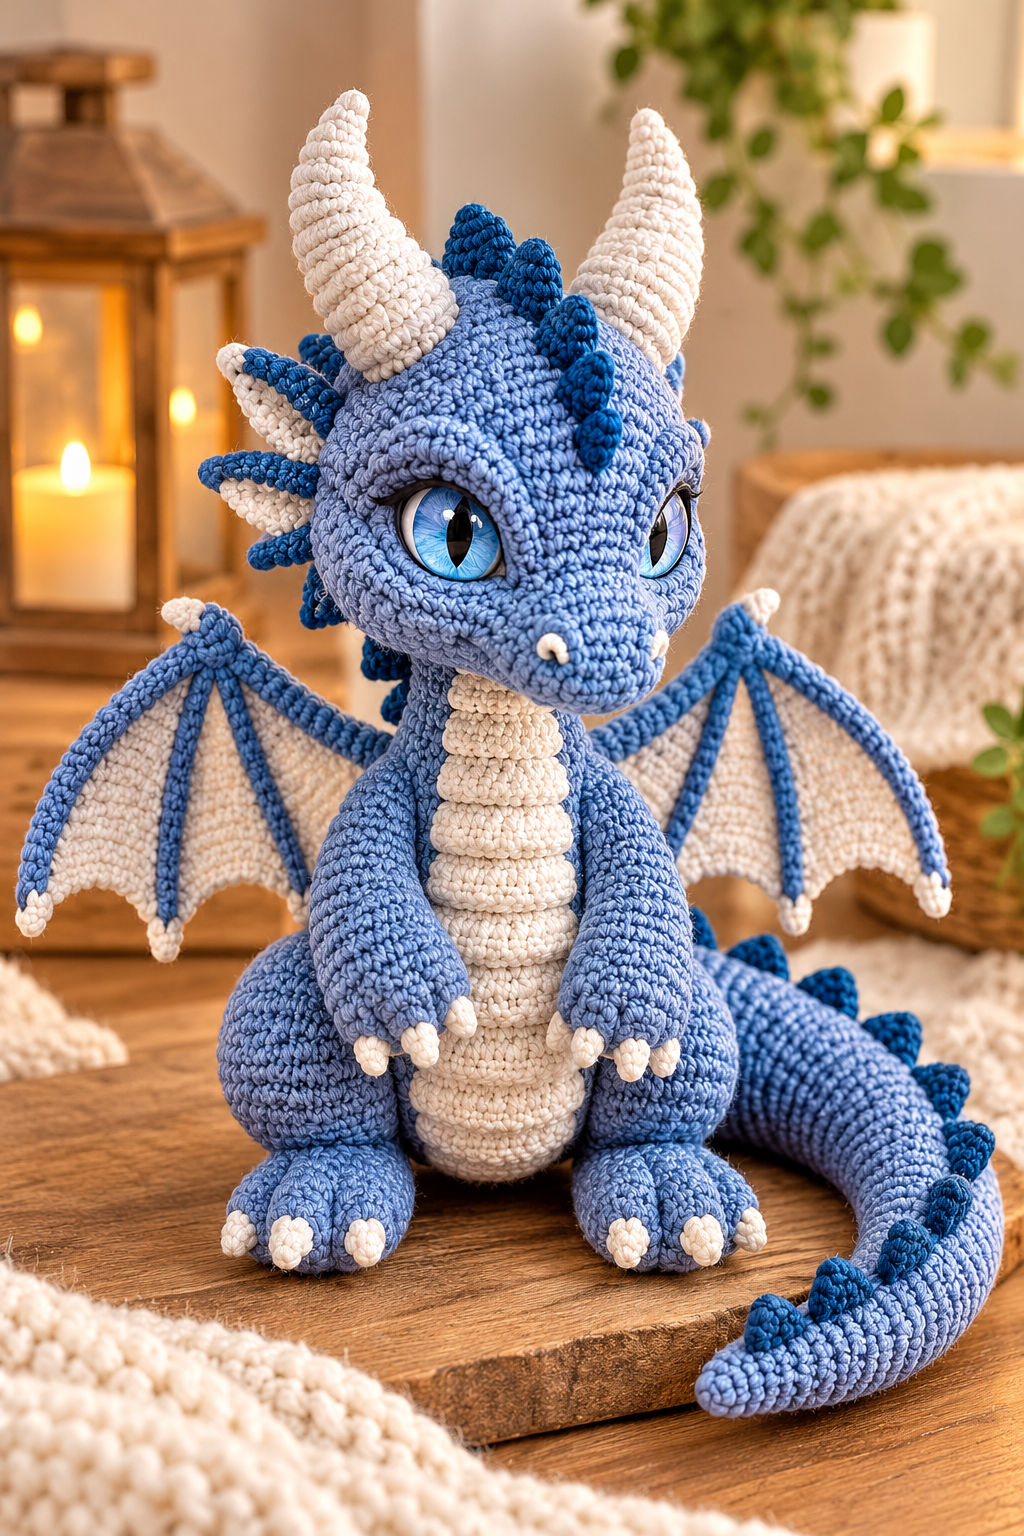

Create an adorable handmade crochet dragon featuring a soft blue body, creamy white horns, beautiful wings, a curled tail, and bright blue eyes. This charming amigurumi dragon makes a wonderful gift or nursery decoration.
Skill Level: Intermediate–Advanced | US Crochet Terms | Approximate Size: 10–12 inches (25–30 cm)
Materials
- Worsted-weight yarn in light blue, dark blue, and ivory
- 3.0 mm or 3.5 mm crochet hook
- Blue safety eyes (18–20 mm)
- Polyester fiberfill stuffing
- Yarn needle and stitch markers
- Scissors
- Optional craft wire for posing the tail
Abbreviations
- MR – Magic Ring
- SC – Single Crochet
- INC – Increase (2 SC in one stitch)
- DEC – Invisible Decrease
- CH – Chain
- SL ST – Slip Stitch
- HDC – Half Double Crochet
- DC – Double Crochet
- FO – Fasten Off
Work in continuous rounds unless otherwise indicated.
1. Dragon Head (Light Blue)
R1: 6 SC in MR (6)
R2: INC around (12)
R3: (1 SC, INC) × 6 (18)
R4: (2 SC, INC) × 6 (24)
R5: (3 SC, INC) × 6 (30)
R6: (4 SC, INC) × 6 (36)
R7: (5 SC, INC) × 6 (42)
R8: (6 SC, INC) × 6 (48)
R9–17: SC around (48)
R18: (6 SC, DEC) × 6 (42)
R19: (5 SC, DEC) × 6 (36)
R20: (4 SC, DEC) × 6 (30)
Insert safety eyes between rounds 12 and 13, approximately 10 stitches apart.
R21: (3 SC, DEC) × 6 (24)
R22: (2 SC, DEC) × 6 (18)
Stuff firmly, leaving a long tail for sewing.
2. Dragon Body (Light Blue)
R1: 6 SC in MR (6)
R2: INC around (12)
R3: (1 SC, INC) × 6 (18)
R4: (2 SC, INC) × 6 (24)
R5: (3 SC, INC) × 6 (30)
R6: (4 SC, INC) × 6 (36)
R7–15: SC around (36)
R16: (4 SC, DEC) × 6 (30)
R17: SC around (30)
R18: (3 SC, DEC) × 6 (24)
R19: SC around (24)
R20: (2 SC, DEC) × 6 (18)
Stuff firmly and leave a long tail for attaching the head.
3. Dragon Snout
Using light blue yarn:
R1: CH 7, SC in second chain, 4 SC, 3 SC in last chain. Continue on opposite side with 4 SC and INC (14).
R2: INC, 4 SC, 3 INC, 4 SC, 2 INC (20).
R3–5: SC around (20).
Stuff lightly and sew to the lower front of the head. Embroider two small ivory nostrils.
4. Dragon Horns (Make 2)
Using ivory yarn:
R1: 4 SC in MR (4)
R2: SC around (4)
R3: (1 SC, INC) × 2 (6)
R4–5: SC around (6)
R6: (2 SC, INC) × 2 (8)
R7–8: SC around (8)
R9: (3 SC, INC) × 2 (10)
R10–12: SC around (10)
Stuff lightly and attach securely to the top of the head.
5. Arms (Make 2)
Using light blue yarn:
R1: 6 SC in MR (6)
R2: INC around (12)
R3–5: SC around (12)
R6: (2 SC, DEC) × 3 (9)
R7–12: SC around (9)
Stuff lightly, flatten the openings, and sew to both sides of the upper body. Add small ivory claws.
6. Legs (Make 2)
Using light blue yarn:
R1: 6 SC in MR (6)
R2: INC around (12)
R3: (1 SC, INC) × 6 (18)
R4–7: SC around (18)
R8: (1 SC, DEC) × 6 (12)
R9–11: SC around (12)
Stuff firmly and sew to the lower body. Embroider three ivory claws on each foot.
7. Dragon Wings (Make 2)
Use ivory yarn for the inner wings.
Row 1: CH 4, SC across (3)
Row 2: CH 1, turn, INC, SC, INC (5)
Row 3: SC across (5)
Row 4: CH 1, turn, INC, 3 SC, INC (7)
Row 5: SC across (7)
Row 6: CH 1, turn, INC, 5 SC, INC (9)
Rows 7–10: SC across (9)
Finish with a dark blue SC border. Shape the lower edge into gentle scallops using groups of HDC and DC stitches.
Crochet several dark blue chain cords and sew them from the upper wing corner toward the lower scallops to create the wing ribs. Attach both wings to the dragon’s back.
8. Dragon Tail
Using light blue yarn:
R1: 4 SC in MR (4)
R2–3: SC around (4)
R4: (1 SC, INC) × 2 (6)
R5–7: SC around (6)
R8: (2 SC, INC) × 2 (8)
R9–11: SC around (8)
R12: (3 SC, INC) × 2 (10)
R13–15: SC around (10)
R16: (4 SC, INC) × 2 (12)
R17–19: SC around (12)
R20: (5 SC, INC) × 2 (14)
R21–24: SC around (14)
Stuff progressively and sew the wider end to the back of the body. Curve the tail naturally around the dragon.
9. Back Spikes
Using dark blue yarn, make 8–12 small spikes.
R1: 4 SC in MR (4)
R2: SC around (4)
R3: (1 SC, INC) × 2 (6)
R4: SC around (6)
FO and leave a sewing tail.
Attach the spikes along the dragon’s head, back, and tail.
10. Ivory Belly
Using ivory yarn:
CH 9.
Row 1: SC in second chain and across (8)
Rows 2–16: CH 1, turn, SC across (8)
FO and leave a long sewing tail.
Sew the panel vertically to the front of the dragon. Add horizontal embroidered lines or raised crochet strips to create the segmented belly shown in the picture.
Final Assembly
- Sew the head securely onto the stuffed body.
- Attach both horns, arms, legs, wings, and tail.
- Sew the ivory belly panel into place.
- Add the dark blue spikes along the head, back, and tail.
- Embroider small ivory claws and nostrils.
- Shape the wings and gently curve the tail.
- Weave in all loose ends and adjust the stuffing.
Crochet Tip: Use consistent tension and stuff each piece gradually to achieve smooth, rounded shapes. For a children’s toy, use embroidered eyes instead of plastic safety eyes, and avoid exposed wire.