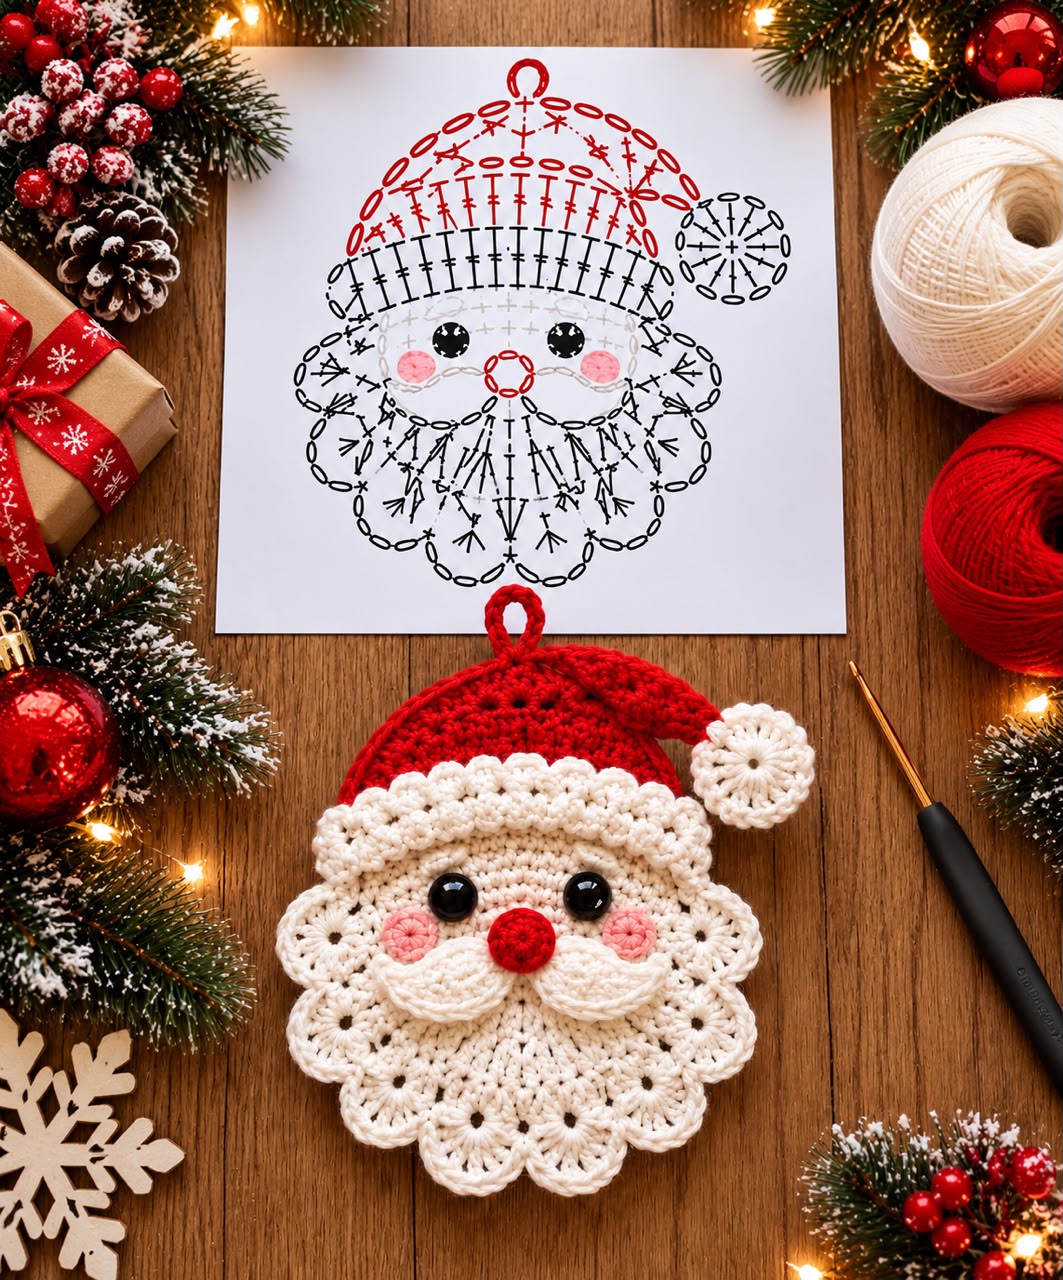

Create an adorable handmade Santa Claus ornament with a bright red hat, fluffy white beard, rosy cheeks, and a festive hanging loop. Perfect for Christmas trees, holiday decorations, and handmade gifts.
Skill Level: Intermediate Finished Size: Approximately 5–6 inches (13–15 cm) Crochet Hook: 3.0 mm or 3.5 mm Yarn: Cotton yarn, DK weight
Materials Needed
- Red yarn for Santa’s hat and nose
- White or ivory yarn for the face, beard, moustache, and pom-pom
- Light pink yarn for the cheeks
- Two black safety eyes (6–8 mm)
- Crochet hook (3.0–3.5 mm)
- Yarn needle
- Scissors
- Stitch markers
- Fiberfill (optional)
Crochet Abbreviations (US Terms)
- MR – Magic Ring
- CH – Chain
- SC – Single Crochet
- HDC – Half Double Crochet
- DC – Double Crochet
- TR – Treble Crochet
- SL ST – Slip Stitch
- ST – Stitch
- INC – Increase
- DEC – Decrease
- BLO – Back Loop Only
- FO – Fasten Off
Step 1: Crochet Santa’s Face
Using ivory yarn:
Round 1: Make a magic ring and work 6 SC into the ring. (6)
Round 2: INC in every stitch. (12)
Round 3: (1 SC, INC) repeat 6 times. (18)
Round 4: (2 SC, INC) repeat 6 times. (24)
Round 5: (3 SC, INC) repeat 6 times. (30)
Round 6: (4 SC, INC) repeat 6 times. (36)
Round 7: (5 SC, INC) repeat 6 times. (42)
Round 8: (6 SC, INC) repeat 6 times. (48)
Fasten off, leaving a long tail for assembly.
Attach the black safety eyes approximately 6–7 stitches apart. If the ornament is intended for young children, embroider the eyes instead.
Step 2: Crochet Santa’s Red Hat
Using red yarn:
Row 1: CH 3, work 2 SC into the second chain from the hook. CH 1, turn. (2)
Row 2: INC in each stitch. CH 1, turn. (4)
Row 3: SC across. CH 1, turn. (4)
Row 4: INC, 2 SC, INC. CH 1, turn. (6)
Continue increasing by 2 stitches every second row until the hat reaches approximately 28–32 stitches across, or fits the top of Santa’s face.
Work 2 additional rows of SC to create a rounded hat edge.
Fasten off.
White Hat Brim
Join ivory yarn along the bottom edge of the hat.
Row 1: Work SC evenly across.
Row 2: Work (SC, 3 DC in next stitch, skip 1 stitch) repeatedly to create a fluffy scalloped border.
Fasten off and weave in the ends.
Step 3: Crochet the White Pom-Pom
Using ivory yarn:
Round 1: MR, CH 2, work 12 DC into the ring. Join with SL ST.
Round 2: CH 2, work 2 DC in each stitch around. Join.
For a fuller textured pom-pom, work small clusters of 3 DC around the outer edge.
Fasten off and attach to the pointed end of the hat.
Step 4: Crochet Santa’s Beard
Using ivory yarn, create a scalloped beard approximately the width of the face.
Row 1: CH 25.
Row 2: Starting in the second chain from the hook, SC across. CH 1, turn.
Row 3: Work 2 DC into every second stitch to increase the width.
Row 4: Work SC across.
Row 5: Repeat (skip 1 stitch, 5 DC in next stitch, skip 1 stitch, SL ST in next stitch) across the bottom edge to form rounded beard scallops.
For a fuller beard, crochet additional small circular motifs and sew them around the sides and bottom, overlapping slightly.
Step 5: Crochet Santa’s Moustache
Make two identical pieces using ivory yarn.
Round 1: CH 7.
Round 2: Work 1 SC, 1 HDC, 3 DC, 1 HDC along the chain.
Round 3: Work SC along the opposite side of the foundation chain.
Fasten off, leaving a sewing tail.
Shape each piece into a soft curved moustache and sew them beneath the nose.
Step 6: Crochet the Red Nose
Using red yarn:
Round 1: MR, 6 SC. (6)
Round 2: INC in every stitch. (12)
Round 3: SC around. (12)
Fasten off, leaving a long tail.
Add a tiny amount of fiberfill if desired, then sew the nose between the eyes and above the moustache.
Step 7: Crochet the Pink Cheeks
Make two using light pink yarn.
Round 1: MR, work 8 SC into the ring.
Round 2: INC in every stitch. (16)
Fasten off.
Sew one cheek beneath each eye.
Step 8: Create the Hanging Loop
Using red yarn:
- Attach yarn to the top center of Santa’s hat.
- CH 15–20, depending on the desired loop size.
- SL ST into the starting point to close the loop.
- Fasten off and secure the yarn ends.
Step 9: Final Assembly
Sew the hat to the upper section of Santa’s face, allowing the white brim to overlap slightly.
Position the beard below the face and attach it securely. Add the moustache, red nose, pink cheeks, and pom-pom.
Gently shape the scalloped beard and hat brim to create a soft, dimensional finish.
Tips for a Beautiful Finish
Use consistent yarn tension to keep the ornament symmetrical. Cotton yarn helps the ornament maintain its shape, while slightly thicker yarn creates a fuller beard.
For extra stability, add a felt backing or crochet a second plain circular piece and sew it to the back.
Note: This is an approximate, original pattern inspired by the reference image, not a verified transcription of the stitch chart. The chart’s layered floral beard may require adjustments to reproduce exactly.
Your handmade Crochet Santa Claus Ornament is ready to decorate your Christmas tree, gift packages, or holiday wreaths!