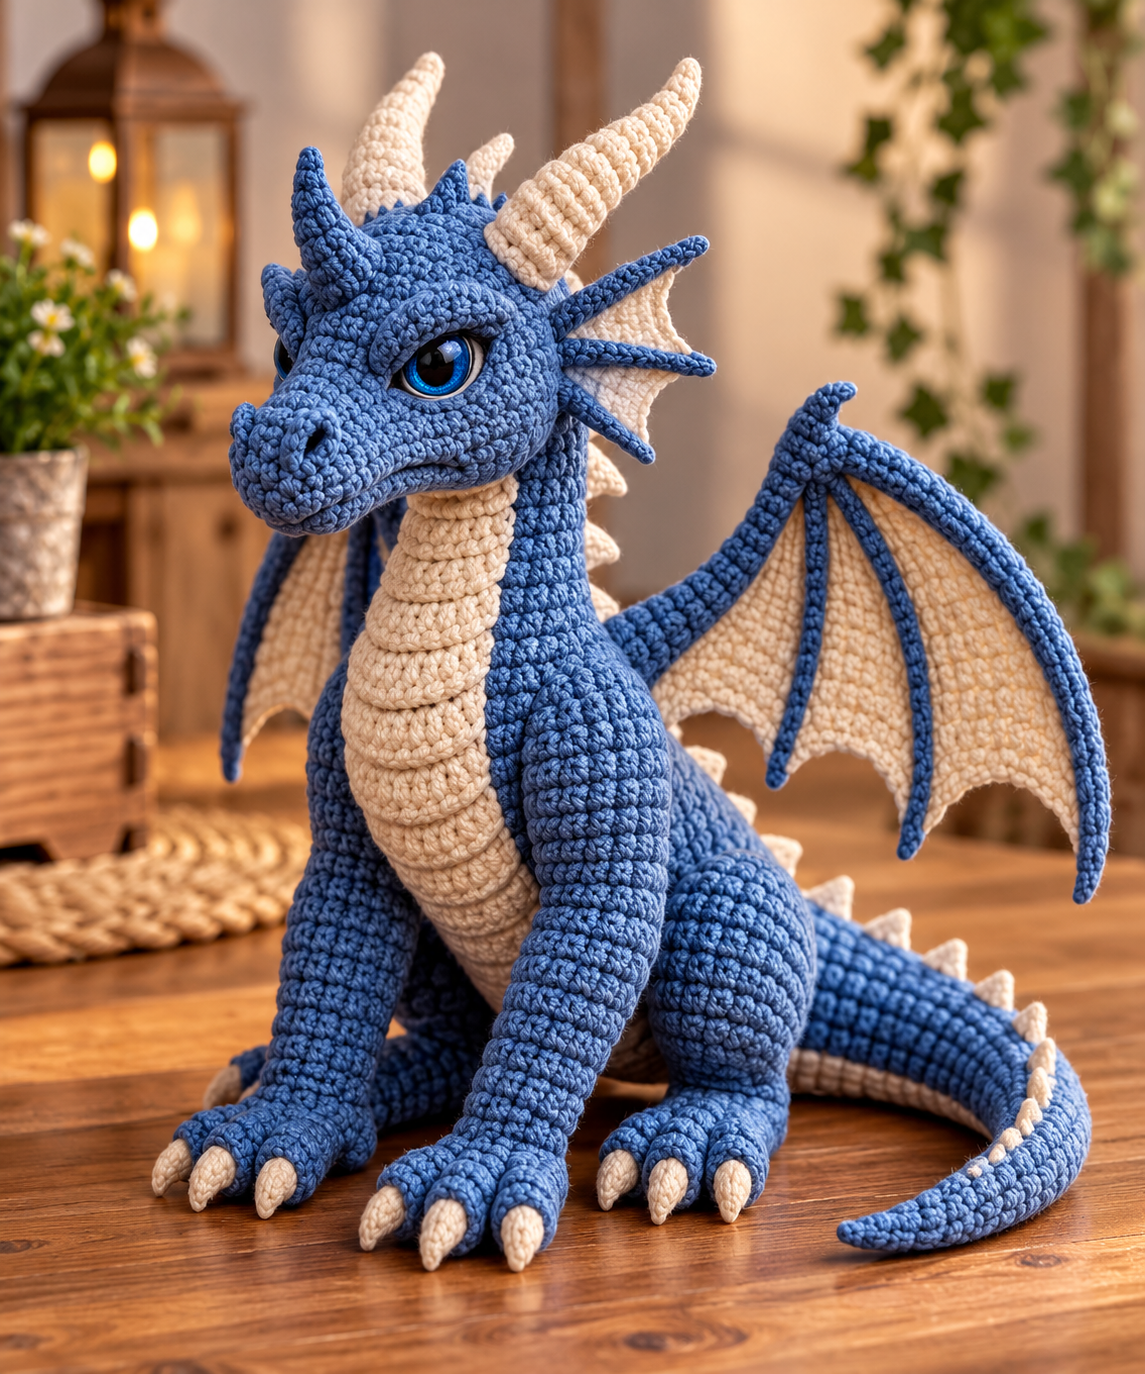

Skill Level: Advanced Finished Size: Approximately 12–15 inches tall Style: Fantasy dragon with blue body, cream belly, horns, wings, and bright blue eyes.
This is an original, approximate pattern inspired by the image, not a tested reproduction.
Materials
- Blue medium-weight yarn
- Cream-colored yarn
- 3.5 mm crochet hook
- 16–20 mm blue safety eyes
- Polyester fiberfill
- Yarn needle
- Stitch markers
- Scissors
- Craft wire or flexible supports (optional; avoid for children’s toys)
Abbreviations (US Terms)
- MR – Magic Ring
- SC – Single Crochet
- INC – Increase (2 SC in one stitch)
- DEC – Invisible Decrease
- CH – Chain
- SL ST – Slip Stitch
- HDC – Half Double Crochet
- DC – Double Crochet
- FO – Fasten Off
1. Dragon Head (Blue Yarn)
Work in continuous rounds.
R1: 6 SC in MR (6) R2: INC around (12) R3: (SC, INC) × 6 (18) R4: (2 SC, INC) × 6 (24) R5: (3 SC, INC) × 6 (30) R6: (4 SC, INC) × 6 (36) R7–12: SC around (36) R13: (4 SC, DEC) × 6 (30) R14: SC around (30) R15: (3 SC, DEC) × 6 (24) R16: (2 SC, DEC) × 6 (18)
Insert blue safety eyes between rounds 9 and 10, approximately 8 stitches apart.
Stuff firmly, leaving a long tail for sewing.
2. Dragon Body (Blue Yarn)
R1: 6 SC in MR (6) R2: INC around (12) R3: (SC, INC) × 6 (18) R4: (2 SC, INC) × 6 (24) R5: (3 SC, INC) × 6 (30) R6: (4 SC, INC) × 6 (36) R7: (5 SC, INC) × 6 (42) R8–15: SC around (42) R16: (5 SC, DEC) × 6 (36) R17–19: SC around (36) R20: (4 SC, DEC) × 6 (30) R21–23: SC around (30) R24: (3 SC, DEC) × 6 (24) R25–27: SC around (24)
Stuff firmly and leave the neck opening for assembly.
3. Front Legs (Make 2)
R1: 6 SC in MR (6) R2: INC around (12) R3: (SC, INC) × 6 (18) R4–7: SC around (18) R8: (4 SC, DEC) × 3 (15) R9–20: SC around (15)
Stuff and flatten the upper opening slightly.
Make three small cream claws for each foot and sew them onto the toes.
4. Back Legs (Make 2)
R1: 6 SC in MR (6) R2: INC around (12) R3: (SC, INC) × 6 (18) R4: (2 SC, INC) × 6 (24) R5–9: SC around (24) R10: (2 SC, DEC) × 6 (18) R11–14: SC around (18)
Stuff and attach to the lower sides of the body.
5. Dragon Tail
R1: 4 SC in MR (4) R2–3: SC around (4) R4: (SC, INC) × 2 (6) R5–7: SC around (6) R8: (2 SC, INC) × 2 (8) R9–11: SC around (8)
Continue increasing two stitches approximately every fourth round until reaching 20 stitches.
Work another 8 rounds evenly.
Stuff lightly and sew to the back of the dragon. Curve the tail before attaching.
6. Dragon Wings (Make 2)
Use blue yarn for the wing structure and cream yarn for the inner panels.
Wing foundation:
R1: CH 21 R2: SC in second CH from hook and across (20) R3: CH 1, turn, 20 SC R4: CH 1, turn, DEC, 16 SC, DEC (18) R5: SC across (18) R6: DEC, 14 SC, DEC (16)
Continue decreasing at both ends every second row until 6 stitches remain.
For the scalloped edge, work groups of 5 DC into selected edge stitches, separated by SL ST.
Make additional narrow blue crochet strips and sew them onto the cream wing panels to imitate dragon wing bones.
Attach both wings securely to the upper back.
7. Dragon Horns (Make 2)
Using cream yarn:
R1: 4 SC in MR (4) R2–3: SC around (4) R4: (SC, INC) × 2 (6) R5–6: SC around (6) R7: (2 SC, INC) × 2 (8) R8–10: SC around (8) R11: (3 SC, INC) × 2 (10) R12–14: SC around (10)
Stuff lightly and sew onto the head, angling the horns slightly backward.
8. Cream Belly Panel
CH 9.
Row 1: SC in second CH from hook and across (8) Rows 2–28: CH 1, turn, 8 SC.
For a more textured appearance, alternate rows of SC and back-loop-only SC.
Sew the panel from the dragon’s chest down to its lower belly, shaping it gently around the body.
9. Back Spikes
Make 8–12 small cream spikes.
R1: 4 SC in MR (4) R2: SC around (4) R3: (SC, INC) × 2 (6) R4: SC around (6) R5: (2 SC, INC) × 2 (8)
Attach the spikes along the dragon’s back and tail.
10. Final Assembly
- Sew the head securely onto the body.
- Attach both front and back legs.
- Sew the wings symmetrically onto the back.
- Attach the cream horns and back spikes.
- Sew the tail into a natural curved position.
- Add embroidered nostrils and a subtle mouth line.
- Shape the wings and adjust the stuffing.
Finishing Tips
Use tight, consistent stitches to create a professional amigurumi appearance. Keep the dragon’s expression gentle but serious, with large bright blue eyes. Lightly shape the horns backward and spread the wings for a dramatic fantasy-dragon silhouette.
Final Result: A beautiful handmade blue crochet dragon with cream details, textured wings, curved horns, and striking blue eyes—perfect for fantasy-themed decorations, handmade gifts, or crochet collections.