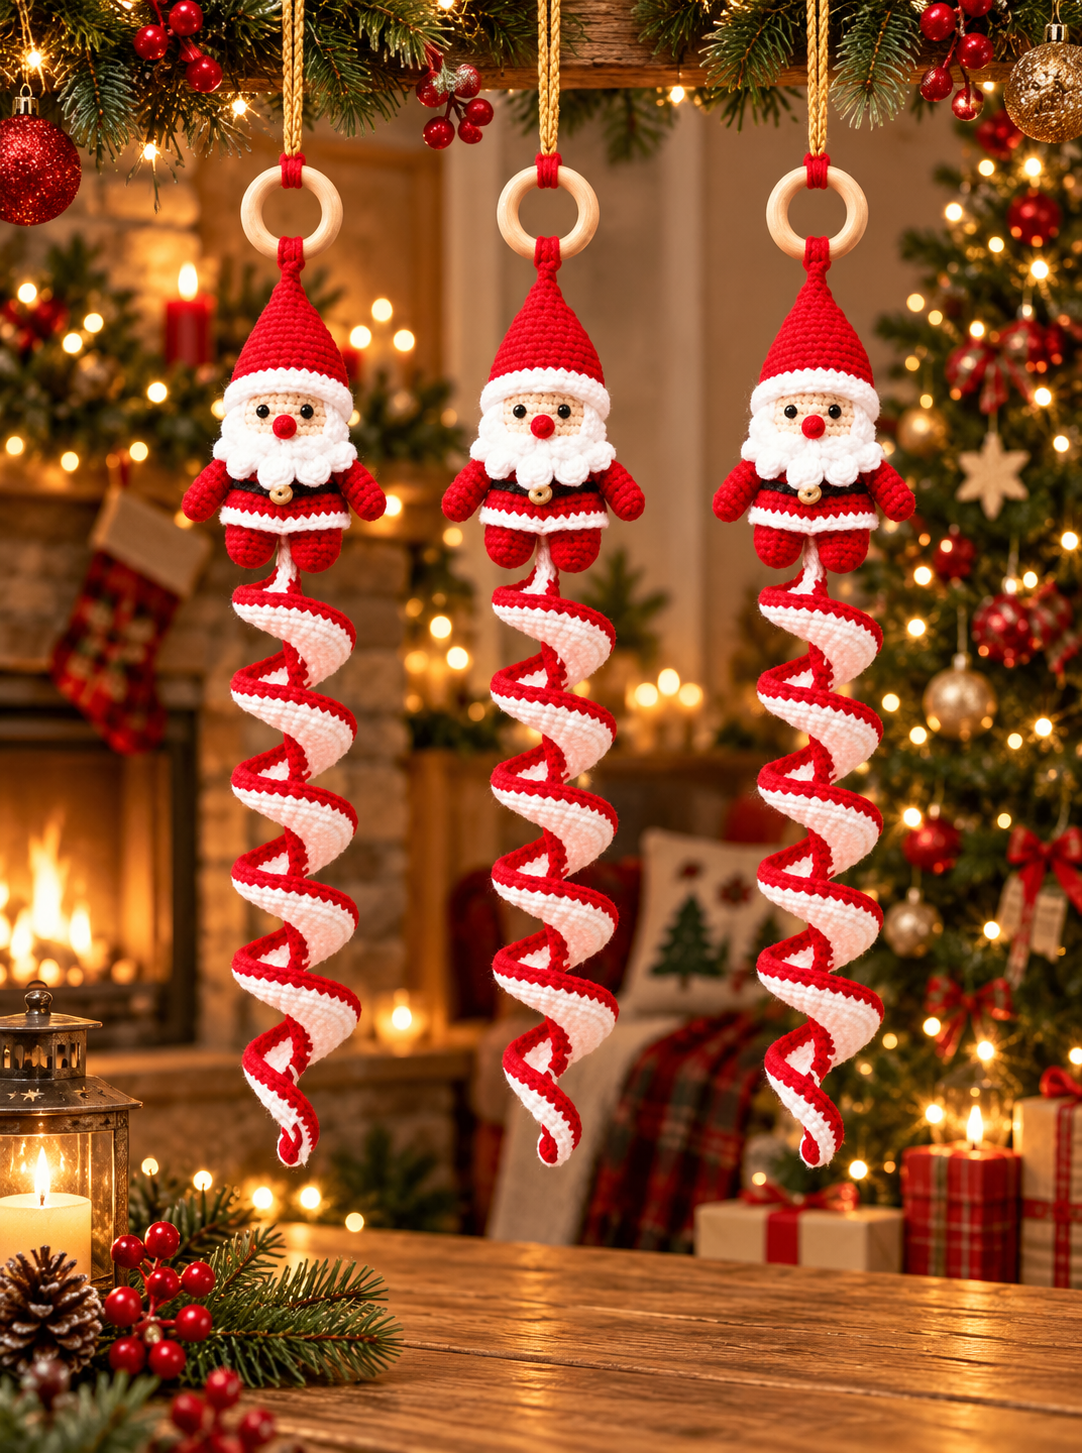

Create these adorable handmade Santa Claus spiral ornaments to decorate your Christmas tree, fireplace, windows, or holiday garlands. Each decoration features a miniature crocheted Santa with a red hat, fluffy white beard, wooden hanging ring, and a long red-and-white corkscrew spiral.
Skill Level: Intermediate Crochet Terms: US terminology Finished Length: Approximately 40–50 cm (16–20 inches), including the spiral, Santa, and hanging ring Construction: Santa amigurumi, crocheted spiral, and hanging loop
This is an original pattern designed to recreate the appearance of the reference decoration, rather than a verified pattern from its original maker.
Materials Needed
- Red yarn (DK or light worsted weight)
- White yarn
- Cream or skin-tone yarn
- Small amount of black yarn
- 2.5–3.5 mm crochet hook, depending on yarn thickness
- 6 mm black safety eyes or embroidered eyes
- Polyester fiberfill
- Small red pom-pom or red yarn for Santa’s nose
- Small wooden ring, approximately 3–4 cm in diameter
- Gold hanging cord
- Stitch markers
- Yarn needle
- Scissors
- Optional small gold bead or bell
Crochet Abbreviations
| Abbreviation | Meaning |
| MR | Magic Ring |
| ch | Chain |
| sc | Single Crochet |
| hdc | Half Double Crochet |
| dc | Double Crochet |
| sl st | Slip Stitch |
| inc | Increase (2 sc in one stitch) |
| dec | Invisible Decrease |
| BLO | Back Loop Only |
| st(s) | Stitch(es) |
| FO | Fasten Off |
Part 1: Santa’s Head
Use cream-colored yarn. Work in continuous rounds.
Round 1: 6 sc in MR. (6)
Round 2: Inc in every stitch. (12)
Round 3: (1 sc, inc) × 6. (18)
Round 4: (2 sc, inc) × 6. (24)
Round 5: (3 sc, inc) × 6. (30)
Rounds 6–10: Sc around. (30)
Round 11: (3 sc, dec) × 6. (24)
Insert the safety eyes between rounds 7 and 8, approximately 5 stitches apart. Attach a small red nose between the eyes, slightly lower.
Round 12: (2 sc, dec) × 6. (18)
Stuff firmly with fiberfill.
Round 13: (1 sc, dec) × 6. (12)
Round 14: Dec × 6. (6)
FO, close the opening, and weave in the end.
Part 2: Santa’s Red Christmas Hat
Use red yarn.
Round 1: 6 sc in MR. (6)
Round 2: Sc around. (6)
Round 3: (1 sc, inc) × 3. (9)
Round 4: Sc around. (9)
Round 5: (2 sc, inc) × 3. (12)
Round 6: Sc around. (12)
Round 7: (3 sc, inc) × 3. (15)
Round 8: Sc around. (15)
Round 9: (4 sc, inc) × 3. (18)
Round 10: Sc around. (18)
Round 11: (2 sc, inc) × 6. (24)
Round 12: Sc around. (24)
Round 13: (3 sc, inc) × 6. (30)
Round 14: Sc around. (30)
Change to white yarn.
Rounds 15–16: Sc around. (30)
FO, leaving a long tail for sewing. Lightly stuff the hat if needed, then sew it onto Santa’s head.
Part 3: Fluffy White Beard and Mustache
Use white yarn.
Beard
Row 1: Ch 16.
Row 2: Starting in the second chain, work 15 sc. Ch 1 and turn.
Row 3: Work (sl st, 3 dc in next st, sl st in next st) five times.
FO, leaving a sewing tail.
Position the beard beneath Santa’s nose and sew the top edge across the lower face. Arrange the scallops to form a rounded, fluffy beard.
Mustache
Make two identical pieces.
Row 1: Ch 5.
Row 2: Work sl st in the second chain, sc in the next chain, hdc in the next chain, and sl st in the last chain.
FO, leaving a tail.
Attach both pieces below the nose, pointing outward.
Part 4: Santa’s Red Body
Use red yarn.
Round 1: 6 sc in MR. (6)
Round 2: Inc around. (12)
Round 3: (1 sc, inc) × 6. (18)
Round 4: (2 sc, inc) × 6. (24)
Rounds 5–8: Sc around. (24)
Change to white yarn.
Round 9: Sc around. (24)
Change to red yarn.
Rounds 10–11: Sc around. (24)
Round 12: (2 sc, dec) × 6. (18)
Round 13: Sc around. (18)
Round 14: (1 sc, dec) × 6. (12)
Stuff the body.
FO, leaving a sewing tail. Sew the body securely beneath the head.
For the black belt, embroider a horizontal black line across the front of the body or sew on a thin black crocheted strip. Add a tiny gold bead as the buckle.
Part 5: Santa’s Arms (Make 2)
Use red yarn.
Round 1: 6 sc in MR. (6)
Rounds 2–7: Sc around. (6)
Stuff lightly at the lower end.
Flatten the opening and close with 3 sc through both layers.
FO, leaving a sewing tail.
Sew the arms onto opposite sides of the upper body. Angle them slightly outward.
Part 6: Santa’s Legs (Make 2)
Use red yarn.
Round 1: 6 sc in MR. (6)
Round 2: (1 sc, inc) × 3. (9)
Rounds 3–5: Sc around. (9)
Stuff lightly.
FO, leaving a long tail.
Attach both legs to the bottom of Santa’s body, leaving a small space between them.
Part 7: Long Red and White Crochet Spiral
This is the signature decorative feature of the ornament.
The spiral is made from a long crocheted strip with increases that encourage it to curl naturally.
Step 1: Foundation Chain
Using white yarn, chain 90–110 stitches, depending on your preferred spiral length.
For a long ornament similar to the image, begin with ch 100.
Step 2: Create the Spiral
Row 1: Starting in the third chain from the hook, work 3 dc in every chain across.
The strip will begin curling automatically because of the extra stitches.
Row 2: Ch 1, turn. Work 1 sc in every stitch across to strengthen the edge.
FO and weave in the ends.
Step 3: Add the Red Border
Join red yarn at one end of the spiral.
Work 1 sc in each stitch along the outer edge. Place additional stitches around tight curves when needed to keep the border smooth.
FO and weave in the ends.
Step 4: Shape the Spiral
Hold the top of the strip and gently rotate the lower section to arrange the corkscrew shape.
Use your fingers to adjust the loops until the white center and red border are both clearly visible.
If the spiral looks too flat, make a sample with 4 dc in each foundation chain instead of 3 dc. This creates a fuller curl but uses considerably more yarn.
Part 8: Attach the Spiral to Santa
Use a yarn needle and a strong strand of red yarn.
- Locate the center of Santa’s lower body.
- Position the top end of the crochet spiral beneath the legs.
- Sew the spiral securely into the body.
- Reinforce the connection with several stitches.
- Allow the long spiral to hang freely.
- Adjust its curves for a balanced corkscrew effect.
Make sure the spiral is centered so the finished ornament hangs straight.
Part 9: Wooden Hanging Ring
Take one wooden ring measuring approximately 3–4 cm.
Cut approximately 20–25 cm of golden hanging cord, fold it in half, and attach it securely to the ring.
Using red yarn, crochet a short chain of approximately 8–12 stitches, depending on the desired distance between the ring and Santa’s hat.
Secure one end of the chain to the top of Santa’s hat and the other end around the wooden ring.
Reinforce both ends with stitches.
Part 10: Final Assembly
Check that the complete ornament is securely assembled.
Gently straighten Santa’s hat, shape the beard, and position the arms evenly.
Allow the crochet spiral to hang vertically and arrange it into even curls.
Make three matching decorations for a coordinated Christmas display.
Finishing Tips
For a more professional result, maintain even crochet tension throughout the project. Use a slightly smaller hook for the stuffed Santa pieces so the fiberfill doesn’t show through.
Lightly steam-block the spiral without touching it directly with a hot iron. Adjust the curls by hand and let them cool and dry in position.
For decorations intended for homes with small children, embroider the eyes and nose instead of using detachable beads or safety eyes.
Final Result
Your finished Santa Claus crochet spiral ornament will feature a cheerful handmade Santa, a pointed red Christmas hat, fluffy white facial details, a long red-and-white spiral, and a natural wooden hanging ring.
Hang all three ornaments from a Christmas garland, decorated wooden beam, or festive window display to create a warm, handmade Christmas atmosphere.
