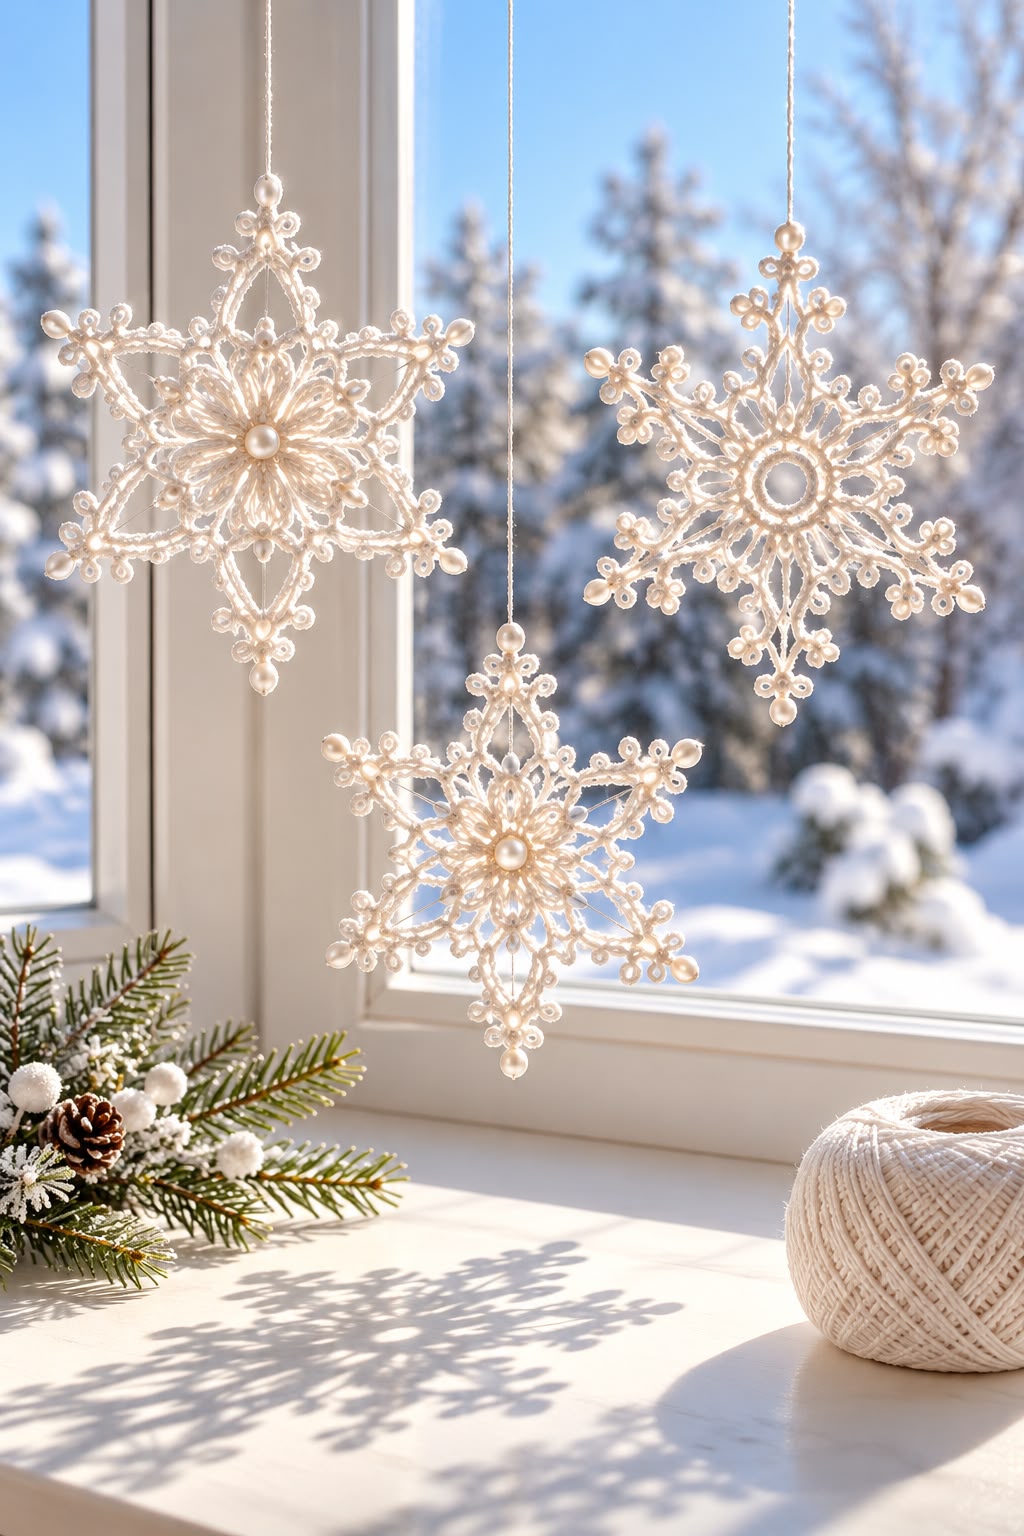

Create beautiful, delicate crochet snowflakes to decorate your home for Christmas and winter. These elegant handmade ornaments feature intricate lace details, six symmetrical points, decorative picot edges, and pearl embellishments that give them a luxurious, snow-inspired appearance.
Perfect for Christmas trees, winter window decorations, holiday gifts, and handmade festive displays.
Skill Level: Intermediate Estimated Time: 45–90 minutes per snowflake Finished Size: Approximately 5–7 inches (13–18 cm) Crochet Terminology: US Terms
Note: This is an original pattern inspired by the reference image. It creates a similar six-point lace snowflake rather than an exact reproduction.
Materials Needed
- Fine cotton crochet thread, size 10, in ivory or white
- 1.75 mm or 2.0 mm crochet hook
- 6–8 mm pearl beads for the center
- Small pearl beads for the tips (optional)
- Yarn needle
- Scissors
- Fabric stiffener or diluted PVA glue
- Blocking mat and rustproof pins
- Thin thread or ribbon for hanging
Crochet Abbreviations
| Abbreviation | Meaning |
|---|---|
| MR | Magic Ring |
| ch | Chain |
| sl st | Slip Stitch |
| sc | Single Crochet |
| hdc | Half Double Crochet |
| dc | Double Crochet |
| tr | Treble Crochet |
| sp | Space |
| picot | Ch 3, sl st into first ch |
| rep | Repeat |
| FO | Fasten Off |
Part 1: Crochet the Snowflake Center
Use ivory cotton thread.
Round 1: Foundation Ring
Make a magic ring.
Ch 3 (counts as first dc), work 11 dc into the ring.
Pull the ring closed and join with a sl st to the top of the beginning ch-3.
Total: 12 dc.
Round 2: Create Six Open Spaces
Ch 1.
Repeat the following six times:
- Sc in the next stitch.
- Ch 5.
- Skip the next stitch.
Join with a sl st to the first sc.
You should now have six evenly spaced ch-5 loops.
Round 3: Form the Inner Petals
Sl st into the first ch-5 space.
Work the following into each ch-5 space:
(sc, hdc, 3 dc, hdc, sc).
Repeat in all six spaces.
Join with a sl st.
You now have six rounded petals forming the central flower.
Part 2: Create the Lace Framework
Round 4: Outer Chain Loops
Join the thread with a sl st at the top of one central petal.
Repeat six times:
- Ch 8.
- Sl st into the top of the next petal.
After the sixth repeat, join to the starting point.
You should have six large chain loops surrounding the central flower.
Round 5: Strengthen the Lace Arches
Work into each ch-8 loop:
- 4 sc
- Ch 3
- 4 sc
Repeat around all six loops.
Join with a sl st.
The ch-3 spaces mark the center of each future snowflake point.
Part 3: Crochet the Six Snowflake Points
The following section creates the long, pointed arms.
Work each point separately.
Point 1
Join thread in one ch-3 space from Round 5.
Row 1: Ch 3, 2 dc, ch 2, 3 dc in the same space.
Row 2: Ch 3, turn. Work 2 dc into the first stitch, ch 2, 2 dc into the next ch-2 space, ch 2, and 2 dc into the last stitch.
Row 3: Ch 4, turn. Sl st into the first chain to create a small picot. Ch 5, sl st into the top of the opposite side of the point.
Row 4: Ch 7, sl st into the first chain to create a decorative tip loop.
Fasten off.
Repeat these steps in the remaining five ch-3 spaces.
This creates six symmetrical pointed arms.
Part 4: Add Delicate Picot Details
Join ivory thread at the base of one snowflake arm.
Work sc evenly along the outer edge.
At selected points, create decorative picots:
Ch 3, sl st into the first chain.
At the outermost tip, create a larger picot:
Ch 5, sl st into the first chain.
Continue along the opposite edge of the arm.
Repeat around all six points.
The picots create the delicate, frost-like texture seen in decorative lace snowflakes.
Part 5: Create the Decorative Inner Flower
For a fuller snowflake similar to the left ornament in the reference image, add a second small flower to the center.
Round 1: Make a magic ring and work 6 sc into it.
Round 2: Repeat (sl st, ch 5, sl st into the next stitch) six times.
Round 3: Into each ch-5 loop, work (sc, hdc, 3 dc, hdc, sc).
Fasten off.
Position this small flower over the center of the main snowflake and sew it securely in place.
Part 6: Add Pearl Embellishments
To create the elegant pearl-decorated appearance:
- Sew one 6–8 mm pearl bead into the center of the snowflake.
- Add small pearls to the six outer points if desired.
- Sew additional tiny pearls near the decorative picots.
- Secure each bead with several stitches.
For a more minimalist design, use only one pearl in the center.
Part 7: Make the Hanging Loop
Using matching ivory thread:
- Attach thread to the tip of one snowflake point.
- Ch 35.
- Sl st into the same attachment point to form a loop.
- Fasten off.
- Weave in the ends securely.
Alternatively, attach a thin satin ribbon or metallic hanging cord.
Part 8: Stiffen and Block the Snowflake
Blocking is essential for achieving a crisp, symmetrical lace appearance.
Step 1: Prepare the Stiffening Solution
Mix equal parts PVA craft glue and water, or use a commercial fabric stiffener.
Step 2: Shape the Snowflake
Lightly soak the snowflake in the solution.
Remove excess liquid without twisting the stitches.
Step 3: Pin into Position
Place the snowflake on a protected blocking mat.
Stretch each of the six points outward evenly.
Pin the tips and decorative loops into place.
Step 4: Dry Completely
Allow the snowflake to dry for approximately 12–24 hours, depending on humidity and the stiffening product.
Once dry, remove the pins carefully.
If using glued-on pearls, attach them after stiffening and drying.
Part 9: Snowflake Design Variations
Classic White Snowflake
Use bright white cotton thread with a single pearl in the center.
Vintage Ivory Snowflake
Use warm ivory thread and champagne-colored pearls for a traditional Christmas look.
Silver Winter Snowflake
Use pale gray cotton thread with silver beads and a metallic hanging cord.
Elegant Gold Snowflake
Use cream thread with gold beads for luxurious holiday decorations.
Large Window Snowflake
Use slightly thicker cotton yarn and a larger hook to create a more substantial decoration.
Frequently Asked Questions
What is the best yarn for crochet snowflakes?
Size 10 cotton crochet thread is an excellent choice because it produces defined lace stitches and holds its shape well after blocking.
Can beginners crochet these snowflakes?
Confident beginners can attempt this pattern, although familiarity with chain spaces, double crochet stitches, and picots is helpful.
How can I make larger snowflakes?
Use thicker yarn and a larger crochet hook. You can also increase the length of the decorative chains, although this may require adjusting the stitch placement.
Do crochet snowflakes need stiffening?
Stiffening is recommended for hanging ornaments because it helps the points remain open and symmetrical.
Can these snowflakes be washed?
Unstiffened cotton snowflakes can generally be hand-washed. Stiffened ornaments should be cleaned carefully according to the stiffener manufacturer’s instructions.
Conclusion
These elegant crochet snowflake ornaments are a beautiful addition to handmade Christmas decorations. Their delicate lacework, symmetrical pointed arms, and pearl accents create a timeless winter appearance.
Make several snowflakes in different sizes and hang them near a window, on your Christmas tree, or across a festive garland for a charming handmade holiday display.
