
Skill Level: Intermediate to Advanced Pattern Type: 3D Floral Granny Square Bedspread with Matching Pillows Terminology: US Crochet Terms
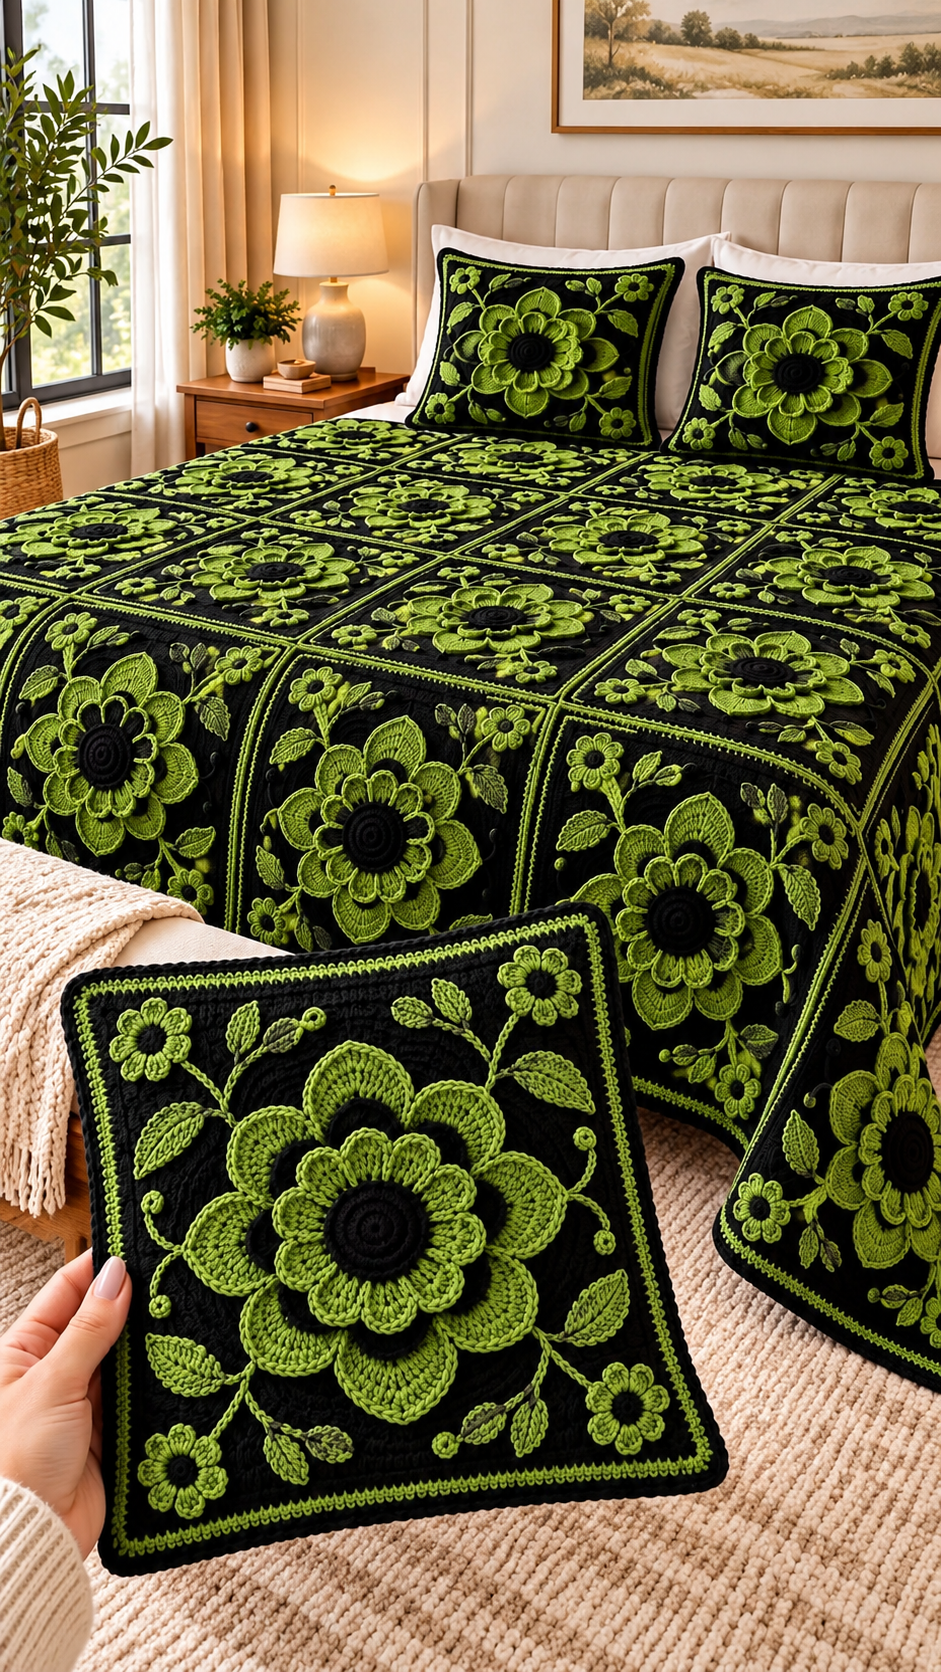
This elegant crochet bedspread features a deep black background, vibrant lime-green layered flowers, raised petals, delicate vines, textured leaves, and decorative borders. Each square is joined to create a luxurious floral blanket, complemented by matching crochet pillow covers.
Note: This is a reconstructed, original pattern inspired by the reference image, not the exact designer’s pattern.
1. Materials Needed
- Black worsted-weight yarn (main background)
- Lime-green worsted-weight yarn (flower petals)
- Olive-green yarn (leaves and decorative accents)
- 4.0 mm or 4.5 mm crochet hook
- Yarn needle
- Stitch markers
- Scissors
- Two pillow inserts, approximately 18 × 18 inches
- Optional black fabric for pillow backing
2. Crochet Abbreviations
| Abbreviation | Meaning |
| MR | Magic Ring |
| CH | Chain |
| SC | Single Crochet |
| HDC | Half Double Crochet |
| DC | Double Crochet |
| TR | Treble Crochet |
| SL ST | Slip Stitch |
| ST | Stitch |
| BLO | Back Loop Only |
| FPDC | Front Post Double Crochet |
| PICOT | Chain 3, slip stitch into first chain |
3. Large 3D Flower Pattern
Step 1: Black Flower Center
Using black yarn:
Round 1: Make a magic ring and work 12 SC into the ring. Join with SL ST.
Round 2: Work 2 SC in every stitch. (24 stitches)
Round 3: Work (1 SC, 2 SC in next stitch) around. (36 stitches)
Round 4: Work 1 SC in each stitch around.
Fasten off, leaving a long tail for sewing.
Step 2: First Layer of Lime-Green Petals
Join lime-green yarn to a stitch of Round 3.
Round 1: Repeat (SL ST in next stitch, CH 3, skip 2 stitches) around to create 12 petal spaces.
Round 2: In each CH-3 space work:
1 SC, 1 HDC, 3 DC, 1 HDC, 1 SC.
Repeat around to create 12 small petals.
Fasten off.
Step 3: Second Layer of Raised Petals
Join lime-green yarn behind the first petal layer.
Create 8 evenly spaced CH-5 loops, anchoring them behind the petals.
Into each loop work:
1 SC, 1 HDC, 2 DC, 3 TR, 2 DC, 1 HDC, 1 SC.
Repeat for all 8 petals.
These petals should stand slightly above the first layer.
Step 4: Third Layer of Large Petals
Work behind the second layer.
Create 8 CH-7 loops, evenly spaced.
Into each loop work:
1 SC, 2 HDC, 3 DC, 5 TR, 3 DC, 2 HDC, 1 SC.
Repeat for all 8 loops.
Fasten off and shape the petals gently with your fingers.
You now have a dimensional flower with a black center and three layers of lime-green petals.
4. Black Granny Square Base
Using black yarn:
Round 1: CH 4 and join into a ring.
Round 2: CH 3, work 2 DC, CH 2, then repeat (3 DC, CH 2) three more times. Join.
Round 3: SL ST into a corner. Work (3 DC, CH 2, 3 DC) in each corner, with CH 1 between corner groups.
Round 4 onward: Continue traditional granny-square rounds, increasing at each corner.
Continue until the square measures approximately 12 × 12 inches (30 × 30 cm).
For a denser black background similar to the photograph, use solid granny-square rounds instead of open granny clusters.
Attach the completed flower to the center using a yarn needle, stitching only the underside of the petals so they retain their raised appearance.
5. Small Decorative Flowers
Using lime-green yarn:
Round 1: MR, 6 SC.
Round 2: Repeat (SL ST, CH 3, 2 DC, CH 3, SL ST) in each stitch around.
Fasten off.
Make four small flowers for each square and position them near the corners, leaving enough room for the leaves and vines.
6. Crochet Leaves and Vines
Leaf Pattern
Using olive-green yarn:
CH 11.
Starting in the second chain from the hook, work:
1 SC, 1 HDC, 2 DC, 3 TR, 1 DC, 1 HDC, 1 SC.
CH 1, rotate to work along the opposite side of the foundation chain, and repeat the same stitch sequence in reverse order.
SL ST to finish.
Make approximately 6–8 leaves per square.
Vine Pattern
Using lime-green yarn:
CH 15–25, depending on the desired vine length.
Work SL ST along the chain to create a slender, flexible stem.
Sew the vines around the large flower and attach the leaves along them.
Add small flower buds at the ends for a decorative finish.
7. Decorative Square Border
Using lime-green yarn:
Round 1: Work SC evenly around the square, placing 3 SC in each corner.
Round 2: Switch to black yarn. Work DC around, placing 3 DC in each corner stitch.
Round 3: Switch to lime-green yarn. Work SC around, placing 3 SC in each corner.
Fasten off and weave in ends.
8. Joining the Squares
For a queen-size bedspread, approximately 60 × 80 inches before draping:
Make 30 squares, arranged in 5 columns and 6 rows, using finished squares measuring approximately 12 inches each.
Arrange all squares with the flowers facing upward.
Join the squares using black yarn and a slip-stitch seam through the back loops of the adjoining edges.
Keep the seams flat and consistent.
For a larger bedspread with generous overhang, add more rows or columns.
9. Outer Bedspread Border
Round 1: Join black yarn and work SC around the entire blanket.
Round 2: Work DC around, placing additional stitches at the corners to keep the border flat.
Round 3: Switch to lime-green yarn and work SC around.
Round 4: Work a decorative picot edging by repeating (3 SC, CH 3, SL ST into the first chain).
Fasten off and weave in all ends.
10. Matching Crochet Pillow Covers
Make two matching pillow covers using the same floral design.
For each pillow:
- Crochet a black square approximately 18 × 18 inches.
- Create one large 3D lime-green flower.
- Sew the flower into the center.
- Add four small flowers, decorative vines, and leaves.
- Crochet a lime-green border around the front panel.
- Create a plain black back panel or use a fabric backing.
- Join three sides and add buttons or a zipper to the fourth side.
- Insert the pillow and close.
11. Finishing and Blocking
Gently hand-wash the pieces in cool water using a mild detergent.
Lay them flat on towels, carefully straighten the square edges, and reshape the flower petals.
Allow everything to dry completely before assembling or placing the bedspread on the bed.
Avoid pressing the raised flowers with a hot iron, as this can flatten their texture.
12. Tips for a Professional Finish
- Maintain consistent yarn tension throughout the project.
- Use a slightly smaller hook for the black base to create a firm background.
- Use a slightly larger hook for the flower petals to enhance their dimensional appearance.
- Secure each flower carefully without flattening the raised layers.
- Keep all square measurements consistent before joining.
- Use the same shade of lime green throughout for a coordinated design.
Final Result
The finished project is a dramatic black-and-lime-green floral crochet bedspread featuring oversized 3D flowers, layered petals, delicate embroidered-style vines, decorative leaves, and matching pillows.
The raised floral details create a luxurious handmade appearance, while the dark background makes the vibrant green flowers stand out beautifully.
Pattern note: The photo includes detailed floral motifs that cannot be fully reverse-engineered from a single image. This pattern provides a workable interpretation of the design; the exact petal shapes, leaf placement, and square proportions may need adjustments to match the reference closely.
