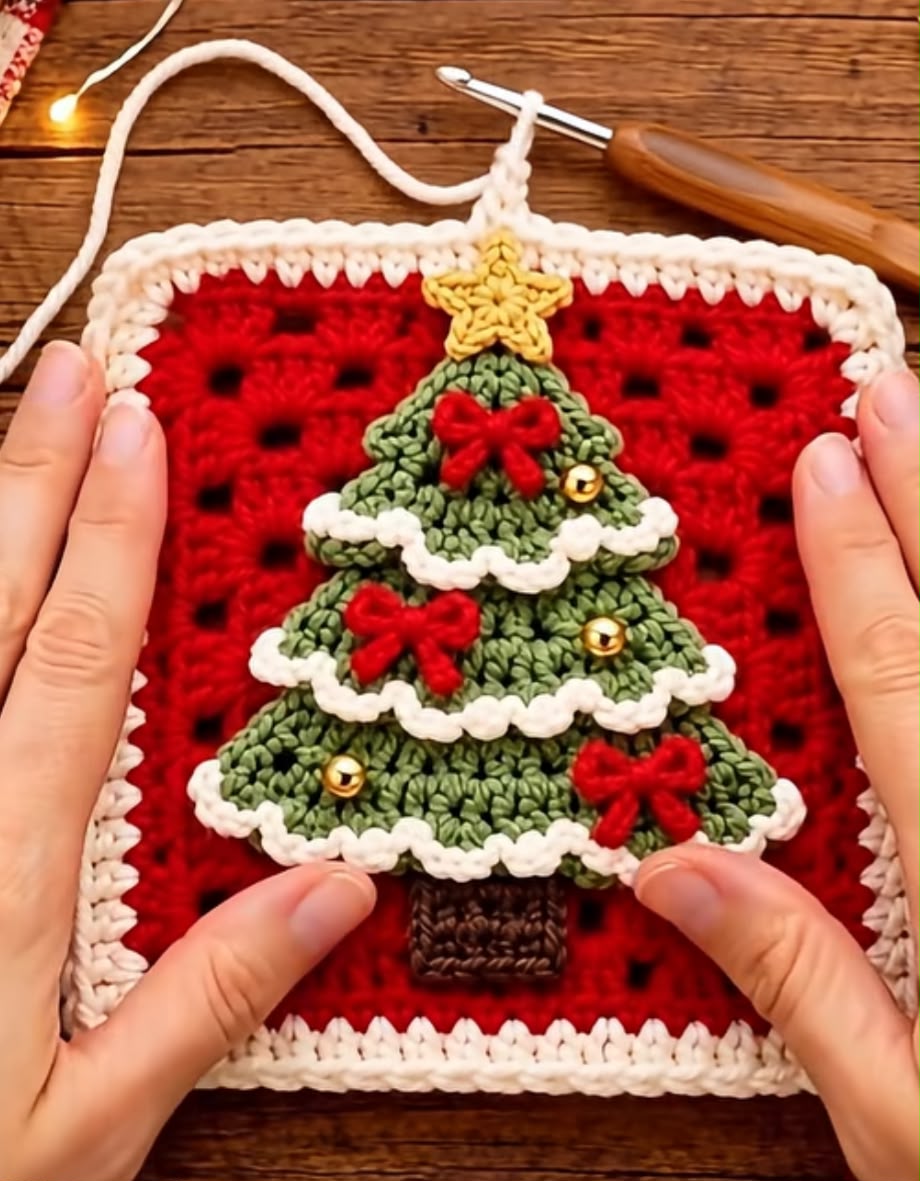

Create a beautiful Christmas granny square featuring a raised 3D Christmas tree, layered green branches, white snowy edges, red bows, golden beads, and a yellow star. Perfect for Christmas blankets, pillows, table runners, and holiday decorations.
Skill Level: Intermediate Finished Size: Approximately 18 × 18 cm (7 × 7 inches) Terminology: US Crochet Terms
This is a detailed pattern reconstructed from the photo. It is not the original designer’s verified pattern.
Materials
- Red yarn – Granny square background
- White yarn – Border and snowy tree edges
- Green yarn – Christmas tree branches
- Brown yarn – Tree trunk
- Yellow yarn – Star
- Small red yarn pieces – Decorative bows
- Small gold beads – Christmas ornaments
- 3.5 mm or 4 mm crochet hook
- Yarn needle
- Scissors
Crochet Abbreviations
- MR = Magic Ring
- ch = Chain
- sl st = Slip Stitch
- sc = Single Crochet
- hdc = Half Double Crochet
- dc = Double Crochet
- tr = Treble Crochet
- st = Stitch
- sp = Space
- rep = Repeat
Part 1: Red Granny Square Base
Using red yarn:
Round 1: Make a magic ring. Ch 3 (counts as first dc), work 2 dc, ch 2. Work (3 dc, ch 2) three more times into the ring. Join with sl st.
Round 2: Sl st into the first corner space. Ch 3, 2 dc, ch 2, 3 dc in the same corner. Ch 1. Repeat (3 dc, ch 2, 3 dc) in each remaining corner, with ch 1 between corners. Join.
Round 3: In each corner, work (3 dc, ch 2, 3 dc). Work 3 dc into each ch-1 space along the sides, separated by ch 1.
Rounds 4–7: Continue the traditional granny square pattern, adding one additional 3-dc group along each side per round.
Fasten off and weave in ends.
Part 2: White Granny Square Border
Join white yarn in any corner.
Round 1: Ch 1, work sc evenly along each side. In every corner, work (sc, ch 2, sc). Join with sl st.
Round 2: Ch 1, sc in each stitch around, working (sc, ch 2, sc) into every corner.
Fasten off.
Part 3: Brown Christmas Tree Trunk
Using brown yarn:
Row 1: Ch 9. Sc in the second chain from the hook and across. (8 sc)
Rows 2–6: Ch 1, turn, sc in each stitch across. (8 sc)
Fasten off, leaving a long tail for sewing.
Position the trunk at the bottom center of the red square.
Part 4: 3D Christmas Tree Branches
Make three separate green triangular layers in different sizes.
Bottom Layer – Large Triangle
Using green yarn:
Row 1: Ch 2, work 2 sc into the second chain from the hook. Turn. (2)
Row 2: Ch 1, 2 sc in each stitch. (4)
Row 3: Ch 1, 2 sc in first stitch, sc across until last stitch, 2 sc in last stitch. (6)
Rows 4–11: Repeat Row 3, increasing by 2 stitches each row. (22 stitches at Row 11)
Row 12: Ch 1, work hdc in each stitch across.
Fasten off.
Middle Layer – Medium Triangle
Repeat the same method as the bottom layer, stopping after Row 9. (18 stitches)
Finish with one row of hdc.
Top Layer – Small Triangle
Repeat the same method, stopping after Row 7. (14 stitches)
Finish with one row of hdc.
Part 5: White Snowy Edging
Join white yarn along the lower edge of each green triangle.
Row 1: Ch 1, sc in the first stitch. Repeat (ch 2, skip 1 stitch, sc in next stitch) across.
Row 2: Work 3 sc into each ch-2 space to create a soft, snowy scalloped effect.
Fasten off.
Repeat on all three tree layers.
Part 6: Yellow Crochet Star
Using yellow yarn:
Round 1: Make a magic ring and work 10 sc into the ring. Join.
Round 2: Repeat the following five times:
Ch 4, sl st into the second chain from hook, sc in next chain, hdc in next chain, skip 1 stitch of the center circle, sl st into the next stitch.
Fasten off, leaving a tail for sewing.
Shape the five points with your fingers.
Part 7: Mini Red Christmas Bows
Make three bows using red yarn.
Step 1: Ch 12 and join with sl st to form a ring.
Step 2: Ch 1, work 18 sc around the ring. Join.
Step 3: Wrap a separate strand of red yarn tightly around the middle to create two bow loops.
Step 4: Tie securely at the back and leave short tails.
Repeat to make three bows.
Part 8: Assemble the 3D Christmas Tree
- Lay the red granny square flat.
- Sew the brown trunk near the bottom center.
- Position the large green triangle over the upper portion of the trunk.
- Place the medium triangle above the large triangle, overlapping it slightly.
- Place the smallest triangle at the top.
- Sew the top and side portions of each triangle to the square, leaving the lower snowy edges free to create the raised 3D effect.
- Attach the yellow star to the top.
- Sew one red bow onto each green tree layer.
- Attach small golden beads as Christmas ornaments.
Part 9: Finishing
Weave in all loose yarn ends on the back.
Gently shape the granny square so that the corners are straight and the tree layers are evenly positioned.
Lightly steam-block the background if needed, avoiding flattening the raised Christmas tree.
Finished Christmas Granny Square
Your handmade Christmas granny square features a bright red background, clean white border, layered green Christmas tree, snowy branches, red bows, gold decorations, and a beautiful star.
Creative Ideas: Make several squares and join them together to create a festive Christmas blanket, cushion cover, table runner, or wall decoration.
Important: The pattern is a photo-inspired approximation. The exact stitch counts and proportions may require adjustment to reproduce the pictured design.
