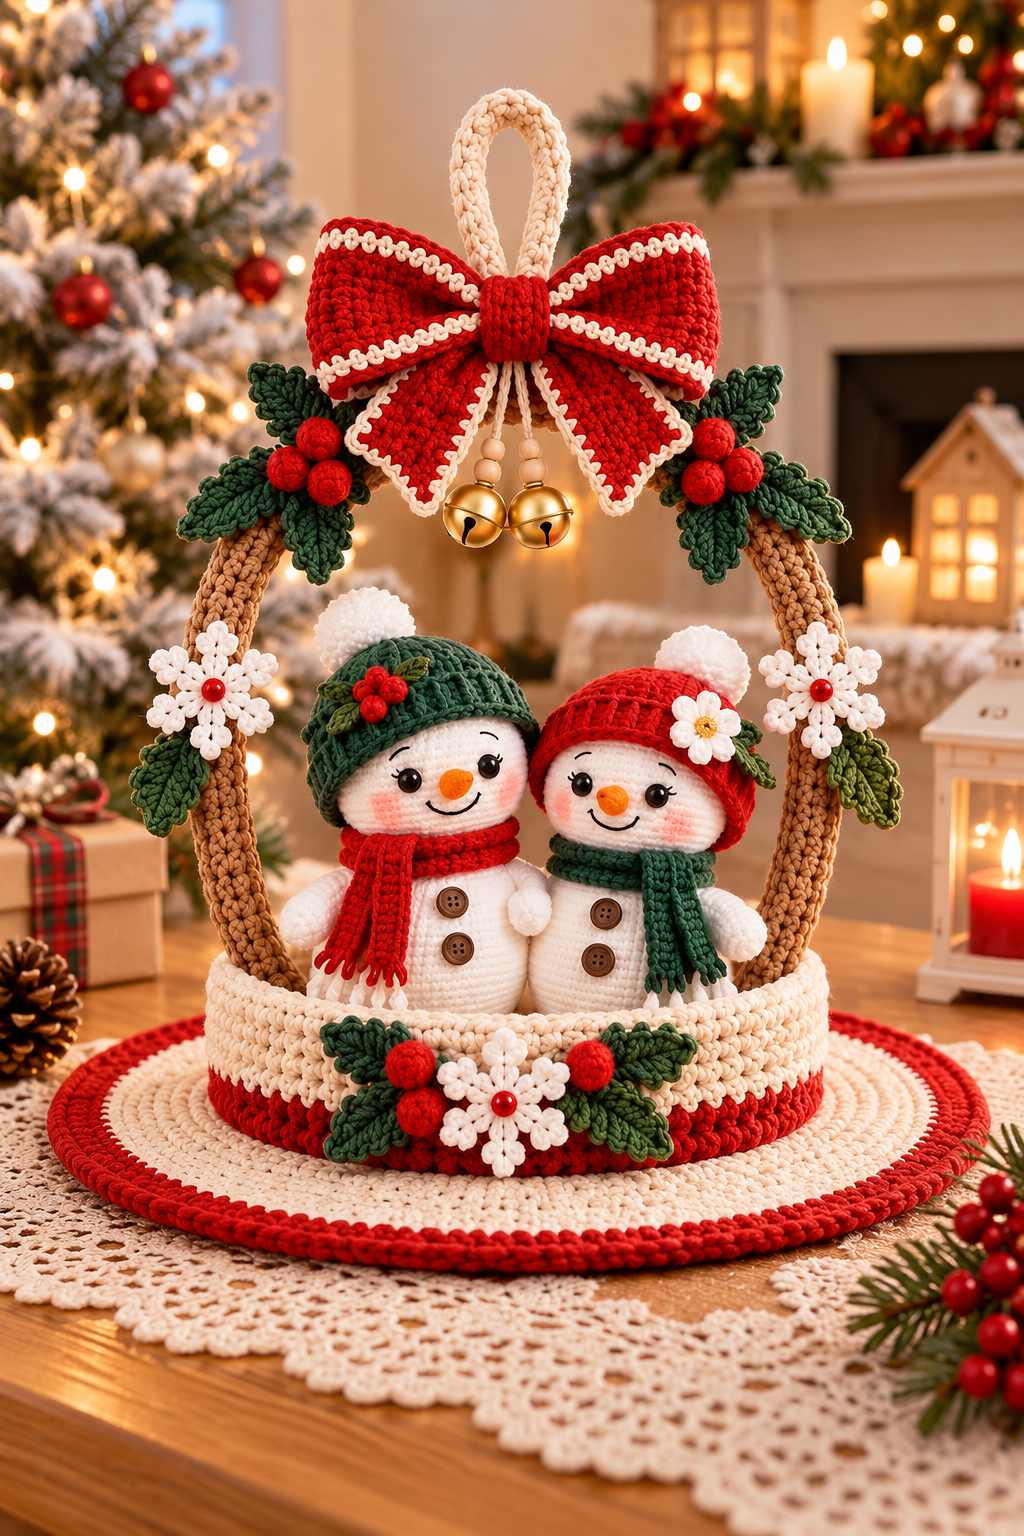

Skill Level: Intermediate Finished Size: Approximately 30–35 cm (12–14 inches) tall Technique: Amigurumi, single crochet, decorative crochet appliqués Terminology: US Crochet Terms
Create an adorable handmade Christmas centerpiece featuring two smiling snowmen wearing festive winter hats and scarves, surrounded by a beautiful crocheted wreath decorated with holly leaves, red berries, white snowflakes, a large Christmas bow, and tiny golden bells.
This is an original, photo-inspired pattern, not the designer’s exact pattern. Adjustments may be needed to reproduce the pictured proportions.
Materials Needed
Yarn (cotton or acrylic, DK/worsted weight):
- White or ivory – snowmen, snowflakes, base, pom-poms
- Christmas red – bow, hat, scarf, decorative edging
- Forest green – hat, scarf, holly leaves
- Light brown or beige – wreath frame
- Orange – carrot noses
- Black – embroidered eyes and smiles
- Small amounts of brown – buttons
Additional Supplies:
- 2.5 mm–3.5 mm crochet hook
- Polyester fiberfill stuffing
- Yarn needle
- Stitch markers
- Scissors
- 4 small brown buttons
- 2 miniature golden bells
- Wooden beads (optional)
- Flexible craft wire or a sturdy circular insert for wreath support
- Cardboard or plastic canvas for the base
- Fabric glue (optional)
Crochet Abbreviations
| Abbreviation | Meaning |
| MR | Magic ring |
| ch | Chain |
| sc | Single crochet |
| sl st | Slip stitch |
| hdc | Half double crochet |
| dc | Double crochet |
| tr | Treble crochet |
| inc | Increase (2 sc in one stitch) |
| dec | Invisible decrease |
| BLO | Back loop only |
| FLO | Front loop only |
| st(s) | Stitch(es) |
| FO | Fasten off |
Work in continuous rounds unless otherwise indicated.
Part 1: Crochet the Two Snowmen
Make two identical snowman bodies.
Snowman Body (White Yarn)
Round 1: 6 sc in MR. (6)
Round 2: Inc in every stitch. (12)
Round 3: (1 sc, inc) × 6. (18)
Round 4: (2 sc, inc) × 6. (24)
Round 5: (3 sc, inc) × 6. (30)
Round 6: (4 sc, inc) × 6. (36)
Rounds 7–14: Sc around. (36)
Round 15: (4 sc, dec) × 6. (30)
Round 16: (3 sc, dec) × 6. (24)
Round 17: (2 sc, dec) × 6. (18)
Stuff the body firmly.
Round 18: (1 sc, dec) × 6. (12)
Round 19: Dec × 6. (6)
FO, close the opening, and weave in ends.
Snowman Head (Make 2)
Using white yarn:
Round 1: 6 sc in MR. (6)
Round 2: Inc around. (12)
Round 3: (1 sc, inc) × 6. (18)
Round 4: (2 sc, inc) × 6. (24)
Round 5: (3 sc, inc) × 6. (30)
Round 6: (4 sc, inc) × 6. (36)
Rounds 7–12: Sc around. (36)
Round 13: (4 sc, dec) × 6. (30)
Round 14: (3 sc, dec) × 6. (24)
Round 15: (2 sc, dec) × 6. (18)
Stuff firmly.
Round 16: (1 sc, dec) × 6. (12)
Round 17: Dec × 6. (6)
FO and close.
Embroider black eyes approximately 6 stitches apart, a small curved smile, and delicate eyelashes for the second snowman.
Carrot Nose (Make 2)
Using orange yarn:
Round 1: 4 sc in MR. (4)
Round 2: Sc around. (4)
Round 3: (1 sc, inc) × 2. (6)
Round 4: Sc around. (6)
FO, leaving a tail. Sew to the center of the face.
Snowman Arms (Make 4)
Using white yarn:
Round 1: 6 sc in MR. (6)
Rounds 2–5: Sc around. (6)
Stuff lightly, flatten, and sew to the sides of the bodies.
Part 2: Christmas Winter Hats
Green Hat
Using forest green yarn:
Round 1: 6 sc in MR. (6)
Round 2: Inc around. (12)
Round 3: (1 sc, inc) × 6. (18)
Round 4: (2 sc, inc) × 6. (24)
Round 5: (3 sc, inc) × 6. (30)
Round 6: (4 sc, inc) × 6. (36)
Rounds 7–10: Sc around. (36)
Round 11: Work 36 hdc in BLO.
Round 12: Work 36 hdc.
FO and weave in ends.
Red Hat
Repeat the same instructions using red yarn.
White Pom-Poms (Make 2)
Round 1: 6 sc in MR. (6)
Round 2: Inc around. (12)
Rounds 3–4: Sc around. (12)
Round 5: Dec × 6. (6)
Stuff lightly, close, and attach to the top of each hat.
Decorate the green hat with holly berries and the red hat with a small white flower.
Part 3: Crochet Winter Scarves
Red Scarf
Using red yarn:
Chain 43.
Row 1: Sc in the second chain from the hook and across. (42)
Rows 2–4: Ch 1, turn, sc across. (42)
FO.
Add short yarn fringes to both ends.
Green Scarf
Repeat using forest green yarn.
Wrap the scarves around the snowmen’s necks, crossing the ends toward the front.
Part 4: Crochet the Christmas Wreath Frame
The wreath is an open arch rather than a complete circular ring.
Brown Crochet Tube
Using light brown yarn:
Round 1: 6 sc in MR. (6)
Round 2: Inc around. (12)
Round 3: (1 sc, inc) × 6. (18)
Rounds 4–approximately 125: Sc around. (18)
Continue until the tube measures approximately 65–75 cm, depending on your desired arch size.
Insert a padded, flexible craft wire into the tube. Bend gently into a symmetrical upside-down U shape.
Secure both ends inside the basket base. Cover or cap any exposed wire ends to prevent injury.
Part 5: Large Christmas Crochet Bow
Main Red Bow
Using red yarn:
Chain 19.
Row 1: Sc in second chain from hook and across. (18)
Rows 2–12: Ch 1, turn, sc across. (18)
FO.
Join the two short ends to form a loop. Flatten it with the seam at the center back.
Using ivory yarn, crochet a decorative border around the flattened bow’s outer edges.
Bow Tails (Make 2)
Using red yarn:
Chain 13.
Row 1: Sc in second chain from hook and across. (12)
Rows 2–6: Ch 1, turn, sc across. (12)
On the last row, shape the end into a shallow V by working the two halves separately and leaving the center slightly shorter.
Finish with an ivory sc border.
Bow Center
Using red yarn:
Chain 7.
Row 1: Sc in second chain from hook and across. (6)
Rows 2–5: Ch 1, turn, sc across. (6)
Wrap around the gathered bow center and sew securely.
Attach the two tails behind the bow, angled downward.
Hanging Loop
Using ivory yarn:
Chain 22.
Row 1: Sc across. (21)
Fold into a loop and sew behind the bow.
Attach the bow to the top center of the wreath.
Part 6: Holly Leaves and Red Berries
Holly Leaves (Make 12–16)
Using dark green yarn:
Chain 13.
Work along one side of the chain:
1 sc, 1 hdc, 2 dc, 1 tr, 2 dc, 1 hdc, 2 sc, 1 sl st.
Work around the opposite side with similar stitches.
For pointed edges, add small picots (ch 3, sl st into the first chain) at three evenly spaced positions along each side.
FO, leaving a tail for sewing.
Red Berries (Make 12–16)
Using red yarn:
Round 1: 6 sc in MR. (6)
Round 2: Inc around. (12)
Round 3: Sc around. (12)
Round 4: Dec × 6. (6)
Stuff lightly and close.
Sew berries in clusters of three onto the green leaves.
Arrange holly clusters on both sides of the wreath, beside the bow, and across the front of the basket.
Part 7: White Crochet Snowflakes
Make three large snowflakes and several smaller flowers.
Using ivory yarn:
Round 1: 6 sc in MR, sl st to join. (6)
Round 2: Repeat the following six times:
- Ch 5.
- Sl st into the second chain from hook.
- Ch 3, sl st into the same chain to create a side point.
- Ch 3, sl st into the same chain for another point.
- Sl st back down the remaining foundation chains.
- Sl st into the next stitch of the center ring.
FO and block gently to define the six snowflake arms.
Sew a small red bead or embroidered red center onto each snowflake.
Attach one snowflake to each side of the wreath and one to the front of the basket.
Part 8: Crochet Basket Base
Round Basket Wall
Using ivory yarn:
Chain 91 and join with a sl st, taking care not to twist.
Rounds 1–9: Ch 1, work 90 sc around, join with sl st.
Round 10: Using red yarn, sc around. (90)
Round 11: Using ivory yarn, sc around. (90)
FO.
The basket wall should be approximately 5–6 cm tall, depending on yarn thickness.
Circular Bottom
Using ivory yarn:
Round 1: 6 sc in MR. (6)
Round 2: Inc around. (12)
Round 3: (1 sc, inc) × 6. (18)
Round 4: (2 sc, inc) × 6. (24)
Round 5: (3 sc, inc) × 6. (30)
Round 6: (4 sc, inc) × 6. (36)
Continue increasing by 6 stitches each round until reaching 90 stitches.
FO.
Sew the basket wall onto the circular bottom. Insert a matching round piece of cardboard or plastic canvas for stability.
Part 9: Large Decorative Mat
Using ivory yarn:
Round 1: 12 dc in MR. (12)
Round 2: 2 dc in each stitch. (24)
Round 3: (1 dc, inc) × 12. (36)
Round 4: (2 dc, inc) × 12. (48)
Continue increasing evenly by 12 stitches each round until the mat measures approximately 28–32 cm in diameter. For these dc rounds, an increase means working 2 dc into one stitch.
Finish with two rounds of red sc for a bold Christmas border.
Keep the circle flat by adjusting increases if your yarn or tension causes rippling.
Part 10: Assembly Instructions
- Sew each snowman head securely onto its body.
- Attach the hats, scarves, arms, noses, and small brown buttons.
- Position both snowmen closely together inside the basket, with their faces looking forward.
- Attach the wreath arch securely to the basket’s inner sides, reinforcing the connection with stitching.
- Sew the large red bow at the top of the wreath.
- Hang two small golden bells underneath the bow using strong thread.
- Arrange holly leaves and red berries around the arch.
- Sew the white snowflakes onto both sides of the wreath.
- Decorate the basket front with a central snowflake, holly leaves, and red berries.
- Secure the basket onto the circular crochet mat.
For a more polished result, use invisible stitches and hide all yarn tails inside the work.
Finishing Tips
- Use a smaller hook than normally recommended for your yarn to create tight amigurumi stitches.
- Stuff the snowmen firmly but avoid stretching the stitches.
- Shape the bow with gentle steam blocking, keeping the iron away from the yarn.
- Keep both snowmen at slightly different angles to create a sweet, natural couple appearance.
- Use warm Christmas lighting when photographing the finished centerpiece.
Final Result: A charming handmade Christmas decoration featuring two adorable snowmen sitting together beneath a festive crocheted arch, topped with a red bow and golden bells, and decorated with holly berries and delicate white snowflakes.
Care: Spot-clean gently and air-dry. Because the decoration contains small bells, beads, buttons, and potentially wire, it is intended for display rather than as a toy for young children.
