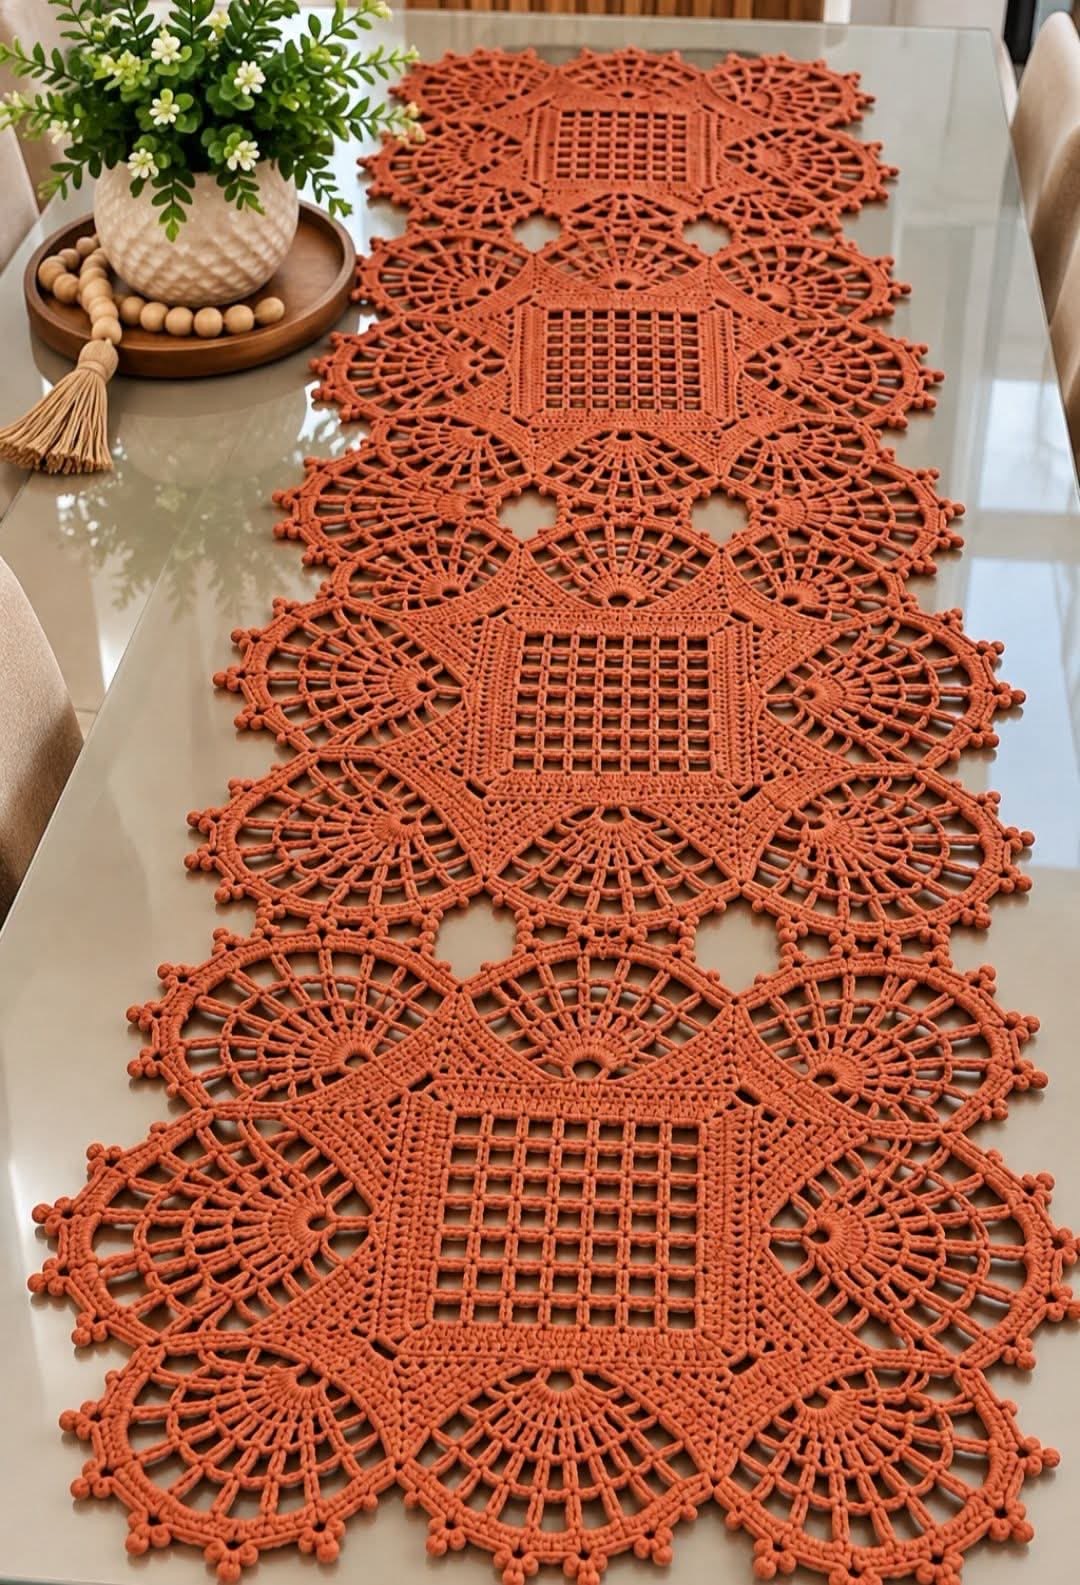

Skill Level: Intermediate to Advanced Finished Size: Approximately 40 × 150 cm (16 × 59 inches) Yarn Color: Terracotta / Burnt Orange Crochet Terms: US Terminology
This elegant crochet table runner features square lattice centers, decorative triangular corners, delicate fan-shaped lace, and beautiful picot edging.
This is a photo-inspired pattern, not the exact original designer’s instructions. Make a sample motif first to check the shape and measurements.
Materials Needed
- 700–1,000 g terracotta cotton yarn (DK weight)
- 3.0 mm crochet hook
- Scissors
- Yarn needle
- Stitch markers
- Measuring tape
- Blocking pins
Abbreviations
- ch – Chain
- sc – Single crochet
- dc – Double crochet
- tr – Treble crochet
- sl st – Slip stitch
- sp – Space
- st – Stitch
- rep – Repeat
- picot – Ch 3, sl st into first chain
Part 1: Square Lattice Center
Foundation
Ch 43.
Row 1: Dc in the 4th chain from hook and in every remaining chain. (41 dc, counting the turning chain)
Row 2: Ch 3, turn. Dc in next 3 stitches. Ch 2, skip 2 stitches, dc in next stitch. Repeat across, adjusting the final solid stitches to maintain a straight edge.
Rows 3–14: Ch 3, turn. Work dc above the previous row’s dc posts and ch 2 above each open space, maintaining the square mesh pattern.
Row 15: Ch 3, turn. Dc across, placing 2 dc in each ch-2 space.
Fasten off.
The result should be a square-like open lattice panel.
Part 2: Solid Crochet Frame
Join yarn at one corner.
Round 1: Work sc evenly around all four sides, placing 3 sc in each corner.
Round 2: Work dc around, placing (2 dc, ch 2, 2 dc) in each corner space.
Round 3: Repeat Round 2, keeping the corner increases aligned.
The frame should lie flat.
Part 3: Decorative Triangular Corners
At each corner, create a triangular extension.
Row 1: Join yarn at the corner space. Ch 3, work 5 dc into the corner.
Row 2: Ch 3, turn, dc across, increasing at both ends.
Rows 3–6: Continue increasing by 2 stitches per row to create a widening triangular shape.
Fasten off.
Repeat at all four corners.
Part 4: Fan-Shaped Lace Border
Join yarn to the outer edge of the square.
Round 1: Foundation Arches
Repeat around the motif:
Ch 5, skip approximately 3 stitches, sc into the next stitch.
Adjust spacing so the arches are evenly distributed.
Round 2: Fan Foundation
Into each ch-5 space work:
(3 dc, ch 3, 3 dc).
Sl st between fans.
Round 3: Expanding Fans
Into each fan’s ch-3 space work:
(5 dc, ch 3, 5 dc).
Round 4: Open Lace Fans
Work:
(2 dc, ch 2) five times into each fan center, then 2 dc.
Round 5: Decorative Arches
Work ch-5 arches between the dc groups.
Round 6: Outer Fan Edging
Work 7 dc into each selected chain arch, with sc anchors between the fans.
Part 5: Picot and Bobble Edge
For a decorative finish:
- Join yarn at the outer edge.
- Work 3 sc.
- Ch 3 and sl st into the first chain to form a picot.
- Continue along the edge.
- Add small bobble details at evenly spaced points.
Small Bobble: Work 4 unfinished dc into the same stitch, yarn over and pull through all loops, then ch 1 to secure.
Part 6: Joining the Motifs
The pictured runner has approximately four large square sections arranged lengthwise.
Make four matching motifs.
Lay the motifs in a straight row, aligning the lace edges.
Join using one of these methods:
- Slip-stitch joining
- Single-crochet joining
- Join-as-you-go chain loops
For an airy finish, join corresponding fan arches with:
Sc into first motif’s arch, ch 3, sc into the matching arch of the second motif.
Repeat along the joining edge.
Make sure the runner lies flat and the fan patterns align.
Part 7: Final Border
After joining all four motifs:
Round 1: Work sc evenly around the entire runner.
Round 2: Work ch-5 arches around the outside.
Round 3: Add picots or small bobbles to the outer arches.
Fasten off and weave in all yarn ends.
Part 8: Blocking and Finishing
- Soak the finished table runner in lukewarm water.
- Gently remove excess moisture.
- Lay flat on a blocking surface.
- Stretch the square lattice centers evenly.
- Shape the fan motifs into symmetrical curves.
- Pin the pointed corners and decorative edging.
- Allow to dry completely.
Finished Result
Your completed terracotta crochet table runner will feature an elegant combination of geometric square centers, openwork lace fans, pointed details, and decorative edging.
Perfect for dining tables, coffee tables, farmhouse décor, fall decorations, and handmade gifts.
