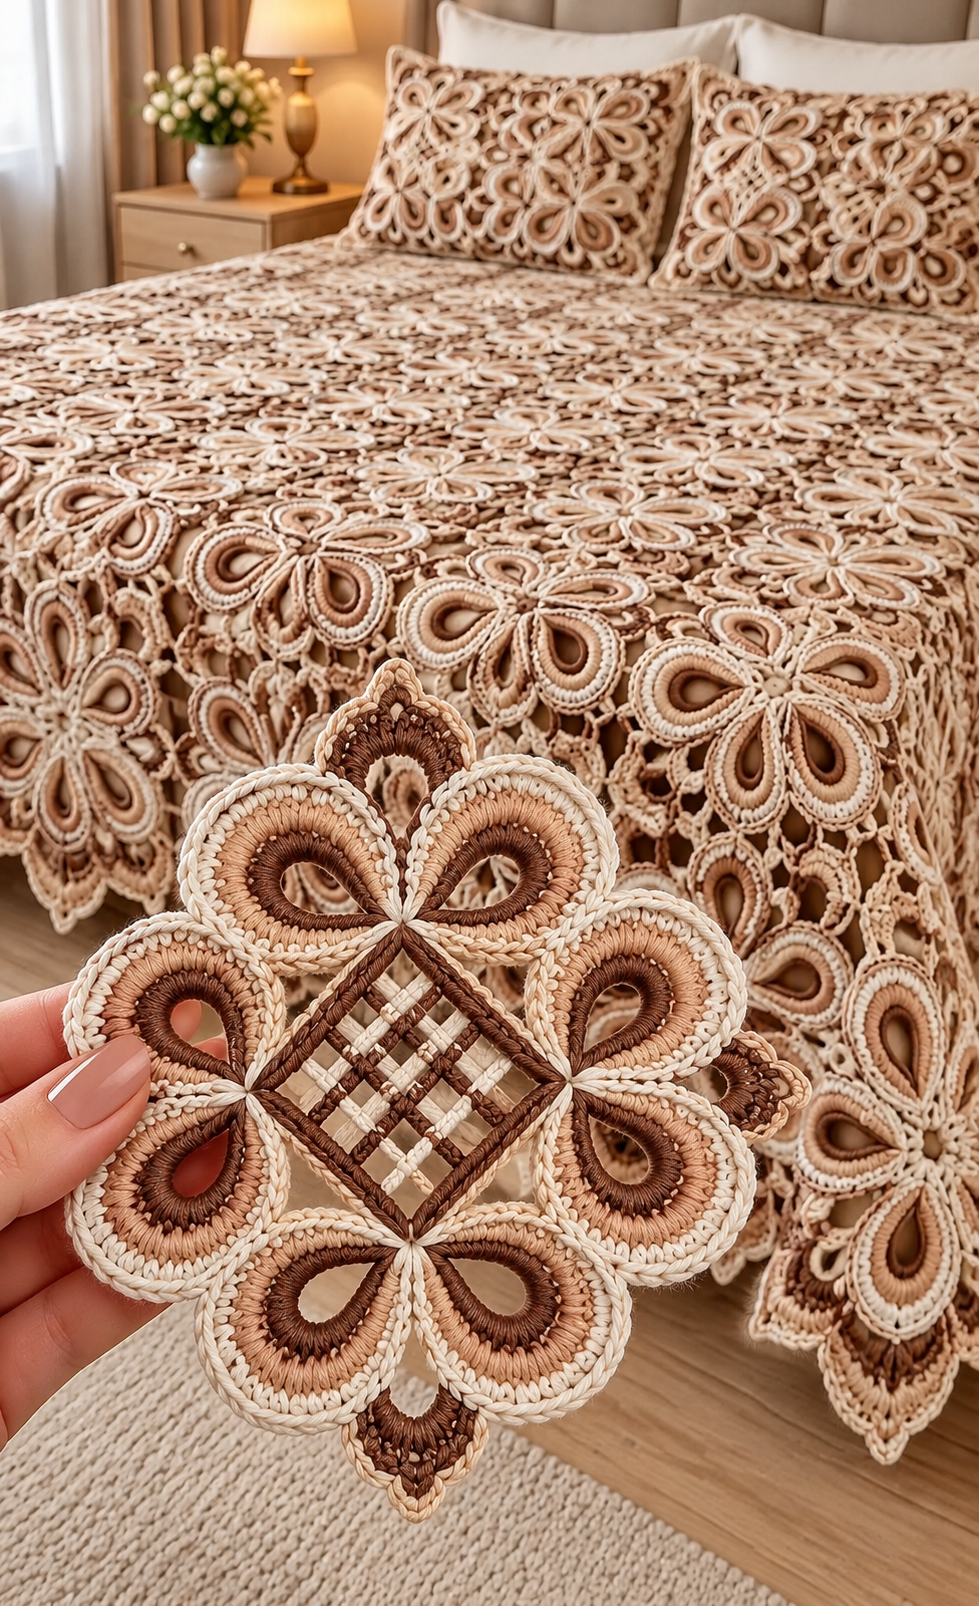

Skill Level: Intermediate to Advanced Technique: Raised Petal Crochet, Lace Motifs, Openwork Joining Colors: Chocolate Brown, Caramel Beige, Champagne, and Ivory Finished Project: Queen-size floral bedspread with two matching pillow covers
This pattern is a reconstructed design inspired by the reference image, not the original designer’s verified instructions. The distinctive flower has eight raised teardrop petals surrounding an open lattice center.
Materials
- Cotton yarn, DK or light worsted weight, in four coordinating colors
- 3.5 mm or 4 mm crochet hook
- Yarn needle
- Stitch markers
- Scissors
- Blocking mat and pins
Crochet Abbreviations (US Terms)
- MR – Magic Ring
- CH – Chain
- SL ST – Slip Stitch
- SC – Single Crochet
- HDC – Half Double Crochet
- DC – Double Crochet
- TR – Treble Crochet
- SC2TOG – Single Crochet Two Together
- FO – Fasten Off
Part 1: Crochet the Central Diamond
Round 1 – Foundation
Using chocolate brown yarn:
- Make a magic ring.
- CH 3 (counts as first DC).
- Work 2 DC, CH 3 into the ring.
- Repeat (3 DC, CH 3) three more times, using the initial 3 DC as the first group.
- SL ST to join and tighten the ring.
You now have four corners.
Round 2 – Square Expansion
- SL ST into the first corner space.
- CH 3, 2 DC, CH 3, 3 DC in the same corner.
- CH 2.
- Work (3 DC, CH 3, 3 DC) in each remaining corner, with CH 2 between corners.
- Join with SL ST.
Round 3 – Open Lattice
Switch to ivory yarn.
- Work SC in the first corner.
- CH 5, SC into the next corner.
- Repeat around.
- Add decorative crossing chain strands through the open center using a yarn needle, securing them to opposite edges.
This creates the woven diamond effect visible in the photograph.
Part 2: Crochet the Eight Raised Petals
Each flower contains eight elongated teardrop-shaped petals.
Petal Foundation
Using chocolate brown:
- CH 18.
- SL ST into the second chain from the hook.
- SC in the next 3 chains.
- HDC in the next 4 chains.
- DC in the next 6 chains.
- HDC in the next 2 chains.
- Work 5 SC around the end of the foundation chain.
- Continue along the opposite side, mirroring the stitch heights.
- Join at the base.
This creates an elongated oval. The opening in the pictured petals can be approximated by crocheting around a chain-loop foundation instead of filling the center.
Petal Border
Switch to caramel beige.
- Attach yarn at the petal base.
- Work SC evenly around the outside edge.
- At the rounded tip, work 3 SC in one stitch.
- Continue around the opposite side.
- Join and fasten off.
Raised Ivory Edging
- Attach ivory yarn.
- Work one round of SC around the petal.
- For a thicker corded appearance, work reverse SC (crab stitch) around the outer edge.
- Fasten off.
Repeat until you have eight matching petals.
Part 3: Assemble the Flower
- Position the central diamond diagonally.
- Arrange two petals along each side of the diamond.
- Point the rounded petal ends outward.
- Sew the narrow petal bases to the corners and edges of the diamond.
- Secure adjacent petals together using small joining stitches.
- Add four small pointed decorative motifs between the outer petal groups.
Keep the petals slightly raised to preserve the three-dimensional appearance.
Part 4: Decorative Lace Connections
Using ivory yarn:
Round 1: Attach yarn to the outer edge of one flower. CH 5, SC into a nearby petal edge, and repeat around the motif.
Round 2: Work (SC, CH 5, SC) into selected chain spaces to form decorative arches.
Round 3: Connect neighboring flowers using CH 3 and SL ST at matching lace points.
Keep the connections evenly spaced to prevent the bedspread from puckering.
Part 5: Assemble the Bedspread
For an approximately 220 × 240 cm queen-size cover, make a test motif, block it, and measure its finished width before calculating the total number required.
For example, if each joined motif occupies approximately 22 × 22 cm, a starting layout is:
- 10 motifs across
- 11 motifs down
- Approximately 110 motifs total
Adjust the motif count to match your actual gauge and desired drape.
Join the motifs in horizontal rows, then connect the rows using the decorative lace joining method.
Part 6: Crochet the Decorative Border
Round 1: SC evenly around the entire bedspread.
Round 2: Repeat (SC, CH 5, skip approximately 3 stitches) around the edge, adjusting spacing at corners.
Round 3: Work 7 DC into each CH-5 space, SC between shells.
Round 4: Finish with ivory reverse SC for a raised corded edge.
Block the finished bedspread gently to open the lacework.
Part 7: Matching Crochet Pillow Covers
Create matching pillow fronts using the same floral motifs.
- Measure the pillow insert.
- Arrange completed motifs to cover the front.
- Join them with matching lace connections.
- Crochet or sew a coordinating solid fabric back.
- Add buttons or an envelope closure.
- Insert the pillow.
Finishing Instructions
Weave in all loose yarn ends, lightly steam-block or wet-block according to the yarn manufacturer’s instructions, and allow the project to dry completely. Spread the finished bedspread over the mattress and arrange the matching pillows.
Important: The image features intricate, possibly corded or Romanian-lace-style construction. The instructions above provide a workable crochet-inspired approximation, but they will not reproduce the exact photographed motif stitch for stitch. A tested chart or original pattern would be needed for an exact replica.
