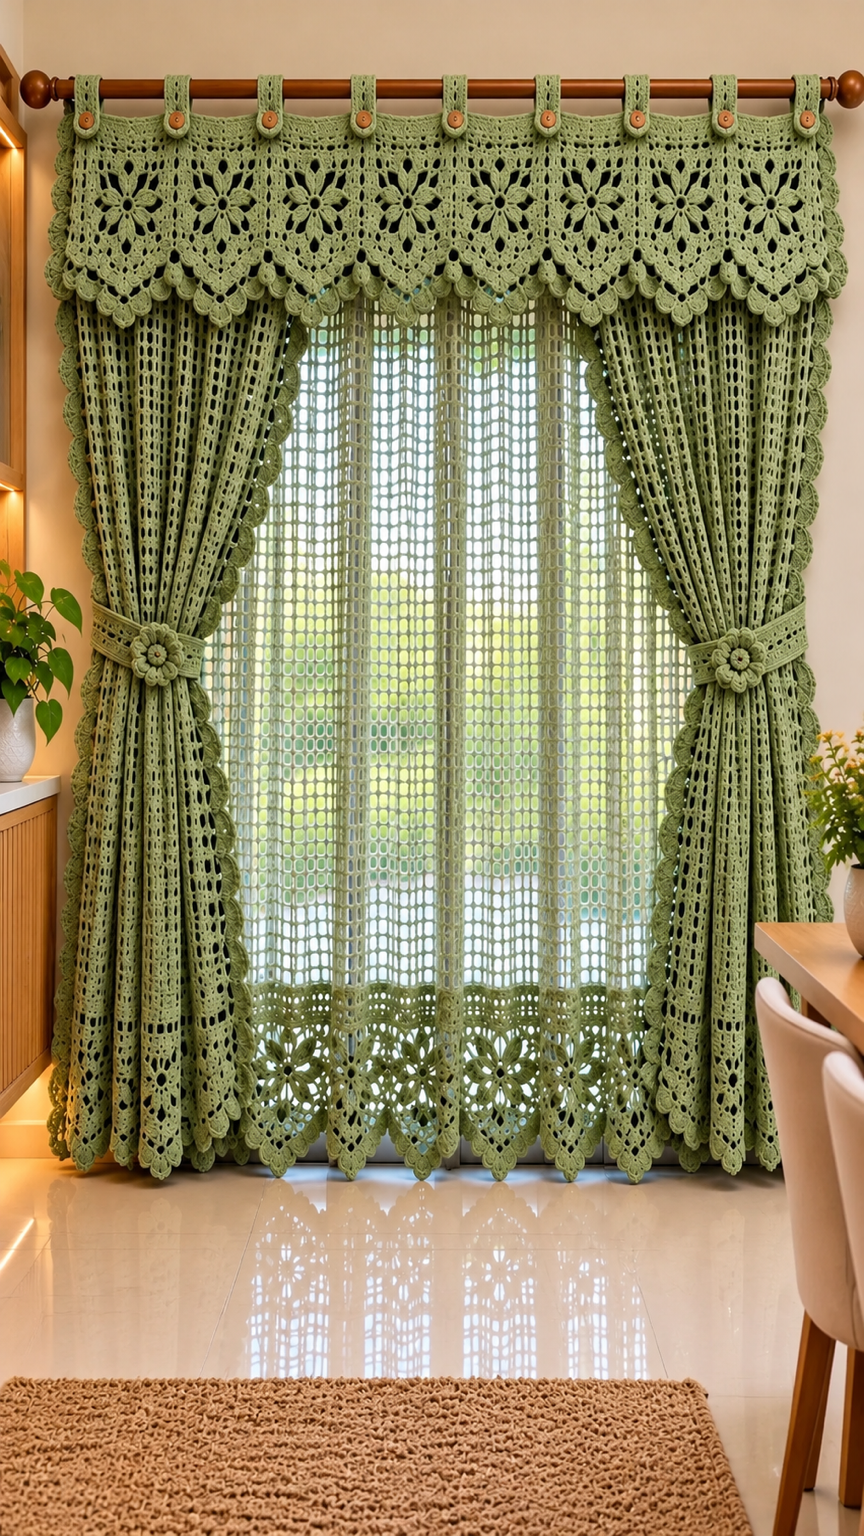

Create a beautiful handmade crochet curtain set featuring delicate floral lace, elegant scalloped edges, decorative tiebacks, and a matching floral valance. This vintage-inspired design is perfect for living rooms, bedrooms, and cozy farmhouse interiors.
This is a custom pattern inspired by the reference photo, not the original designer’s exact instructions.
Materials Needed
- Sage green cotton yarn (sport or DK weight, approximately 2,500–4,000 meters, depending on window size)
- 3.0–3.5 mm crochet hook
- Scissors
- Yarn needle
- Measuring tape
- Stitch markers
- 9 wooden buttons
- Wooden curtain rod
- Optional curtain rings
Crochet Abbreviations (US Terms)
- CH – Chain
- SC – Single Crochet
- DC – Double Crochet
- HDC – Half Double Crochet
- TR – Treble Crochet
- SL ST – Slip Stitch
- ST – Stitch
- SP – Space
- REP – Repeat
- PICOT – Chain 3, slip stitch into first chain
Part 1: Main Crochet Curtain Panels
Make three panels: one center sheer panel and two side panels.
Step 1: Foundation Chain
Measure the desired curtain width.
Create a foundation chain in multiples of 6 + 4 stitches.
For a sample panel, CH 184.
Step 2: Mesh Pattern
Row 1: DC in the 4th CH from the hook. CH 2, skip 2 CH, DC in next CH. Repeat across.
Row 2: CH 3, turn. CH 2, DC in next DC. Repeat across.
Row 3–end: Repeat Row 2 until the curtain reaches the desired length, leaving space for the decorative bottom border.
For a lightweight, airy appearance, maintain loose and even tension.
Part 2: Floral Lace Bottom Border
The bottom border features large openwork flowers with pointed scallops.
Round 1: Base
Work SC evenly across the bottom edge.
Round 2: Lace Foundation
CH 5, skip 3 ST, SC in next ST. Repeat across.
Round 3: Flower Petals
Into each CH-5 space, work:
SC, CH 3, 3 DC, CH 3, SC.
Repeat across the row.
Round 4: Decorative Arches
Work CH-7 arches between the flower groups, attaching each arch with SC.
Round 5: Scalloped Finish
Into each CH-7 space work:
SC, HDC, 3 DC, TR, PICOT, TR, 3 DC, HDC, SC.
Repeat across.
For a border closer to the photograph, make separate eight-petal floral motifs and join them along the lower edge using chain arches.
Part 3: Crochet Floral Valance
The upper valance creates the most decorative section of the curtain.
Step 1: Foundation
CH a length matching the full curtain rod width, using a multiple of 12 + 4.
Row 1: DC in the 4th CH from the hook and in each remaining CH.
Rows 2–5: CH 3, turn, DC across.
Step 2: Floral Motifs
Make one flower for each decorative repeat.
Round 1: Create a magic ring, CH 3, work 15 DC into the ring. SL ST to join.
Round 2: CH 4, skip 1 ST, SC in next ST. Repeat 8 times.
Round 3: In each CH-4 space, work SC, HDC, 3 DC, HDC, SC.
Round 4: Behind each petal, create CH-5 loops.
Round 5: Work SC, HDC, 5 DC, HDC, SC into each loop.
Fasten off.
Make enough flowers to cover the valance width, then join them with chain-loop lace sections.
Step 3: Pointed Scalloped Edge
Attach yarn to the lower edge.
Work alternating CH-5 and CH-7 loops.
In each CH-7 loop, crochet:
SC, HDC, 4 DC, TR, PICOT, TR, 4 DC, HDC, SC.
Repeat across to create the decorative hanging points.
Part 4: Curtain Rod Button Tabs
Make approximately 9 tabs, adjusting the number to your curtain width.
- CH 9.
- Row 1: SC in the second CH and across.
- Rows 2–18: CH 1, turn, SC across.
- Create a buttonhole near one end using CH 2 and skipping 2 stitches.
- Fasten off and weave in ends.
- Sew each tab evenly along the valance top.
- Attach wooden buttons.
Fold each tab around the wooden curtain rod and secure it with its button.
Part 5: Crochet Curtain Tiebacks
Make two matching tiebacks.
Tieback Strap
Row 1: CH 13, SC in the second CH and across.
Rows 2–45: CH 1, turn, SC across.
Continue until the strap fits comfortably around the gathered curtain.
Decorative Flower
Round 1: Magic ring, 12 DC.
Round 2: CH 3, skip 1 ST, SC in next ST. Repeat to create 6 loops.
Round 3: In each loop work SC, HDC, 3 DC, HDC, SC.
Round 4: Create CH-5 loops behind the petals.
Round 5: Work SC, HDC, 5 DC, HDC, SC in each loop.
Sew one flower to the center of each tieback.
Part 6: Side Curtain Scalloped Edging
Attach yarn to the outside edge of each side panel.
Round 1: SC evenly along the edge.
Round 2: CH 5, skip 3 ST, SC in next ST. Repeat.
Round 3: In each CH-5 loop work SC, HDC, 5 DC, HDC, SC.
Repeat along the full length.
Part 7: Assembly and Finishing
- Block all crochet panels to their final measurements.
- Hang the center sheer panel behind the decorative side curtains.
- Attach the floral valance across the top of the curtain rod.
- Arrange the side panels symmetrically.
- Secure each side curtain with a floral tieback.
- Adjust the bottom scallops so the floral motifs hang evenly.
- Steam lightly if appropriate for the yarn.
Recommended Measurements
For a standard window approximately 150 cm wide and 200 cm tall:
| Component | Suggested size |
| Center sheer curtain | 150 × 185 cm |
| Side curtains | 75 × 190 cm each |
| Floral valance | 165 × 40 cm |
| Curtain tiebacks | 35 × 6 cm each |
| Decorative flowers | 8–12 cm diameter |
Adjust all measurements to suit your window.
Tips for a Professional Finish
Use 100% cotton yarn for beautiful stitch definition and natural draping. Maintain consistent tension throughout the mesh sections. Block the floral motifs before joining them, and use matching yarn for all seams.
For a closer match to the reference image, focus on the sage green color, large floral valance, delicate open mesh, scalloped side borders, and matching flower tiebacks.
Finished result: A romantic sage green crochet curtain set with vintage floral details, elegant lace texture, and a soft handmade appearance.
