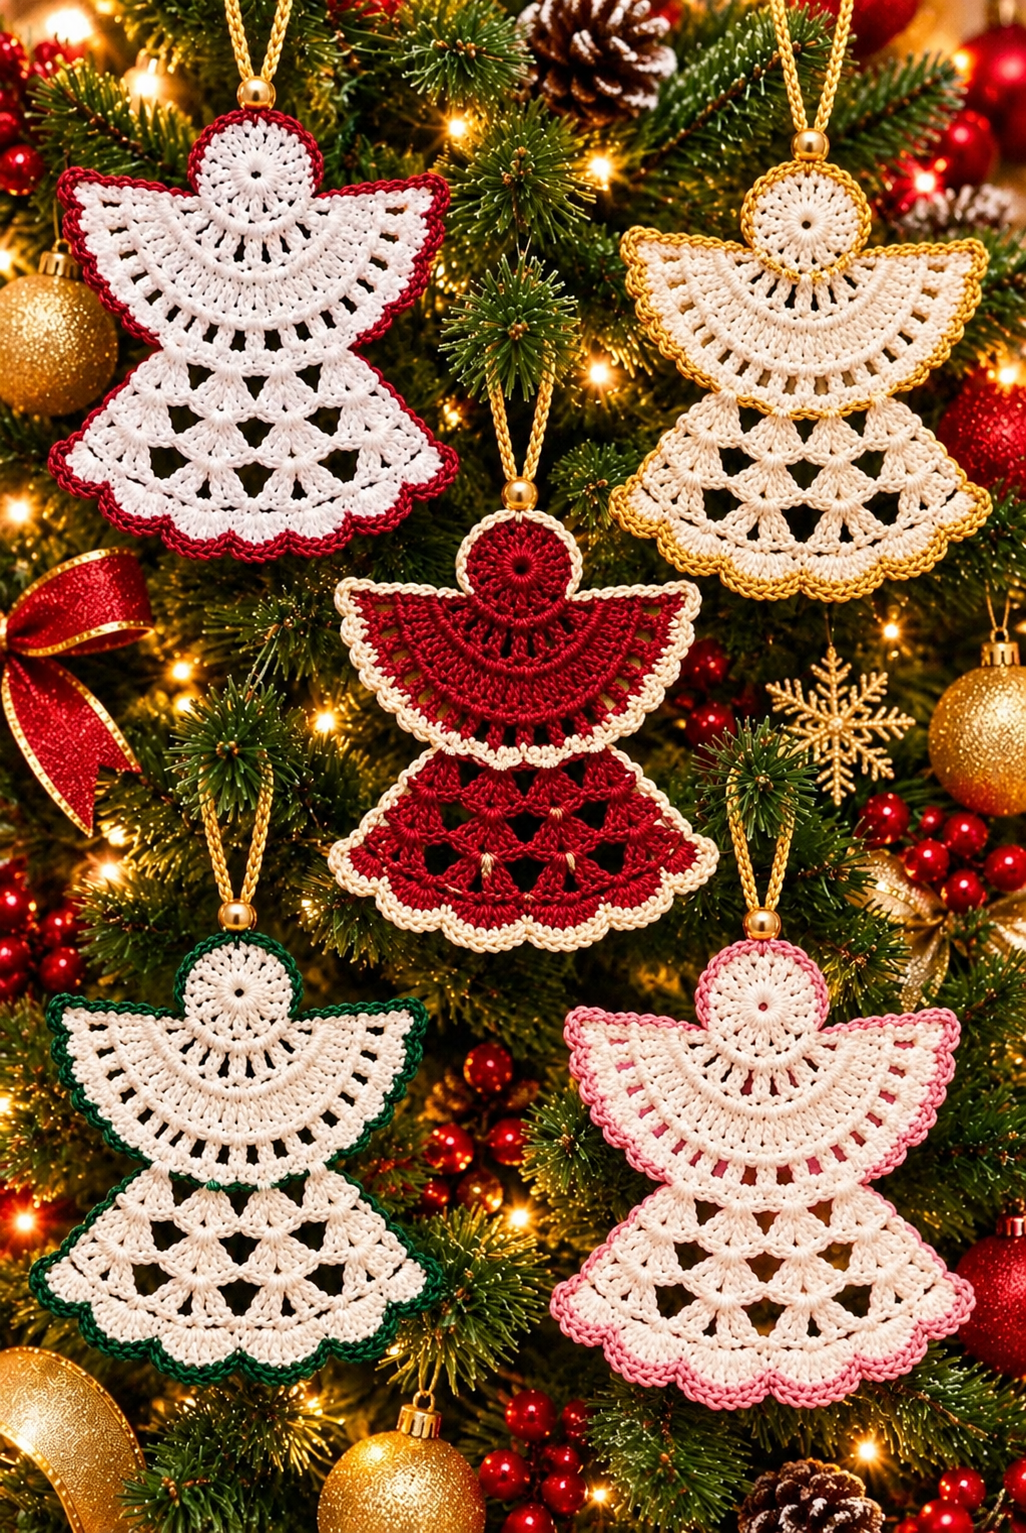

Elegant Gold & White Lace Angel Ornaments
Create beautiful handmade crochet angels with delicate lace wings, an openwork dress, and elegant gold edging. Perfect for Christmas trees, holiday decorations, and handmade gifts.
This is a detailed, photo-inspired pattern. The original designer’s exact stitch instructions are not available, so some details may differ from the image.
1. Materials Needed
- Size 10 crochet cotton thread in white and metallic gold
- 1.75 mm or 2.0 mm crochet hook
- Gold embroidery thread for edging
- Small gold beads (6–8 mm)
- Yarn needle
- Scissors
- Stitch markers
- Fabric stiffener or diluted PVA glue
- Blocking pins and foam mat
- Gold hanging cord
Finished size: Approximately 12–15 cm tall, depending on thread and hook size.
2. Crochet Abbreviations (US Terms)
| Abbreviation | Meaning |
| MR | Magic Ring |
| ch | Chain |
| sc | Single Crochet |
| hdc | Half Double Crochet |
| dc | Double Crochet |
| tr | Treble Crochet |
| sl st | Slip Stitch |
| st | Stitch |
| sp | Space |
| FO | Fasten Off |
3. Angel Head
The angel’s head is a flat, circular crochet motif.
Round 1: Make a magic ring, ch 3 (counts as first dc), work 11 dc into the ring. Join with sl st. (12 dc)
Round 2: Ch 3, work 1 dc into the same stitch. Work 2 dc into each remaining stitch. Join. (24 dc)
Round 3: Ch 1, work 1 sc into each stitch around. Join. (24 sc)
Fasten off and weave in the ends.
For gold angels, use metallic gold thread. For white angels, use white cotton thread.
4. Angel Wings
The wings form a wide, decorative semicircle directly underneath the head.
Join the yarn to the lower edge of the head.
Row 1: Ch 3, work 2 dc into the attachment stitch, ch 2, work 3 dc into the next suitable attachment point. Turn.
Row 2: Ch 3, work 2 dc into the first space, ch 2, 3 dc into the next space. Repeat across, increasing at both ends.
Row 3: Work groups of 3 dc separated by ch 2 spaces, increasing the width of the wings.
Row 4: Ch 3, work 1 dc into each dc and 2 dc into each chain space.
Row 5: Create an open lace effect by repeating (1 dc, ch 2, skip 2 stitches) across.
Row 6: Work 3 dc into each chain space, with ch 1 between groups.
Row 7: Work sc around the wing edges, adding 3 sc into each outer corner to maintain the shape.
Fasten off.
Gently stretch and block the wings into a symmetrical semicircle.
5. Angel Dress – Lace Skirt
Attach yarn at the center bottom of the wings.
The dress is worked downward in rows, gradually widening to create a bell shape.
Row 1: Ch 3, work 2 dc, ch 2, 3 dc into the center attachment area.
Row 2: Ch 3, work 3 dc into the first ch-2 space, ch 3, work 3 dc into the next space.
Row 3: Work (3 dc, ch 2, 3 dc) into each major chain space, increasing the width.
Row 4: Ch 3, work 3 dc into each chain space, separated by ch 3.
Row 5: Create an openwork lace design by working groups of 3 dc separated by ch 4 spaces.
Row 6: Work 5 dc into each chain space to form decorative fan motifs.
Row 7: Work (1 sc, ch 3, 1 sc) between fan groups to create a scalloped bottom edge.
Fasten off and weave in the ends.
Adjust the increases and spacing as necessary so the skirt remains flat and symmetrical.
6. Gold Decorative Border
For the white angels, attach metallic gold thread at the outer edge.
Work 1 sc into each stitch around the wings and dress.
At corners and scallops, work 2–3 sc into the same stitch to prevent pulling.
For the gold angels, use matching gold thread for a neat finish.
Fasten off and weave in all ends.
7. Hanging Loop
Using gold thread:
- Attach yarn to the top center of the angel’s head.
- Ch 35–40.
- Sl st into the same attachment point to form a loop.
- Fasten off securely.
- Slide a small gold bead onto the loop if desired.
8. Blocking and Stiffening
To achieve the crisp, elegant lace shape:
- Lightly dampen the finished angel.
- Apply fabric stiffener according to the product instructions.
- Place the angel on a foam blocking mat.
- Pin the wings into a wide, symmetrical shape.
- Spread the skirt into a bell shape.
- Allow the angel to dry completely.
- Remove the pins carefully.
Avoid using excessive stiffener, as it may obscure the delicate crochet stitches.
9. Color Variations
White & Gold Christmas Angel
Use white cotton thread for the entire angel and metallic gold thread for the outer edging. Add a small gold bead above the head.
Luxury Golden Christmas Angel
Use gold cotton or metallic thread throughout the entire angel. Add a matching gold hanging loop and bead.
Optional Christmas Variations
Try ivory with champagne gold, silver with white, or burgundy with gold for different holiday themes.
10. Final Assembly
Check that the head, wings, and dress are securely joined. Hide all loose yarn ends and make sure the hanging loop is centered.
The finished angel should hang flat, with the wings spread evenly and the lace skirt forming a graceful bell shape.
Care Instructions: Store the ornaments flat in a dry place, away from heavy objects. Gently reshape them before hanging each Christmas season.
These delicate crochet angels make beautiful Christmas tree ornaments, window decorations, festive garlands, and thoughtful handmade holiday gifts.
