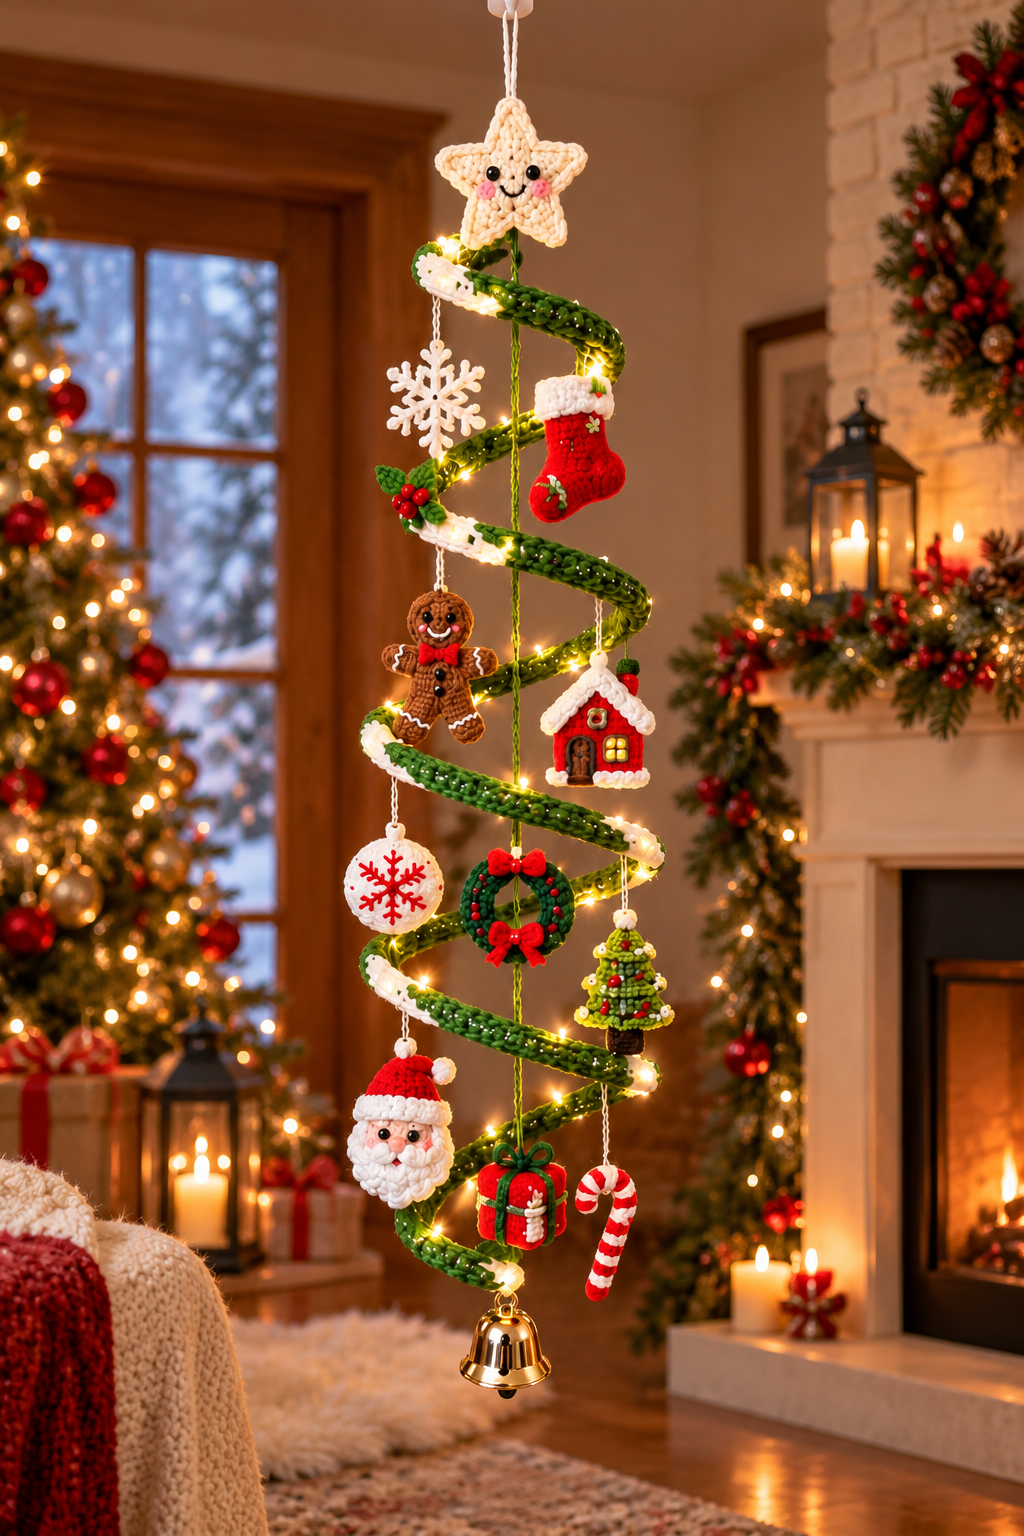

DIY Christmas Hanging Decoration with Mini Crochet Ornaments, Glowing Lights, and a Smiling Star Topper
This beautiful hanging Christmas spiral combines green-and-white crochet, adorable handmade ornaments, warm fairy lights, and a golden bell. The spiral hangs from the ceiling, creating a floating Christmas tree effect.
Below is an original, detailed pattern inspired by your reference photo. It is designed to recreate the overall appearance, although the exact stitch pattern of the photographed piece cannot be determined from the image alone.
1. Materials Needed
| Material | Quantity |
|---|---|
| Green worsted-weight yarn | 250–350 g |
| White or cream yarn | 100–150 g |
| Red yarn | 50–80 g |
| Brown, yellow, pink and black yarn | Small amounts |
| Crochet hooks | 3 mm and 4 mm |
| Polyester stuffing | Small bag |
| Flexible craft wire | Approximately 3 m |
| Battery-operated warm-white LED fairy lights | 1 strand |
| Yarn needle and scissors | 1 each |
| Strong hanging cord and clear support thread | As needed |
| Small golden bell | 1 |
| Safety eyes or black embroidery thread | As needed |
Finished size: Approximately 85–100 cm tall and 25–35 cm wide, depending on how you shape the spiral.
2. Crochet Abbreviations (US Terms)
| Abbreviation | Meaning |
|---|---|
| MR | Magic ring |
| ch | Chain |
| sc | Single crochet |
| hdc | Half double crochet |
| dc | Double crochet |
| tr | Treble crochet |
| sl st | Slip stitch |
| inc | 2 sc in the same stitch |
| dec | Single crochet 2 together |
| st(s) | Stitch(es) |
| FO | Fasten off |
3. Main Green Christmas Spiral
The foundation of the entire decoration
Use green yarn and a 4 mm crochet hook.
Step 1 – Crochet the long spiral strip
- Foundation: Chain 520.
- Row 1: Sc in the second chain from the hook and each remaining chain. (519 sc)
- Row 2: Ch 1, turn, sc in every stitch.
- Row 3: Ch 2, turn, hdc in every stitch.
- Row 4: Ch 2, turn, hdc in every stitch.
- Row 5: Ch 1, turn, sc in every stitch.
Fasten off and weave in the ends. The finished strip should be approximately 2.7–3 m long, depending on gauge.
Step 2 – Add the snowy white edging
Join white yarn along one long side of the green strip.
Work one row of sc along the entire edge.
For a textured snowy finish, repeat:
(sc, hdc, sc) in the next stitch, skip 2 stitches
Continue to the end, adjusting the final repeat as necessary.
Fasten off and weave in the ends.
Step 3 – Reinforce the strip
Place flexible craft wire along the underside of the strip and secure it with yarn stitches at regular intervals. Cover and secure both wire ends so that no sharp edges are exposed.
This will help the strip keep its spiral shape when suspended.
4. Shape the Hanging Spiral
Cut a strong hanging cord approximately 110 cm long.
Create a loop at the top for hanging.
Starting near the upper part of the cord, wind the crocheted strip into a descending spiral.
- Keep the first loop narrow.
- Gradually increase the width of each lower loop.
- Aim for approximately five to six turns.
- Leave 10–13 cm of vertical separation between successive turns.
- Secure the spiral to the central cord and reinforce the outer curves with clear support thread.
The final shape should resemble a floating Christmas tree, narrow at the top and wider toward the bottom.
5. Smiling Crochet Star Topper ⭐
Use cream yarn and a 3 mm hook.
Make two identical star panels.
Round 1: MR, 10 sc, join.
Round 2: Repeat (sc, inc) five times. (15 sc)
Round 3 – Five star points:
Repeat five times:
- Sl st into the next stitch.
- Ch 6.
- Sl st in the second chain from the hook.
- Sc in the next chain.
- Hdc in the next chain.
- Dc in the next chain.
- Tr in the last chain.
- Skip the next base stitch and sl st into the following base stitch.
Fasten off.
Place the two stars together and sew around the outer edges, adding a little stuffing before closing.
Embroider two black eyes, a smiling mouth, and pink cheeks.
Attach the smiling star to the top of the hanging spiral.
6. Mini Christmas Ornaments
A. Crochet Snowflake
Use white yarn and a 3 mm hook.
Round 1: Ch 4 and join to form a ring.
Round 2: Repeat (sc into ring, ch 3) six times.
Round 3: Work the following into each chain-3 space:
sc, ch 5, sl st in second ch from hook, ch 3, sl st in second ch from hook, ch 2, sc in same space
Repeat for all six spaces.
Fasten off and block the snowflake flat. Add a hanging loop.
B. Mini Red Christmas Stocking
Use red yarn.
Make two stocking panels.
- Row 1: Ch 9, sc in second chain and across. (8)
- Rows 2–10: Ch 1, turn, sc across. (8)
- Row 11: Sc across all 8 stitches, then ch 5.
- Row 12: Turn, sc in second chain and next 3 chains, then sc across the original 8 stitches. (12)
- Rows 13–15: Ch 1, turn, sc across. (12)
Fasten off.
Place the two panels together with the toes pointing in the same direction. Sew around the edges.
White cuff: Ch 9, work 8 sc for two rows. Sew the cuff across the top of the stocking.
Add a tiny green holly leaf and red berries.
C. Gingerbread Man
Use brown yarn and a 3 mm hook.
Head – Make two circles:
- Round 1: MR, 6 sc.
- Round 2: Inc in each stitch. (12)
- Round 3:
(sc, inc)× 6. (18)
Sew the two circles together with light stuffing.
Body:
- Ch 9, sc in second chain and across. (8)
- Continue for 9 rows of sc.
Arms and legs:
Make four separate pieces by chaining 7 and working 6 sc back along each chain.
Sew two arms to the upper sides of the body and two legs to the bottom.
Attach the head.
Decorate with white embroidered icing, a red bow tie, black buttons, and a smiling face.
D. Christmas Wreath
Use green yarn.
Round 1: Ch 18 and join to make a ring.
Round 2: Work 36 sc around the ring.
Round 3: Work 36 sc around.
Fasten off.
Create a small red bow with two crocheted chains and sew it to the bottom of the wreath. Add tiny red berries.
E. Santa Claus Face
Use peach, white, and red yarn.
Face:
- Round 1: MR, 6 sc.
- Round 2: Inc around. (12)
- Round 3:
(sc, inc)× 6. (18) - Round 4:
(2 sc, inc)× 6. (24)
Make a second circle for the back and sew them together.
Beard:
Join white yarn along the lower half of the face. Work repeated small loops of ch 4, sl st in the same stitch to create a fluffy beard.
Santa hat:
Using red yarn:
- Row 1: Ch 11, sc across. (10)
- Row 2: Sc across. (10)
- Row 3: Dec, sc 6, dec. (8)
- Row 4: Sc across. (8)
- Row 5: Dec, sc 4, dec. (6)
- Row 6: Sc across. (6)
- Row 7: Dec, sc 2, dec. (4)
- Row 8: Sc across. (4)
- Row 9: Dec twice. (2)
Add a white brim and a little white pompom.
Sew the hat onto Santa’s head. Embroider the facial details.
F. Mini Christmas Gift
Use red yarn and a 3 mm hook.
Make two square panels.
- Row 1: Ch 11, sc across. (10)
- Rows 2–10: Ch 1, turn, sc across.
Join the panels with sc around the edges, adding light stuffing before closing.
Use green yarn to embroider a vertical and horizontal ribbon.
Add a small green bow on top.
G. Candy Cane
Use white and red yarn.
Round 1: MR, 6 sc.
Rounds 2–24: Sc around, changing between red and white every two rounds.
Before closing, insert a short length of flexible craft wire with safely covered ends.
Shape the finished tube into a candy cane and sew the opening closed.
H. Mini Crochet Christmas Tree
Use green yarn.
- Row 1: Ch 16, sc across. (15)
- Row 2: Dec, sc 11, dec. (13)
- Row 3: Sc across. (13)
- Row 4: Dec, sc 9, dec. (11)
- Row 5: Sc across. (11)
- Row 6: Dec, sc 7, dec. (9)
- Row 7: Sc across. (9)
- Row 8: Dec, sc 5, dec. (7)
- Row 9: Sc across. (7)
- Row 10: Dec, sc 3, dec. (5)
- Row 11: Sc across. (5)
- Row 12: Dec, sc, dec. (3)
- Row 13: Sc across. (3)
- Row 14: Sc3tog. (1)
Fasten off.
For the trunk, use brown yarn: Ch 5 and work 4 sc for two rows. Sew to the base.
Decorate with tiny colored stitches, beads, or miniature crocheted bobbles.
I. Mini Gingerbread House
Use red yarn.
House body – Make two panels:
Ch 13, work 12 sc across and continue for 14 rows.
White roof:
Ch 17 and work 16 sc across.
Decrease one stitch at each end of every second row until only two stitches remain.
Sew the roof over the upper part of the red house.
Add a small brown crocheted door, yellow square windows, and white embroidered icing decorations.
Join the house panels, adding a small amount of stuffing before closing.
7. Add the Christmas Fairy Lights
Use one strand of battery-operated warm-white LED lights.
Carefully wind the lights around the green spiral, positioning the bulbs between the snowy white edging and the hanging decorations.
Secure the light cable with a few loose yarn stitches, without piercing or damaging the electrical insulation.
Use cool-running battery LEDs only. Keep the battery pack accessible and supported separately, not dangling from the crochet.
8. Final Assembly and Decoration Placement
Arrange your mini ornaments at different heights, using the reference image as a guide.
| Position | Ornament |
|---|---|
| Very top | Smiling cream star |
| Upper left | White snowflake |
| Upper right | Red Christmas stocking |
| Middle left | Gingerbread man |
| Middle right | Gingerbread house |
| Center lower left | Red snowflake bauble |
| Center | Christmas wreath |
| Lower right | Mini Christmas tree |
| Bottom left | Santa Claus |
| Bottom center | Wrapped gift |
| Bottom right | Candy cane |
| Very bottom | Golden bell |
Attach each ornament using short lengths of yarn, adjusting their hanging lengths so they don’t overlap.
Ensure the center cord supports the main weight. Test the entire decoration before hanging it from a properly secured ceiling hook.
9. Finishing Tips for a Professional Result
- Maintain even yarn tension for consistent stitches.
- Block flat ornaments before attaching them.
- Keep the white edging visible along the full spiral.
- Make the upper spiral turns smaller than the lower ones.
- Hide knots and loose yarn ends.
- Space the Christmas ornaments evenly.
- Use the warm lights to highlight the texture of the crochet.
- Ensure all wire tips are covered, and keep small detachable decorations away from young children.
Final result: A beautiful handmade Christmas spiral suspended from the ceiling, featuring a smiling star at the top, cascading green-and-white crocheted coils, detailed festive ornaments, warm golden lights, and a little bell at the bottom.
Skill level: Intermediate | Estimated completion time: 12–18 hours, depending on experience and ornament detail.
