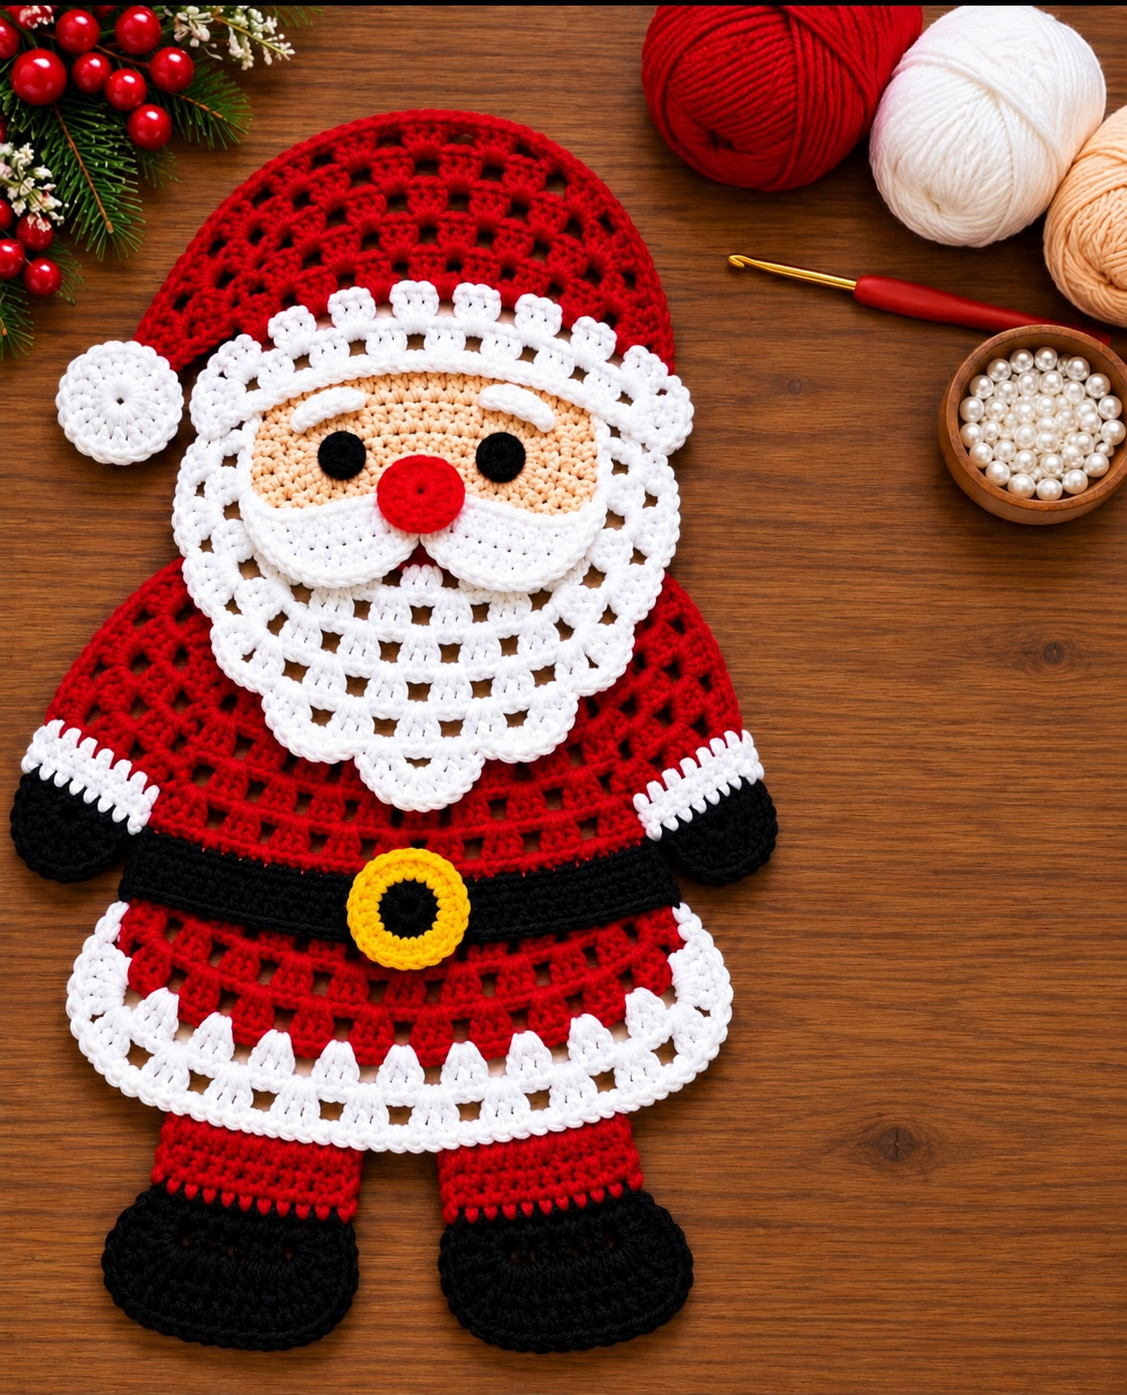

Materials
- Cotton or acrylic yarn: red, white, peach, black and yellow
- Hook suitable for your yarn, approximately 3–4 mm
- Yarn needle, scissors and stitch markers
- Optional hanging cord
Use the same yarn weight throughout. Work firmly enough to keep the decoration flat.
US abbreviations
ch = chain
sl st = slip stitch
sc = single crochet
hdc = half double crochet
dc = double crochet
inc = 2 sc in one stitch
dec = single crochet 2 stitches together
MR = magic ring
Turning chains do not count as stitches. Work through both loops unless stated otherwise.
1. Red coat
Work from the narrow neckline down toward the wide hem.
Ch 19.
Row 1: Sc in the second chain from the hook and across. 18 sc
Row 2: Ch 1, turn. Inc in first stitch, sc to last stitch, inc in last stitch. 20 sc
Row 3: Ch 3, turn. Dc in first stitch, [ch 1, skip 1 stitch, dc in next stitch] 9 times, dc in last stitch. 11 dc and 9 spaces
Row 4: Ch 1, turn. Inc in first dc, sc in every remaining dc and chain space to the last dc, inc in last dc. 22 sc
Row 5: Repeat the shaping instructions of Row 2. 24 sc
Row 6: Ch 3, turn. Dc in first stitch, [ch 1, skip 1 stitch, dc in next stitch] 11 times, dc in last stitch. 13 dc and 11 spaces
Row 7: Repeat Row 4. 26 sc
Row 8: Repeat Row 2. 28 sc
Row 9: Ch 3, turn. Dc in first stitch, [ch 1, skip 1 stitch, dc in next stitch] 13 times, dc in last stitch. 15 dc and 13 spaces
Row 10: Repeat Row 4. 30 sc
Row 11: Repeat Row 2. 32 sc
Row 12: Ch 3, turn. Dc in first stitch, [ch 1, skip 1 stitch, dc in next stitch] 15 times, dc in last stitch. 17 dc and 15 spaces
Row 13: Repeat Row 4. 34 sc
Row 14: Repeat Row 2. 36 sc
Row 15: Ch 3, turn. Dc in first stitch, [ch 1, skip 1 stitch, dc in next stitch] 17 times, dc in last stitch. 19 dc and 17 spaces
Row 16: Ch 1, turn. Sc in every dc and chain space. 36 sc
Fasten off.
White hem
Join white at one end of the bottom edge.
Row 1: Ch 1, sc across. 36 sc
Row 2: Ch 1, turn. Repeat [sc in next stitch, skip 1 stitch, 5 dc in next stitch, skip 1 stitch] 9 times.
Fasten off.
2. Peach face
Work in joined rounds. Ch 1 at the beginning of each round; join with sl st at the end.
Round 1: 6 sc in a MR. 6
Round 2: Inc around. 12
Round 3: [Sc, inc] × 6. 18
Round 4: [2 sc, inc] × 6. 24
Round 5: [3 sc, inc] × 6. 30
Round 6: [4 sc, inc] × 6. 36
Round 7: [5 sc, inc] × 6. 42
Round 8: [6 sc, inc] × 6. 48
Fasten off, leaving a long sewing tail.
3. White pointed beard
Work from the bottom point upward.
Ch 2.
Row 1: Work 2 sc in the second chain from the hook. 2
Row 2: Ch 1, turn. Inc in both stitches. 4
Row 3: Ch 1, turn. Inc in first stitch, sc across to last stitch, inc in last stitch. 6
Row 4: Ch 3, turn. Dc in first stitch, [ch 1, skip 1 stitch, dc in next stitch] twice, dc in last stitch. 4 dc and 2 spaces
Row 5: Ch 1, turn. Inc in first dc, sc in each dc and space to last dc, inc in last dc. 8 sc
Row 6: Repeat Row 3. 10 sc
Row 7: Ch 3, turn. Dc in first stitch, [ch 1, skip 1 stitch, dc in next stitch] 4 times, dc in last stitch. 6 dc and 4 spaces
Row 8: Repeat Row 5. 12 sc
Row 9: Repeat Row 3. 14 sc
Row 10: Ch 3, turn. Dc in first stitch, [ch 1, skip 1 stitch, dc in next stitch] 6 times, dc in last stitch. 8 dc and 6 spaces
Row 11: Repeat Row 5. 16 sc
Row 12: Repeat Row 3. 18 sc
Fasten off, leaving a sewing tail.
For a soft border, join white at an upper corner and sc evenly down one diagonal edge and up the other. Work 3 sc around the bottom point. Keep the edging loose enough to lie flat.
4. Moustache — make 2
With white, ch 9.
Starting in the second chain from the hook, work:
sl st, sc, hdc, dc, dc, hdc, sc, sl st.
Fasten off, leaving a sewing tail.
Arrange the two pieces beneath the nose, with the narrow ends meeting in the center.
5. Eyes — make 2
With black, work 6 sc into a MR. Join and fasten off.
Sew them firmly onto the face. Alternatively, embroider two black circles.
6. Red nose
Round 1: 6 sc in a MR. 6
Round 2: Inc around. 12
Round 3: Sc around. 12
Join and fasten off. Sew onto the face with the slightly cupped side facing inward.
Eyebrows — make 2
With white, ch 6. Sl st in the second chain from the hook and across. Fasten off and sew above the eyes.
7. Red hat
Work from the tip toward the brim.
Ch 2.
Row 1: Work 2 sc in the second chain from the hook. 2
Row 2: Ch 1, turn. Inc in both stitches. 4
Row 3: Ch 1, turn. Inc in first stitch, sc to last stitch, inc in last stitch. 6
Repeat Row 3 until you have 24 sc, finishing after Row 12.
Fasten off.
White brim
Join white at the wide edge.
Row 1: Ch 1, sc across. 24 sc
Row 2: Ch 1, turn. Repeat [sc in next stitch, skip 1 stitch, 5 dc in next stitch, skip 1 stitch] 6 times.
Fasten off.
Bend the hat tip to one side during assembly and secure it with a few stitches.
Flat white pom-pom
Round 1: 6 sc in a MR. 6
Round 2: Inc around. 12
Round 3: [Sc, inc] × 6. 18
Join, fasten off and sew to the hat tip.
8. Arms — make 2
With red, ch 9.
Row 1: Sc in the second chain from the hook and across. 8 sc
Rows 2–5: Ch 1, turn, sc across. 8 sc
Change to white.
Row 6: Ch 1, turn, sc across. 8 sc
Change to black.
Rows 7–9: Ch 1, turn, sc across. 8 sc
Row 10: Ch 1, turn. Dec, sc in next 4 stitches, dec. 6 sc
Fasten off. Sew the red ends behind the upper sides of the coat, angling the mittens outward.
9. Legs and boots — make 2
With red, ch 9.
Row 1: Sc in the second chain from the hook and across. 8 sc
Rows 2–4: Ch 1, turn, sc across. 8 sc
Change to black.
Row 5: Ch 1, turn. Inc in first stitch, sc in next 6 stitches, inc in last stitch. 10 sc
Row 6: Ch 1, turn. Inc in first stitch, sc in next 8 stitches, inc in last stitch. 12 sc
Rows 7–8: Ch 1, turn, sc across. 12 sc
Row 9: Ch 1, turn. Dec, sc in next 8 stitches, dec. 10 sc
Fasten off. Sew the red ends behind the coat hem, leaving a small gap between the legs.
10. Black belt
Ch enough stitches to span the coat at waist level.
Row 1: Sc in the second chain from the hook and across.
Rows 2–3: Ch 1, turn, sc across.
Fasten off and sew horizontally across the coat.
Yellow buckle
Ch 12 and join into a ring without twisting.
Work 16 sc into the chain ring. Join and fasten off.
Sew onto the center of the belt, leaving the black belt visible through the opening.
11. Assemble Santa
- Place the face over the coat neckline and sew securely.
- Attach the beard across the lower face, letting its point extend down the coat.
- Sew on the eyes, eyebrows, moustache and nose.
- Attach the hat above the eyebrows.
- Add the arms, legs, belt and buckle.
- Weave in every yarn end and gently block the decoration flat.
