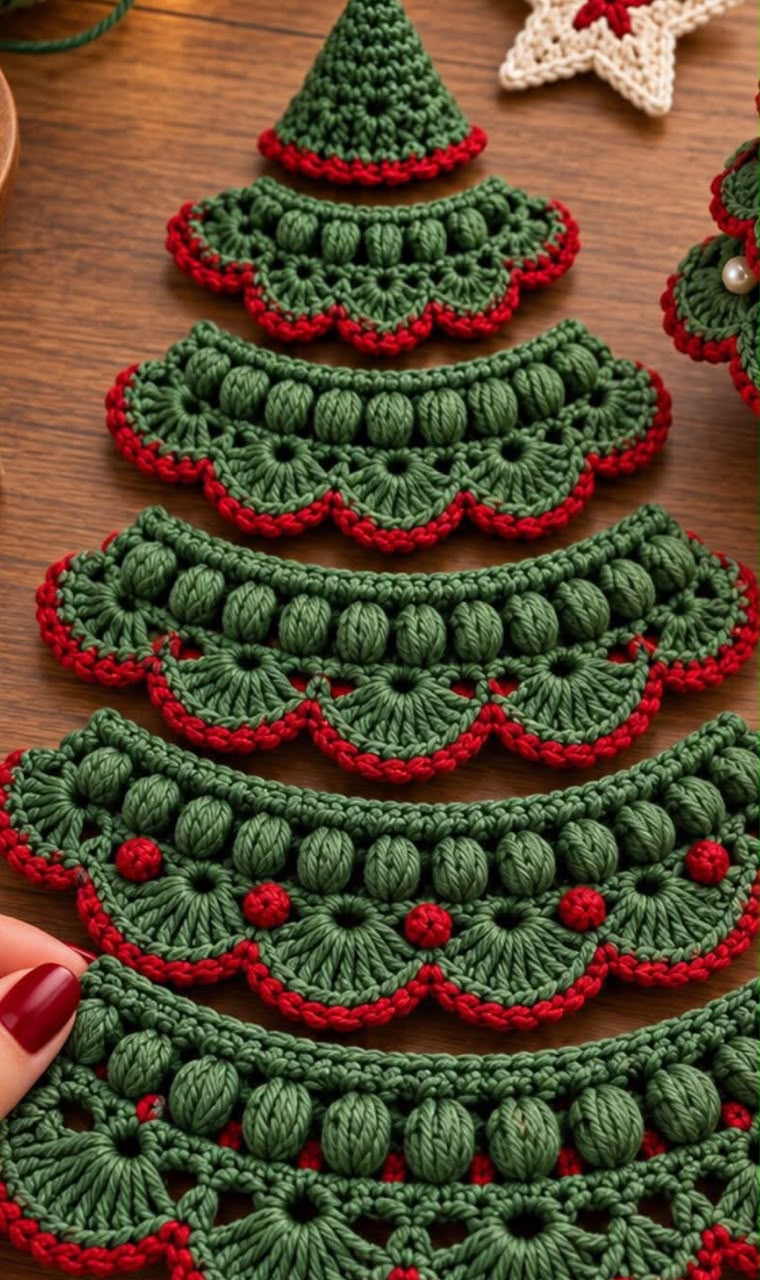

Create a beautiful layered Christmas tree ornament featuring dark green crochet shells, raised puff stitches, red scalloped edging, pearl decorations, and a festive red bow.
This pattern is inspired by the reference image, rather than an exact reproduction of an original designer’s pattern.
Materials
- Dark forest green cotton yarn (DK weight)
- Red cotton yarn for edging
- Brown yarn for the trunk
- 3.0 mm or 3.5 mm crochet hook
- White pearl beads and small red beads
- Red satin ribbon
- Yarn needle and scissors
- Stitch markers
- Fiberfill (optional)
Finished size: Approximately 18–22 cm tall, depending on yarn, hook size, and number of layers.
Crochet Abbreviations (US Terms)
| Abbreviation | Meaning |
| MR | Magic ring |
| ch | Chain |
| sl st | Slip stitch |
| sc | Single crochet |
| hdc | Half double crochet |
| dc | Double crochet |
| tr | Treble crochet |
| inc | 2 sc in same stitch |
| BLO | Back loop only |
| Puff | Puff stitch |
| FO | Fasten off |
Part 1: Crochet the Tree Top
Using green yarn:
Round 1: Make a magic ring and work 6 sc into the ring. (6)
Round 2: Sc in each stitch around. (6)
Round 3: (1 sc, inc) repeat 3 times. (9)
Round 4: Sc in each stitch. (9)
Round 5: (2 sc, inc) repeat 3 times. (12)
Round 6: Sc around. (12)
Round 7: (3 sc, inc) repeat 3 times. (15)
Round 8: Sc around. (15)
Round 9: (4 sc, inc) repeat 3 times. (18)
Round 10: Sc around. (18)
Change to red yarn.
Round 11: Work 1 sc into each stitch, then sl st to join.
Fasten off and weave in ends.
This creates the pointed Christmas tree topper.
Part 2: Create the Decorative Scalloped Layers
Make five separate curved layers, increasing in width from top to bottom.
Small Layer
Using green yarn:
Row 1: Ch 25.
Row 2: Starting in the second chain, work 24 sc. Turn.
Row 3: Ch 3, work 1 dc in each stitch across.
Row 4 – Puff Stitch Row: Ch 2, work 1 hdc, then repeat (puff stitch, ch 1, skip 1 stitch) across. Finish with 1 hdc.
Row 5 – Decorative Shells: Work groups of 5 dc into evenly spaced chain spaces, with 1 sc between groups to create a scalloped appearance.
Change to red yarn.
Row 6: Work sc evenly along the scalloped edge, placing 3 sc around each shell tip to emphasize the red border.
Fasten off.
Medium Layer
Repeat the small-layer pattern, beginning with ch 37.
Distribute the puff stitches and shells evenly, creating a wider curved piece.
Large Layer
Begin with ch 49 and follow the same stitch pattern.
Extra-Large Layer
Begin with ch 61.
Work the puff-stitch row and shell edging as before.
Bottom Layer
Begin with ch 73.
Repeat the same stitch sequence, making the bottom layer the widest.
Note: These starting chains provide approximate sizes. Adjust the number of shells and the spacing between them to fit the available stitches. The photograph shows an intricate fan motif, so the simplified shell instructions will create a similar layered effect, not identical lacework.
Part 3: How to Crochet a Puff Stitch
- Yarn over and insert the hook into the designated stitch.
- Yarn over and pull up a long loop.
- Repeat the yarn-over and pull-up action 4 times in the same stitch.
- Yarn over and pull through all loops on the hook.
- Chain 1 to secure the puff.
Keep all elongated loops at the same height for a neat, rounded appearance.
Part 4: Crochet the Brown Trunk
Using brown yarn:
Round 1: MR, 6 sc. (6)
Round 2: Inc around. (12)
Rounds 3–7: Sc in each stitch. (12)
Lightly stuff with fiberfill.
Fasten off, leaving a long tail for sewing.
Part 5: Assemble the Christmas Tree
- Lay the five green layers on a flat surface, smallest at the top and largest at the bottom.
- Curve each strip slightly to create a rounded, tiered appearance.
- Overlap the upper edge of each layer beneath the previous one.
- Sew the layers together through the hidden upper edges using green yarn.
- Attach the pointed topper at the top.
- Sew the brown trunk behind the bottom layer.
For a three-dimensional ornament like the finished tree in the photo, join the ends of each strip into a circular tier and arrange the tiers around a small stuffed cone-shaped base.
Part 6: Add Christmas Decorations
Pearl beads: Sew small white pearls along the green scalloped layers, spacing them evenly.
Red berries: Make tiny red bobbles using 4 dc worked together into one stitch, or attach small red beads.
Red bow: Tie a red satin ribbon around the upper section of the tree and secure it with stitches.
Hanging loop: Using green yarn, ch 35–45, sl st into the starting chain to form a loop, and sew securely to the tree topper.
Part 7: Finishing
Weave in all yarn ends and gently shape each scalloped layer with your fingers.
Lightly steam-block the crochet pieces before final assembly if necessary, avoiding direct heat on the beads and ribbon.
Your handmade Christmas tree ornament is ready to decorate your home
Pattern tip: To make a fuller Christmas tree, add one or two extra scalloped layers, increasing each new starting chain by approximately 12 stitches.
This design is ideal for Christmas decorations, handmade gifts, festive table displays, and holiday craft projects.
