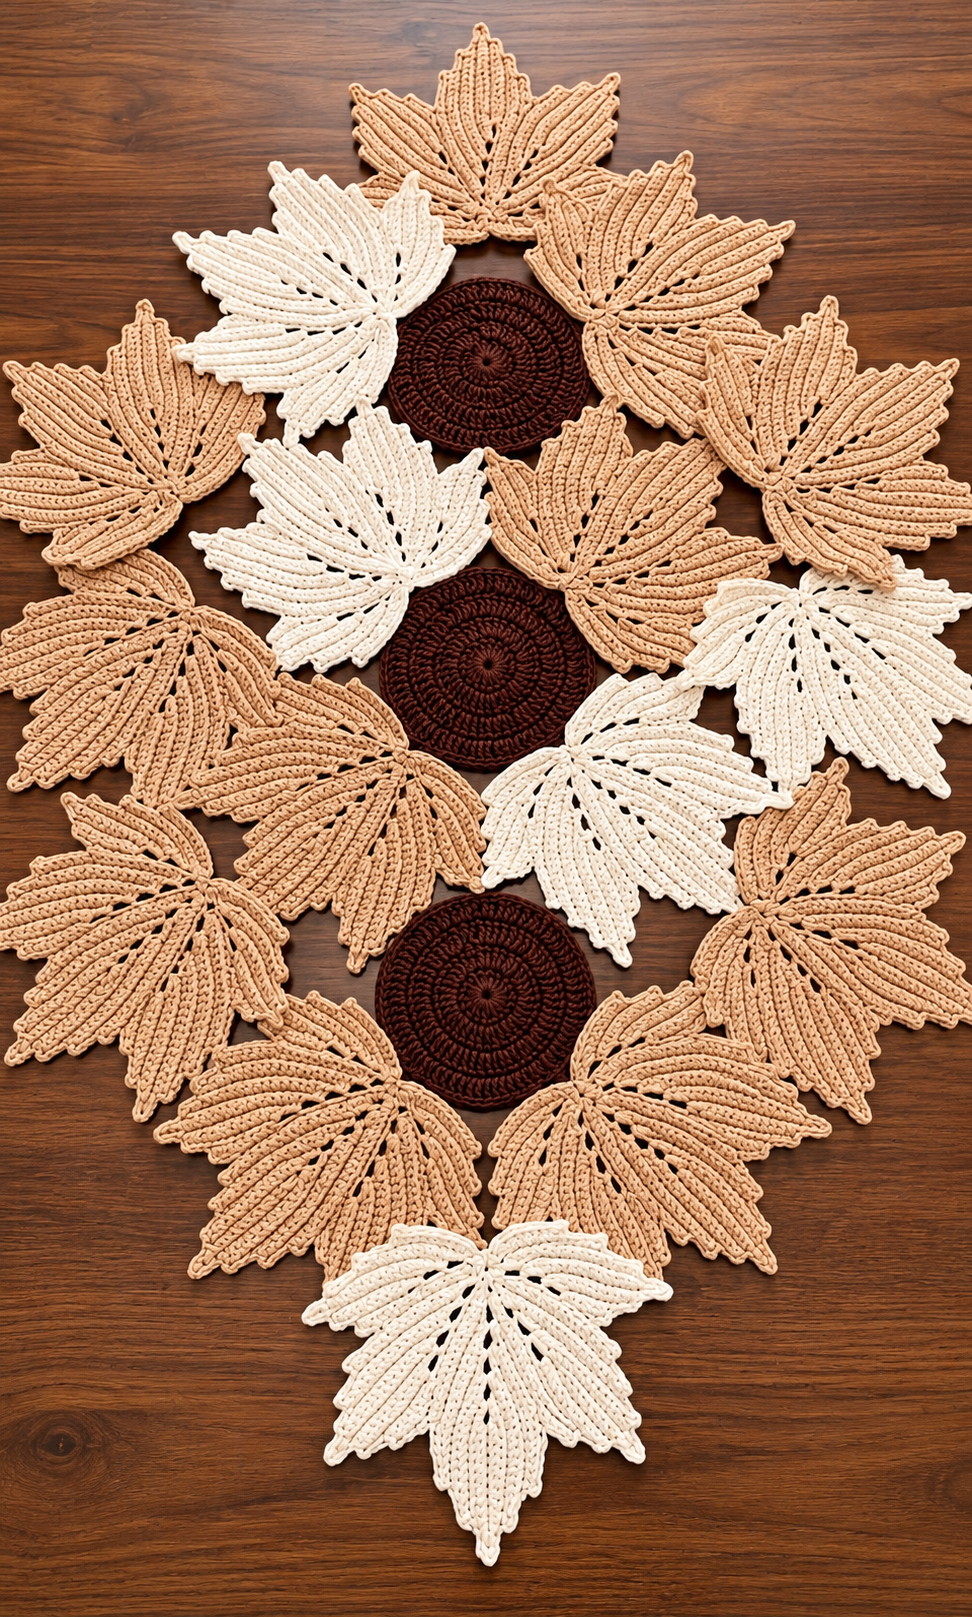

Create a beautiful handmade autumn table runner featuring textured maple leaves in warm beige and ivory, combined with dark chocolate-brown circular motifs. This elegant crochet design is perfect for fall decorating, Thanksgiving tables, and cozy farmhouse interiors.
This is an original, photo-inspired pattern, not the exact designer’s instructions. The stitch counts and joining arrangement are designed to recreate a similar appearance.
Materials Needed
- Worsted-weight cotton yarn in beige, ivory, and dark chocolate brown
- 3.5 mm or 4.0 mm crochet hook
- Yarn needle
- Stitch markers
- Scissors
- Blocking mat and pins
Skill Level: Intermediate to Advanced
Finished Size: Approximately 14 × 36 inches (35 × 91 cm), depending on yarn, gauge, and arrangement.
Crochet Abbreviations (US Terms)
| Abbreviation | Meaning |
| MR | Magic Ring |
| ch | Chain |
| sl st | Slip Stitch |
| sc | Single Crochet |
| hdc | Half Double Crochet |
| dc | Double Crochet |
| tr | Treble Crochet |
| BLO | Back Loop Only |
| inc | Increase |
| st | Stitch |
| FO | Fasten Off |
Part 1: Crochet the Dark Brown Circular Motifs
Make 3 circular motifs using chocolate-brown yarn.
Round 1: Create a magic ring. Ch 3 (counts as first dc), work 11 dc into the ring. Join with a sl st. (12 dc)
Round 2: Ch 3, dc in the same stitch. Work 2 dc into each stitch around. Join. (24 dc)
Round 3: Ch 3, dc in the same stitch, dc in the next stitch. Repeat (2 dc in next st, 1 dc in next st) around. Join. (36 dc)
Round 4: Ch 3, dc in the same stitch, dc in each of the next 2 stitches. Repeat (2 dc in next st, dc in next 2 sts) around. Join. (48 dc)
Round 5: Ch 1, work one sc in each stitch around. Join and fasten off.
For extra texture, work selected rounds in the back loops only.
Part 2: Crochet the Textured Maple Leaves
Make approximately 16–20 leaves, depending on your desired runner length.
Use beige and ivory yarn.
Step 1: Create the Leaf Center
- Ch 18.
- Starting in the second chain from the hook, work 1 sc in each chain across.
- Ch 1 and turn.
- Work 1 sc in BLO across.
- Repeat the previous row once to create a firm central rib.
Do not fasten off.
Step 2: Form the Five Leaf Lobes
The leaf is constructed with five separate tapered lobes, attached around the center.
For each lobe:
Row 1: Ch 13. Starting in the second chain, work 1 sc, 2 hdc, 6 dc, 2 hdc, and 1 sc. Sl st into the leaf center.
Row 2: Ch 1, turn. Work 1 sc in each stitch along the lobe, placing 3 sc at the tip to turn around it. Continue working down the opposite side.
Row 3: Ch 1, turn. Work sc in BLO along the lobe, maintaining the pointed shape.
Repeat until each lobe has a raised ribbed texture.
For a more realistic maple leaf shape, vary the starting chains:
- Center lobe: 16 chains
- Two upper side lobes: 14 chains each
- Two lower side lobes: 11 chains each
Attach the lobes around the center with slip stitches, adjusting their positions to create a symmetrical five-pointed maple leaf.
Step 3: Add the Decorative Leaf Edging
Join yarn at the base of the leaf.
Work sc evenly around the entire outline. At the tip of each lobe, work (sc, ch 2, sc) to create a sharp point.
Fasten off and weave in the ends.
Step 4: Add the Stem
Attach yarn at the base of the leaf.
Ch 8, sl st into the second chain from the hook, and sl st in each remaining chain.
Fasten off.
Part 3: Create the Raised Leaf Veins
To reproduce the deeply textured appearance:
- Thread a yarn needle with matching yarn.
- Embroider a raised central vein from the stem toward the top point.
- Add diagonal veins extending toward each side lobe.
- Use surface slip stitches or chain embroidery to create defined ridges.
- Secure the ends on the wrong side.
Repeat for every leaf.
Part 4: Arrange the Table Runner
Block all motifs before assembly.
Lay the three brown circles in a straight vertical line along the center of your workspace, leaving enough space between them for the leaf motifs.
Arrange beige and ivory leaves around the circles, allowing the pointed lobes to overlap slightly.
Alternate the colors to create visual balance. Place larger leaves along the sides and at the ends of the runner.
The arrangement should form an elongated, flowing autumn design rather than a solid rectangular fabric.
Part 5: Join the Motifs
Use matching yarn and a tapestry needle.
- Pin all motifs into their final positions.
- Identify the points where adjacent leaves overlap.
- Sew the motifs together discreetly at those contact points.
- Attach the brown circles to the surrounding leaves.
- Reinforce the joining points to prevent stretching.
- Keep the spaces between the motifs open to preserve the delicate lace-like appearance.
For a stronger runner, use several small joining points between neighboring leaves rather than a single stitch.
Part 6: Finishing and Blocking
Weave in all yarn ends securely.
Lightly dampen the runner and lay it flat on a blocking mat. Shape the maple leaves individually, gently stretching the points and arranging the lobes.
Pin the motifs into position and allow the runner to dry completely.
Once dry, place the finished crochet table runner on a wooden dining table or coffee table.
Helpful Tips
- Use cotton yarn for crisp leaf definition and a flatter finished runner.
- Keep your stitch tension consistent throughout.
- Make the ivory leaves slightly more prominent to create contrast.
- Use a smaller crochet hook for firmer, more detailed leaf motifs.
- Block every leaf before joining to achieve a neat, professional finish.
Final Result: A stunning autumn crochet table runner featuring sculpted maple leaves, warm neutral colors, and rich brown circular accents—perfect for handmade seasonal home décor.
