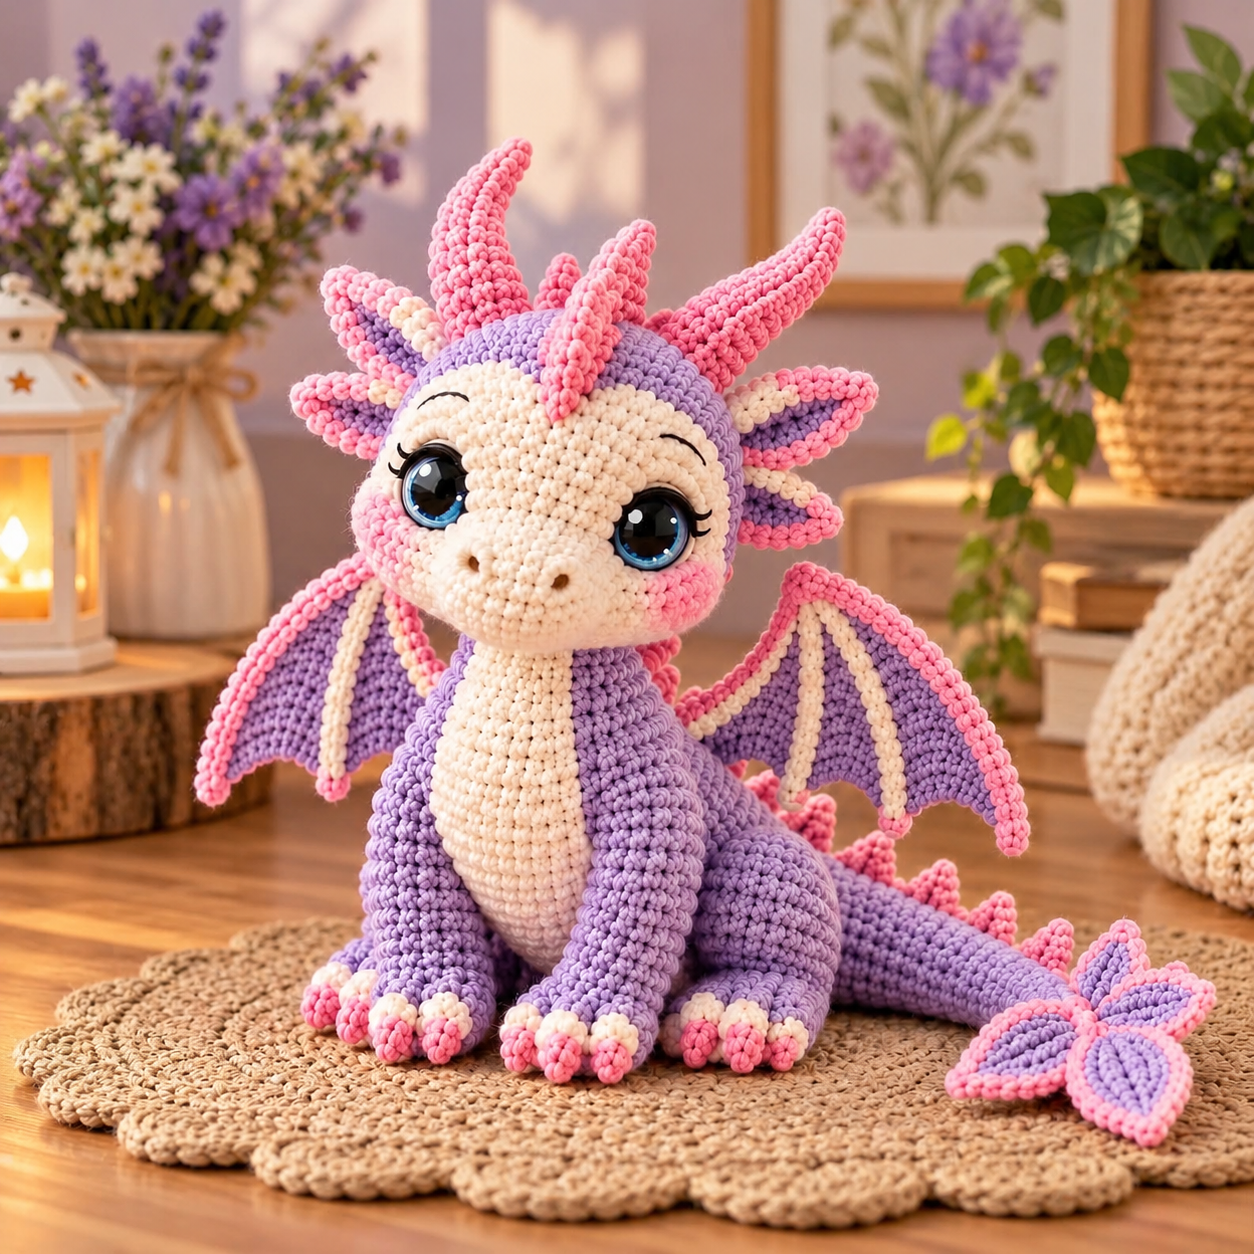

Create an adorable handmade crochet dragon with a lavender body, soft pink horns, beautiful wings, big sparkling eyes, and a cute flower-shaped tail. This cuddly amigurumi dragon is perfect for nursery decorations, handmade gifts, and crochet lovers.
Skill Level: Intermediate Finished Size: Approximately 25–30 cm (10–12 inches), depending on yarn and hook size. Technique: Amigurumi, working in continuous spiral rounds.
This is an original pattern inspired by the photo, not a verified reproduction of the exact stitches used in the pictured dragon.
Materials
- Lavender chenille or cotton yarn (main body)
- Light pink yarn (horns, spikes, wing borders)
- Cream yarn (muzzle, belly, wing details)
- Small amount of dark yarn for eyebrows
- 3.5–4.5 mm crochet hook, appropriate for your yarn
- Two 16–20 mm safety eyes
- Polyester fiberfill
- Yarn needle and stitch markers
Crochet Abbreviations (US Terms)
- MR – Magic ring
- SC – Single crochet
- INC – Increase (2 SC in one stitch)
- DEC – Invisible decrease
- CH – Chain
- SL ST – Slip stitch
- HDC – Half double crochet
- DC – Double crochet
- FO – Fasten off
- BLO – Back loop only
1. Dragon Head (Lavender)
Work in continuous rounds.
R1: 6 SC in MR (6) R2: INC around (12) R3: (1 SC, INC) × 6 (18) R4: (2 SC, INC) × 6 (24) R5: (3 SC, INC) × 6 (30) R6: (4 SC, INC) × 6 (36) R7: (5 SC, INC) × 6 (42) R8: (6 SC, INC) × 6 (48) R9: (7 SC, INC) × 6 (54) R10–17: SC around (54) R18: (7 SC, DEC) × 6 (48) R19: (6 SC, DEC) × 6 (42) R20: (5 SC, DEC) × 6 (36) R21: (4 SC, DEC) × 6 (30) R22: (3 SC, DEC) × 6 (24) R23: (2 SC, DEC) × 6 (18) R24: (1 SC, DEC) × 6 (12)
Insert safety eyes between rounds 12–13, approximately 9 stitches apart. Position them before attaching the muzzle. Stuff firmly, close the opening, and leave a long sewing tail.
2. Cream Dragon Muzzle
R1: CH 7. Starting in the second chain, 5 SC, 3 SC in last chain. Working along the opposite side, 4 SC, INC (14). R2: INC, 4 SC, 3 INC, 4 SC, 2 INC (20) R3: 1 SC, INC, 4 SC, (1 SC, INC) × 3, 4 SC, (1 SC, INC) × 2 (26) R4–6: SC around (26)
FO, stuff lightly, and sew onto the lower front of the head. Embroider two tiny nostrils using dark brown yarn.
For the cream face patch, crochet a flat oval large enough to surround the eye and muzzle area, using the same oval-increase technique. Sew it onto the lavender head before attaching the muzzle and eyes.
3. Dragon Body (Lavender)
Start from the bottom.
R1: 6 SC in MR (6) R2: INC around (12) R3: (1 SC, INC) × 6 (18) R4: (2 SC, INC) × 6 (24) R5: (3 SC, INC) × 6 (30) R6: (4 SC, INC) × 6 (36) R7: (5 SC, INC) × 6 (42) R8–12: SC around (42) R13: (5 SC, DEC) × 6 (36) R14–16: SC around (36) R17: (4 SC, DEC) × 6 (30) R18–20: SC around (30) R21: (3 SC, DEC) × 6 (24) R22–24: SC around (24) R25: (2 SC, DEC) × 6 (18) R26–27: SC around (18)
Stuff firmly and leave a long yarn tail to sew the head securely onto the neck.
4. Cream Belly Patch
CH 9.
Row 1: SC in second CH and across (8). Rows 2–16: CH 1, turn, 8 SC. Row 17: DEC, 4 SC, DEC (6). Rows 18–19: 6 SC. Row 20: DEC, 2 SC, DEC (4).
FO, leaving a long tail. Sew the belly patch vertically onto the front of the body, stretching it slightly to follow the rounded chest.
5. Front Legs (Make 2)
Using lavender yarn:
R1: 6 SC in MR (6) R2: INC around (12) R3: (1 SC, INC) × 6 (18) R4–6: SC around (18) R7: (4 SC, DEC) × 3 (15) R8–13: SC around (15) R14: (3 SC, DEC) × 3 (12) R15–17: SC around (12)
Stuff the paws firmly and the upper legs lightly.
FO, leaving a long tail. Sew to the front sides of the body.
Claws: Using cream yarn, embroider three small rounded toes on each paw, adding pink tips.
6. Back Legs (Make 2)
R1: 6 SC in MR (6) R2: INC around (12) R3: (1 SC, INC) × 6 (18) R4: (2 SC, INC) × 6 (24) R5–8: SC around (24) R9: (2 SC, DEC) × 6 (18) R10–12: SC around (18) R13: (1 SC, DEC) × 6 (12)
Stuff firmly and sew onto the lower sides of the body, slightly behind the front legs.
Add cream and pink embroidered claws.
7. Pink Dragon Horns (Make 4)
Make two long horns and two shorter horns.
Long horns
R1: 4 SC in MR (4) R2–3: SC around (4) R4: (1 SC, INC) × 2 (6) R5–6: SC around (6) R7: (2 SC, INC) × 2 (8) R8–9: SC around (8) R10: (3 SC, INC) × 2 (10) R11–13: SC around (10)
Stuff lightly. Insert flexible, soft craft stuffing as you sew so the horns curve gently.
Short horns
R1: 4 SC in MR (4) R2: SC around (4) R3: (1 SC, INC) × 2 (6) R4–5: SC around (6) R6: (2 SC, INC) × 2 (8) R7–8: SC around (8)
Sew the horns along the top of the head. Position the two longest horns toward the back and the shorter horns toward the front.
8. Dragon Wings (Make 2)
Use lavender yarn for the main wing fabric.
CH 16.
Row 1: SC in second chain from hook and across (15). Row 2: CH 1, turn, INC, 13 SC, INC (17). Row 3: CH 1, turn, 17 SC. Row 4: CH 1, turn, INC, 15 SC, INC (19). Row 5: CH 1, turn, 19 SC. Row 6: CH 1, turn, INC, 17 SC, INC (21). Rows 7–9: CH 1, turn, 21 SC. Row 10: CH 1, turn, DEC, 17 SC, DEC (19). Row 11: CH 1, turn, DEC, 15 SC, DEC (17). Row 12: CH 1, turn, DEC, 13 SC, DEC (15). Row 13: CH 1, turn, DEC, 11 SC, DEC (13).
Fasten off.
To create the scalloped bat-wing effect, work groups of SC, HDC, DC, HDC and SC along the lower wing edge, adjusting the groups to form three rounded scallops.
Using pink yarn, crochet SC around the outside edges of each wing.
With cream yarn, embroider three radiating lines from the top inside corner to the wing tips to create wing veins.
Sew the wings securely to the upper back. For more structure, make two matching panels per wing and stitch them together.
9. Dragon Tail
Using lavender yarn, begin at the tip.
R1: 4 SC in MR (4) R2–3: SC around (4) R4: (1 SC, INC) × 2 (6) R5–6: SC around (6) R7: (2 SC, INC) × 2 (8) R8–9: SC around (8) R10: (3 SC, INC) × 2 (10) R11–12: SC around (10) R13: (4 SC, INC) × 2 (12) R14–16: SC around (12) R17: (5 SC, INC) × 2 (14) R18–20: SC around (14) R21: (6 SC, INC) × 2 (16) R22–25: SC around (16)
Stuff gradually, keeping the tail flexible, and sew to the lower back.
10. Pink Back Spikes
Make 6–8 small spikes.
R1: 4 SC in MR (4) R2: SC around (4) R3: (1 SC, INC) × 2 (6) R4: SC around (6) R5: (2 SC, INC) × 2 (8)
FO and sew spikes evenly along the dragon’s spine and upper tail.
11. Decorative Flower-Shaped Tail Tip
Create five lavender petals with pink borders.
For each petal:
R1: CH 7. R2: SC in second CH, HDC, 2 DC, HDC, 3 SC in last CH. Work back along the opposite side with HDC, 2 DC, HDC, SC. R3: Using pink yarn, SC around the petal edge.
Make five petals and sew them together in a star-shaped arrangement. Attach firmly to the tail tip.
12. Final Assembly and Finishing
- Sew the head securely onto the body.
- Attach the muzzle and embroider nostrils.
- Sew the front and back legs into position.
- Attach the curved horns and head frills.
- Secure both wings to the upper back.
- Attach the tail and pink back spikes.
- Add the decorative flower at the end of the tail.
- Embroider delicate eyebrows and eyelashes.
- Add a little pink blush to the cheeks using yarn or fabric-safe blush.
- Shape the dragon gently and weave in all loose ends.
Safety note: For a toy intended for children under 3, replace plastic safety eyes with securely embroidered eyes and avoid detachable small parts.
Final Result
Your handmade lavender and pink baby dragon is complete! Featuring adorable glossy eyes, soft curved horns, delicate wings, chunky crochet texture, and a beautiful flower-shaped tail, this amigurumi dragon makes a charming handmade gift.
