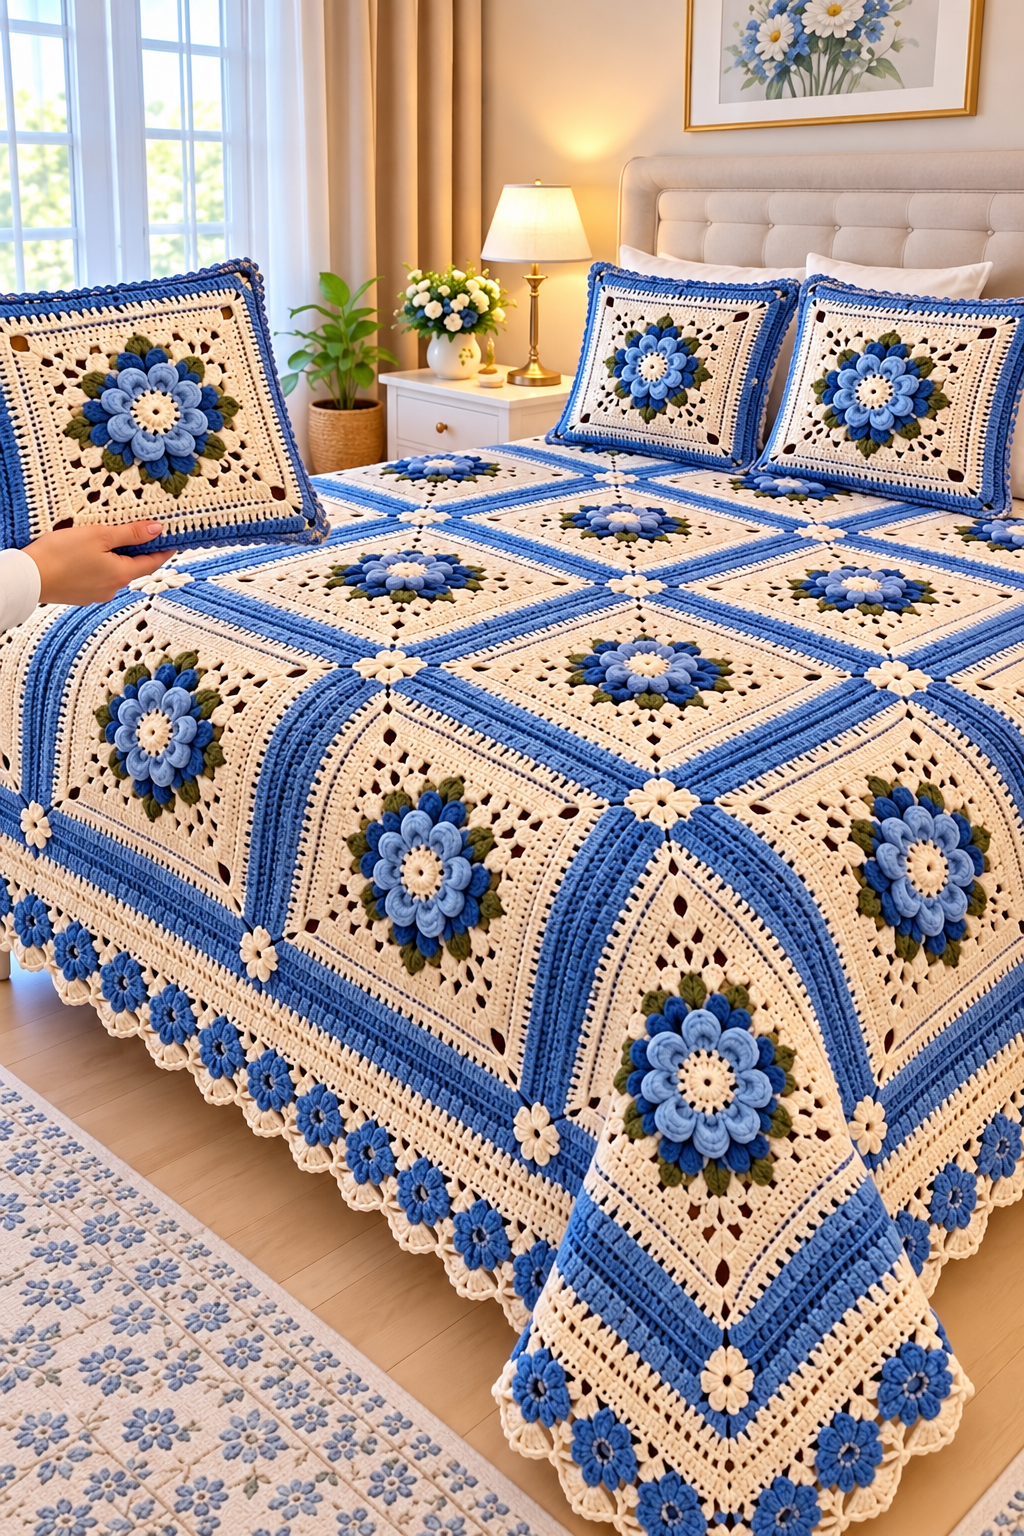

Skill Level: Intermediate to Advanced Finished Project: Queen-size crochet bedspread with matching pillow covers Technique: 3D puff-petal flowers, granny squares, lace stitches, raised borders, and decorative floral edging.
This beautiful handmade crochet bedspread features dimensional blue flowers, ivory lace squares, soft olive-green leaves, and elegant blue borders. The matching pillows complete the coordinated bedroom set.
This is a reconstructed pattern inspired by the photograph, not the original designer’s verified instructions. Stitch counts and dimensions may need adjustment to reproduce the appearance.
Materials Needed
- Worsted-weight cotton or cotton-blend yarn
- Ivory or cream yarn: approximately 3,500–4,500 yards
- Medium blue yarn: approximately 1,800–2,400 yards
- Light blue yarn: approximately 900–1,300 yards
- Dark blue yarn: approximately 500–700 yards
- Olive-green yarn: approximately 400–600 yards
- 4.0 mm or 4.5 mm crochet hook
- Yarn needle, scissors, stitch markers
- Two pillow inserts
Crochet Abbreviations (US Terms)
- MR – Magic Ring
- CH – Chain
- SL ST – Slip Stitch
- SC – Single Crochet
- HDC – Half Double Crochet
- DC – Double Crochet
- TR – Treble Crochet
- FPDC – Front Post Double Crochet
- BLO – Back Loop Only
- ST – Stitch
- SP – Space
- REP – Repeat
Part 1: Crochet the 3D Blue Flower
Round 1 – Flower Center
Using ivory yarn, make a magic ring.
CH 3 (counts as first DC), work 11 DC into the ring. Join with SL ST.
Total: 12 DC.
Round 2 – Inner Petals
Attach light blue yarn.
In each stitch, work (SC, HDC, 2 DC, HDC, SC) into the same stitch to form a small rounded petal. Repeat around.
Total: 12 petals.
Round 3 – Second Petal Layer
Working behind the petals, attach medium blue yarn to a back loop or back-post anchor.
CH 4, SC into the next anchor point. Repeat around to create 12 chain loops.
Work (SC, HDC, 3 DC, HDC, SC) into each loop.
Round 4 – Outer Petals
Using dark blue yarn, create another layer of 12 CH-5 loops behind the second petal layer.
Work (SC, HDC, 5 DC, HDC, SC) into each loop.
Fasten off and weave in ends.
Part 2: Add Green Leaves
Attach olive-green yarn behind the flower.
Round 5: Work (SC, CH 3, 3 DC, CH 3, SC) into evenly spaced back loops to form eight leaves.
Distribute the leaves symmetrically around the flower.
Round 6: Attach ivory yarn and create four corner spaces using CH-3 arches. Work SC and CH-3 or CH-4 spaces between the corners to establish a square foundation.
Make sure all four sides contain matching stitch counts.
Part 3: Create the Ivory Lace Granny Square
Round 7: Work 3 DC into each corner space, CH 2, then 3 DC into the same space. Along the sides, work groups of 3 DC separated by CH 1.
Round 8: Repeat the granny-square structure, increasing at each corner with (3 DC, CH 2, 3 DC).
Round 9: Create decorative lace openings by alternating 3 DC clusters with CH-2 spaces, maintaining the corner increases.
Round 10: Work DC stitches along the sides and (2 DC, CH 2, 2 DC) in each corner. Adjust stitch placement so all sides remain equal.
Part 4: Crochet the Blue Square Border
Round 11: Attach light blue yarn and work one round of SC, placing (SC, CH 2, SC) in each corner.
Round 12: Work DC stitches around the square, increasing at corners.
Round 13: Using medium blue, work FPDC and regular DC alternately to create a raised textured border.
Round 14: Work one final round of SC, keeping corners flat and symmetrical.
Each finished square should measure approximately 10–12 inches after blocking, depending on yarn and tension.
Part 5: Join the Granny Squares
For a queen-size bedspread, make approximately 48 squares arranged in 6 columns and 8 rows, assuming each blocked square measures about 11 inches.
Lay out the squares with every flower facing the same direction.
Using ivory yarn, join adjacent squares with slip stitches or a flat single-crochet join. For a decorative appearance similar to the photograph, add small ivory flower motifs at selected intersections.
Part 6: Crochet the Decorative Bedspread Border
Round 1: Join ivory yarn and work SC evenly around the entire blanket.
Round 2: Using medium blue, work DC around, with extra stitches at each corner to prevent curling.
Round 3: Work alternating FPDC and BPDC to create a raised ribbed effect.
Round 4: Switch to ivory yarn. Work (SC, CH 3, skip 2 ST) around to create lace openings.
Round 5: Make small blue flower motifs separately and attach them evenly along the outer edge.
Round 6: Finish with ivory scallops: work 5 DC into a suitable chain space, then SC into the next space. Repeat, adjusting the spacing to fit.
Part 7: Matching Crochet Pillow Covers
Make two matching pillow covers using the same floral granny-square design.
For each pillow:
- Crochet four matching flower squares for a 2 × 2 front panel.
- Join the squares with ivory yarn.
- Add blue edging around the front.
- Crochet a plain ivory back panel or create an overlapping envelope closure.
- Join three sides, insert the pillow, and close the remaining opening.
Finishing Instructions
Weave in all loose yarn ends securely. Gently wash according to the yarn manufacturer’s instructions and block the individual motifs or finished blanket to even out the squares.
Lay the bedspread over the mattress, allowing the floral edging to drape over the sides. Arrange the two matching pillows at the head of the bed.
Helpful Tips
For a fuller three-dimensional floral effect, use slightly loose tension when crocheting the petals. Keep the background lace relatively flat so the raised flowers stand out.
Before making all 48 squares, complete and block one sample square to confirm its measurements and check that the joins and borders lie flat.
Finished Result: An elegant blue-and-ivory floral crochet bedspread with dimensional flowers, textured borders, decorative lace edging, and coordinated pillow covers.
