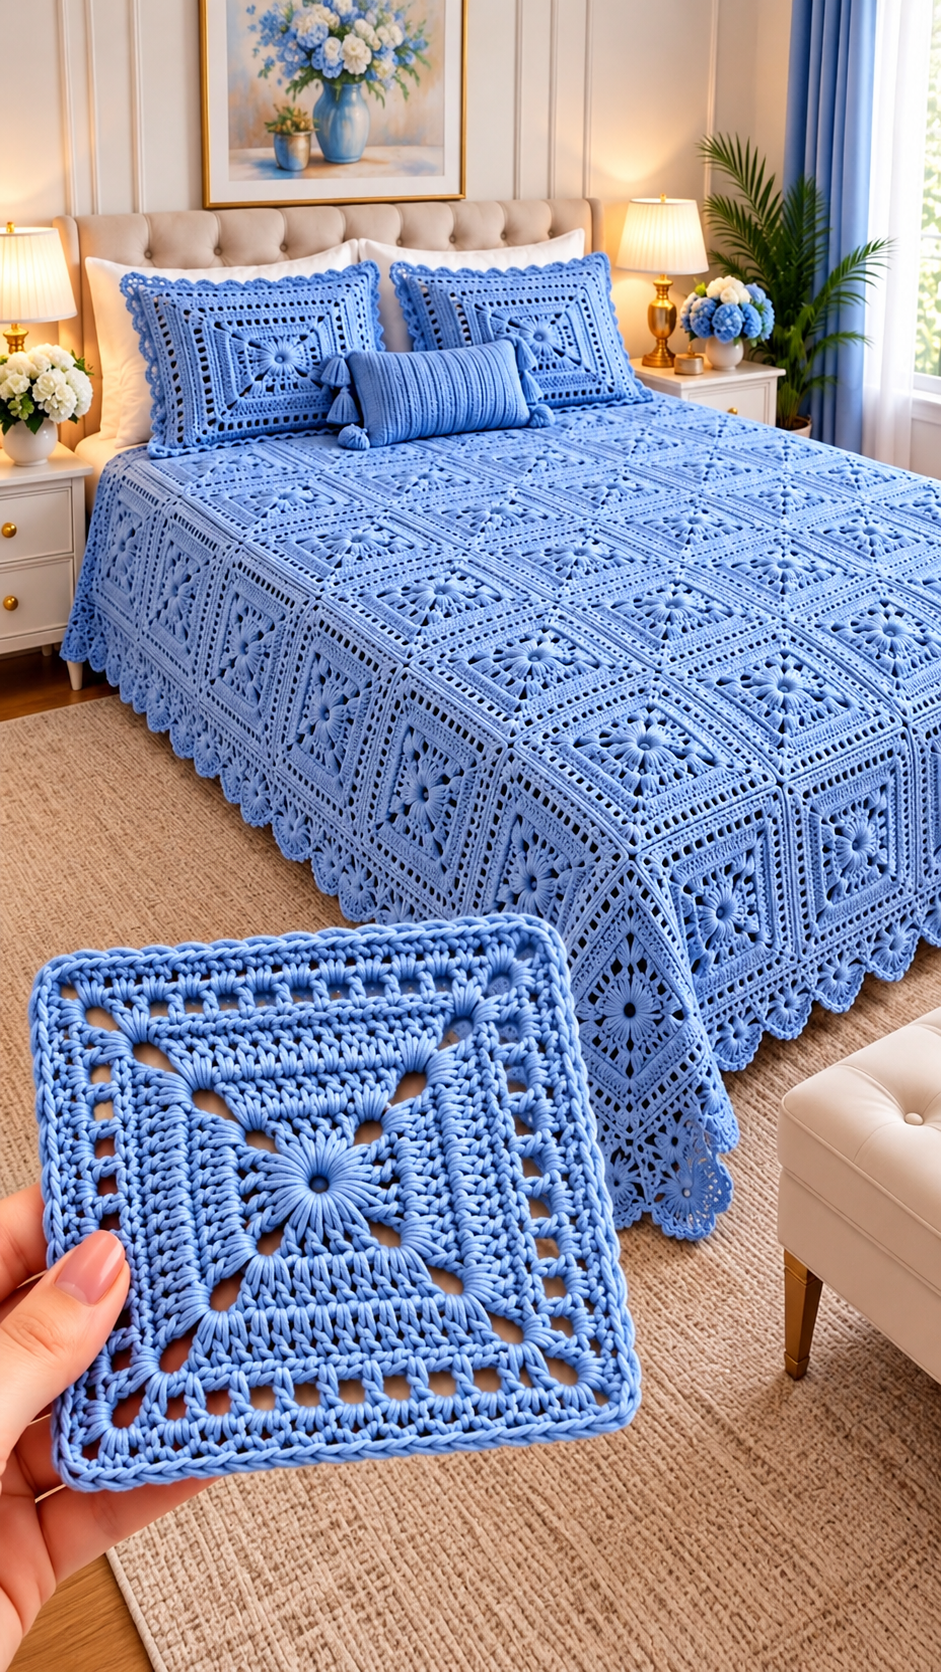

Skill Level: Intermediate Style: Elegant floral granny square with openwork lace Finished Project: Queen-size crochet bedspread with matching pillow covers Yarn Color: Soft Cornflower Blue (Baby Blue)
This beautiful crochet bedspread features raised floral granny squares, delicate openwork details, and a decorative scalloped border. Each square is crocheted separately and joined to create a luxurious handmade bed cover.
This is an inspired, workable pattern based on the photograph, not a verified reproduction of the exact stitches shown.
Materials
- 4,000–5,500 yards of DK cotton or cotton-blend yarn, depending on finished size and gauge
- 4.0 mm crochet hook (adjust for yarn)
- Yarn needle
- Stitch markers
- Scissors
- Measuring tape
- Two pillow inserts, approximately 20 × 20 inches
Crochet Abbreviations (US Terms)
| Abbreviation | Meaning |
| ch | Chain |
| sl st | Slip stitch |
| sc | Single crochet |
| dc | Double crochet |
| tr | Treble crochet |
| sp | Space |
| st | Stitch |
| rep | Repeat |
| puff | Puff stitch |
Part 1: Floral Granny Square Pattern
Target motif size: approximately 8 × 8 inches after blocking.
Round 1 – Magic Ring
Make a magic ring.
Ch 3 (counts as first dc). Work 15 dc into the ring.
Pull the ring tight and join with a sl st to the top of the beginning ch 3.
Total: 16 dc.
Round 2 – Flower Center
Ch 1. Work 1 sc into the same stitch.
Ch 2, skip the next stitch, and work 1 sc into the following stitch.
Repeat around, joining to the first sc.
You should have 8 chain-2 spaces.
Round 3 – Raised Flower Petals
Work into each ch-2 space:
- 1 sc
- 1 hdc
- 3 dc
- 1 hdc
- 1 sc
Repeat in all 8 spaces.
Join with a sl st.
You now have 8 rounded flower petals.
Round 4 – Petal Foundation
Sl st behind the first petal to reach a gap between petals.
Ch 4, then work 1 sc into the gap behind the next petal.
Repeat around, making 8 ch-4 arches.
Join.
Round 5 – Large Floral Petals
In each ch-4 arch, work:
1 sc, 1 hdc, 5 dc, 1 hdc, 1 sc.
Repeat around.
This creates a second layer of larger dimensional petals.
Round 6 – Transform the Flower Into a Square
Join yarn behind the petals.
Work four repeated sections:
Ch 5, sc into the next gap, ch 5, sc into the following gap, ch 7 for the corner, sc into the next gap.
Adjust the attachment points evenly around the eight-petal flower to form four corners.
Round 7 – Square Foundation
Work 3 dc into each side ch-5 space.
In each ch-7 corner space, work:
3 dc, ch 3, 3 dc.
Repeat on all four sides and join.
Round 8 – Decorative Openwork
Ch 3, work dc stitches across the sides, placing ch-1 spaces between selected dc groups for a lace effect.
In every corner, work:
2 dc, ch 3, 2 dc.
Keep the stitch spacing symmetrical on all four sides.
Round 9 – Solid Frame
Work 1 dc in each dc and each ch-1 space across the sides.
At each corner ch-3 space, work:
2 dc, ch 3, 2 dc.
Join.
Round 10 – Lace Border
Work repeating groups of 3 dc, ch 2, skip 2 stitches across each side. Adjust the last repeat to fit the stitch count evenly.
At each corner, work 3 dc, ch 3, 3 dc.
Join and fasten off.
Block the square gently to approximately 8 inches, or add evenly spaced dc rounds if a larger square is needed.
Part 2: Joining the Granny Squares
For a queen-size decorative coverlet, make approximately 120 squares, arranged in 10 columns × 12 rows.
At a blocked size of 8 inches each, the joined center measures approximately 80 × 96 inches before the border.
Lay the squares flat with all flowers facing upward. Join adjacent edges using slip stitches through the back loops, or mattress stitch for a flatter seam. Work across the rows first, then join the rows together.
Part 3: Scalloped Bedspread Border
Round 1
Work sc evenly around the entire blanket. Place 3 sc into each corner.
Round 2
Work dc around the blanket, increasing at the corners to keep the fabric flat.
Round 3
Repeat sc, skip 2 stitches, 5 dc into the next stitch, skip 2 stitches around the edge, adjusting the final repeats and corners for an even scalloped finish.
Fasten off and weave in all ends.
Part 4: Matching Crochet Pillow Covers
Make 4 additional floral granny squares, adding extra border rounds until each square measures approximately 20 × 20 inches.
Use two squares for each pillow, one for the front and one for the back, or make a simpler solid crochet back panel.
Join three sides with sc, insert the pillow form, then close the remaining edge with an invisible seam or removable button closure.
For the decorative rectangular lumbar pillow shown in the image, crochet two ribbed rectangular panels, seam them around an insert, and add tassels to each corner.
Finishing
Lightly wet-block the completed bedspread, taking care to lay the raised flowers face-up. Shape the corners and scalloped edges while damp, then let everything dry completely.
The result is an elegant blue floral crochet bedspread with coordinated pillows, suitable for a romantic, cottage-style, or vintage-inspired bedroom.
Pattern note: The photograph appears to contain more intricate floral and mesh detailing than this simplified construction. Swatch and verify the individual motif before committing yarn to the full bedspread.
