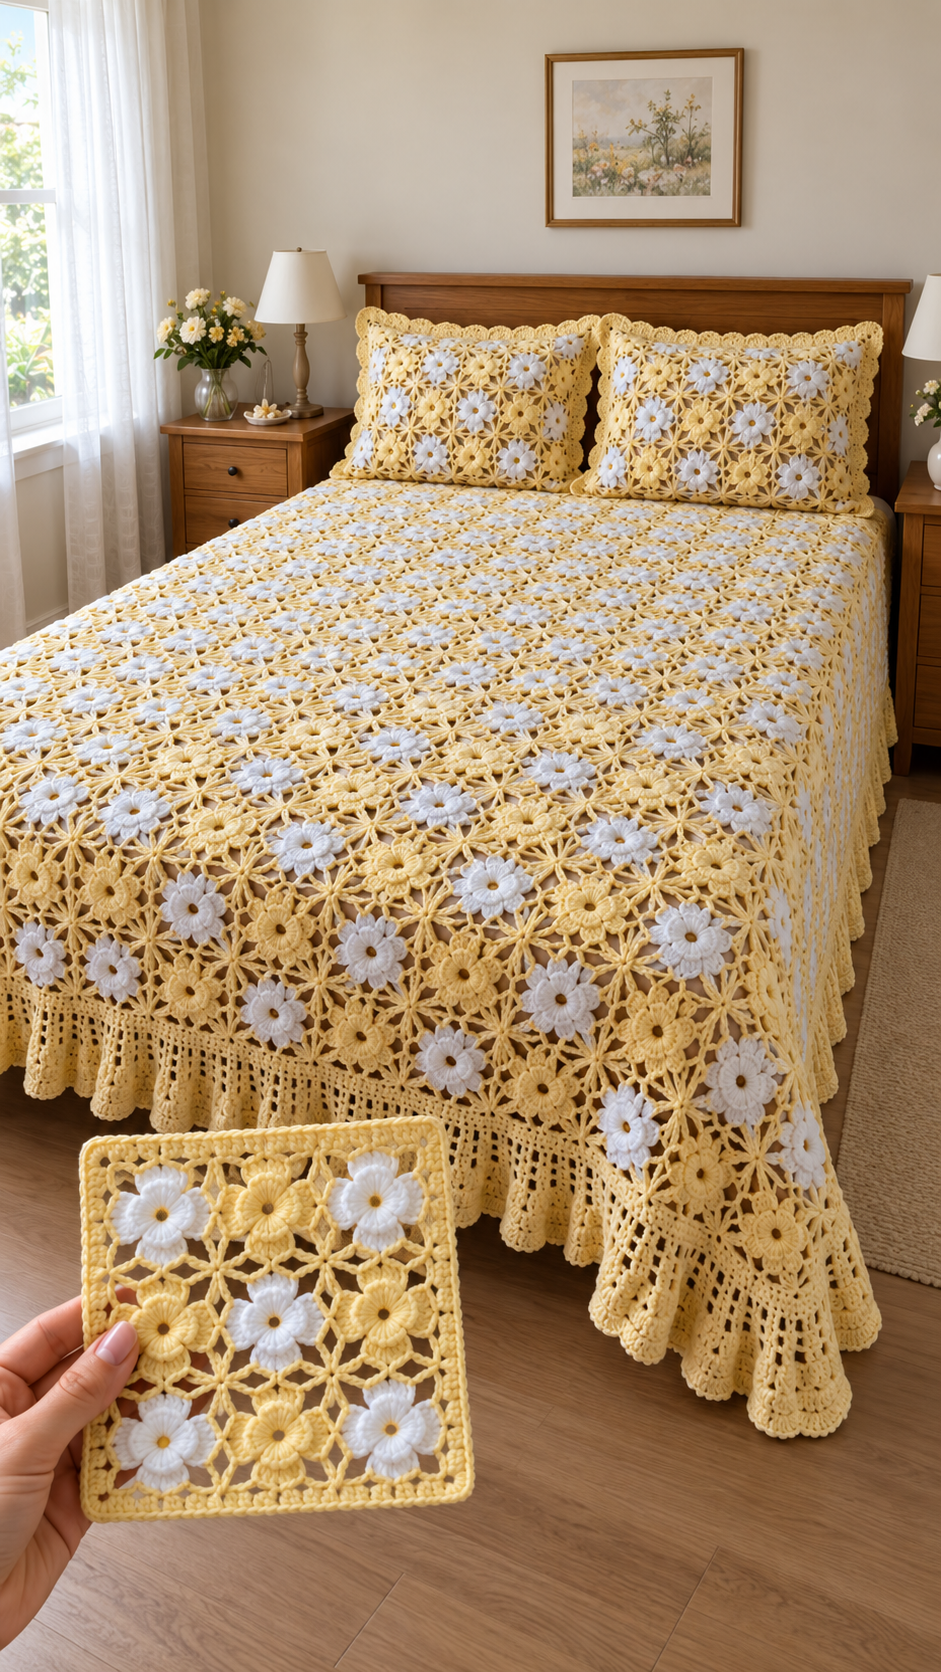

An original, untested pattern inspired by your photo. It recreates the alternating white and yellow flowers, airy yellow connections, and scalloped edging; the exact stitches in the image cannot be confirmed from the photograph.
US crochet terminology.
Materials
- Sport-weight cotton yarn in butter yellow and white
- 3–3.5 mm crochet hook
- Yarn needle and scissors
- Blocking mat and pins
- Two fabric pillow covers for backing
For a large bedspread, provisionally allow 2–3 kg of yarn, approximately 70% yellow and 30% white. Make and weigh a sample before purchasing the full amount.
Abbreviations
ch: chain
sl st: slip stitch
sc: single crochet
hdc: half double crochet
dc: double crochet
tr: treble crochet
sp: space
st: stitch
Size and Planning
Make one flower square and block it before deciding your layout.
For example, if each square measures 10 cm:
- 20 squares across × 22 squares long gives a 200 × 220 cm body.
- The border adds approximately 8–12 cm on each side.
- A 4 × 4 square panel measures about 40 × 40 cm for a pillow front.
Adjust the number of squares to suit your bed and pillow covers.
- Daisy Flower Square
Make two versions:
White daisy: yellow center, white petals, yellow outer mesh.
Yellow daisy: yellow throughout.
Flower center
With yellow, make a magic ring.
Round 1: Ch 1, work 8 sc into the ring. Join with sl st to the first sc. Tighten the ring. (8 sc)
Round 2: Ch 1, work 2 sc in each stitch. Join. (16 sc)
Petals
Round 3: Attach the petal color to the front loop of any stitch.
Repeat the following 8 times:
- Sl st into the front loop of the next available stitch.
- Ch 2.
- Work 3 dc into that same front loop.
- Ch 2.
- Sl st into the front loop of the following stitch.
Each petal uses two stitches from Round 2. After eight petals, join to the first sl st and fasten off.
Leave the back loops of Round 2 unused for the next round.
Mesh foundation behind the flower
Round 4: With the right side facing, fold the petals forward to reach the unused back loops.
Attach yellow to the back loop of the first stitch of any petal pair. Ch 1, sc into that loop.
Ch 5, skip the next unused back loop, sc into the following unused back loop.
Continue around, placing one sc in every other unused back loop, with ch 5 between them. After the eighth ch-5 loop, join to the first sc.
You now have 8 chain spaces behind the petals.
Turn the flower face up and gently arrange the petals over this foundation.
Square the motif
Round 5: Sl st into the first ch-5 space. Ch 1.
Repeat this sequence four times:
- In the next ch-5 space, work [2 sc, ch 3, 2 sc] to form a corner.
- Ch 3.
- In the following ch-5 space, work 3 sc.
- Ch 3.
For the first repeat, begin in the space where you have already positioned the hook. Join to the first sc.
You should have four corners and one group of 3 sc at the middle of each side.
Outer mesh round
Round 6: Sl st to the first corner space. Ch 1.
Repeat around all four sides:
- Work [sc, ch 3, sc] in the corner space.
- Ch 4, sc in the next ch-3 side space.
- Ch 4, sc in the middle stitch of the central 3-sc group.
- Ch 4, sc in the next ch-3 side space.
- Ch 4.
Join to the first sc and fasten off.
Each side now has four ch-4 spaces between the corners.
Block the square gently so its sides are straight and the flower sits neatly in the center.
- Make the Bedspread Motifs
For the example 20 × 22 layout, make 440 squares:
- 220 with white petals
- 220 with yellow petals
Alternate the two colors like a checkerboard.
Make a small 3 × 3 sample first to check the appearance, joining method, and drape before completing the full bedspread.
- Join the Squares
Lay two squares beside each other, right sides facing up.
Using yellow yarn and a yarn needle:
- Sew corresponding corner spaces together.
- Whipstitch the matching ch-4 spaces along the adjoining edges, using two loose stitches through each pair of spaces.
- Sew the final corner spaces together.
Keep the joins relaxed so the lace does not pucker.
Join the squares into rows, then join the rows together. Secure the yarn carefully where four corners meet.
- Yellow Lace Border
Foundation round
Attach yellow at an outer corner.
Work:
- 4 sc into each ch-4 space
- 1 sc into each anchoring sc
- [sc, ch 2, sc] in each of the four outer corner spaces
At motif joins, distribute stitches evenly across the small gap. The edge should lie flat without gathering or waving.
Join to the first sc.
Mesh round
Ch 4; this counts as dc and ch 1.
Repeat [skip 1 stitch, dc in next stitch, ch 1] around.
At each corner ch-2 space, work [dc, ch 2, dc], then ch 1 and continue along the next side.
Adjust the final skip before a corner when necessary. Join to the third chain of the beginning ch 4.
Additional mesh rounds
Work 4–6 more rounds:
- Dc into each dc, with ch 1 between.
- At every corner, work [dc, ch 2, dc] in the corner space.
This creates a lightweight lace drop around the bedspread.
Scalloped finish
Work around the final mesh edge:
- Sc into a ch-1 space.
- Work 5 dc into the next ch-1 space.
- Repeat, alternating sc and 5-dc shells.
At each corner, work 7 dc into the corner space. Adjust the neighboring shell sequence so the edge stays smooth.
Fasten off and weave in the ends.
- Matching Pillow Covers
For each approximately 40 cm pillow front, join 16 squares in a 4 × 4 checkerboard arrangement, assuming each blocked motif measures 10 cm.
Work the border foundation round around the panel, followed by a scalloped edge:
[Sc in next stitch, skip 2 stitches, 5 dc in next stitch, skip 2 stitches] around.
Adjust near corners and place 7 dc at each corner if needed.
Hand-sew the panel onto the front of a matching fabric pillow cover. Keep the scallops free and avoid sewing through the back of the cover or its opening. The fabric backing supports the open lace and hides the pillow insert.
- Finishing
Weave in every yarn tail securely. Wash gently according to the yarn label, then lay flat and shape the squares, mesh, and scallops while damp.
Let the bedspread dry completely before placing it on the bed. Fluff the flower petals gently by hand to emphasize their raised texture.
