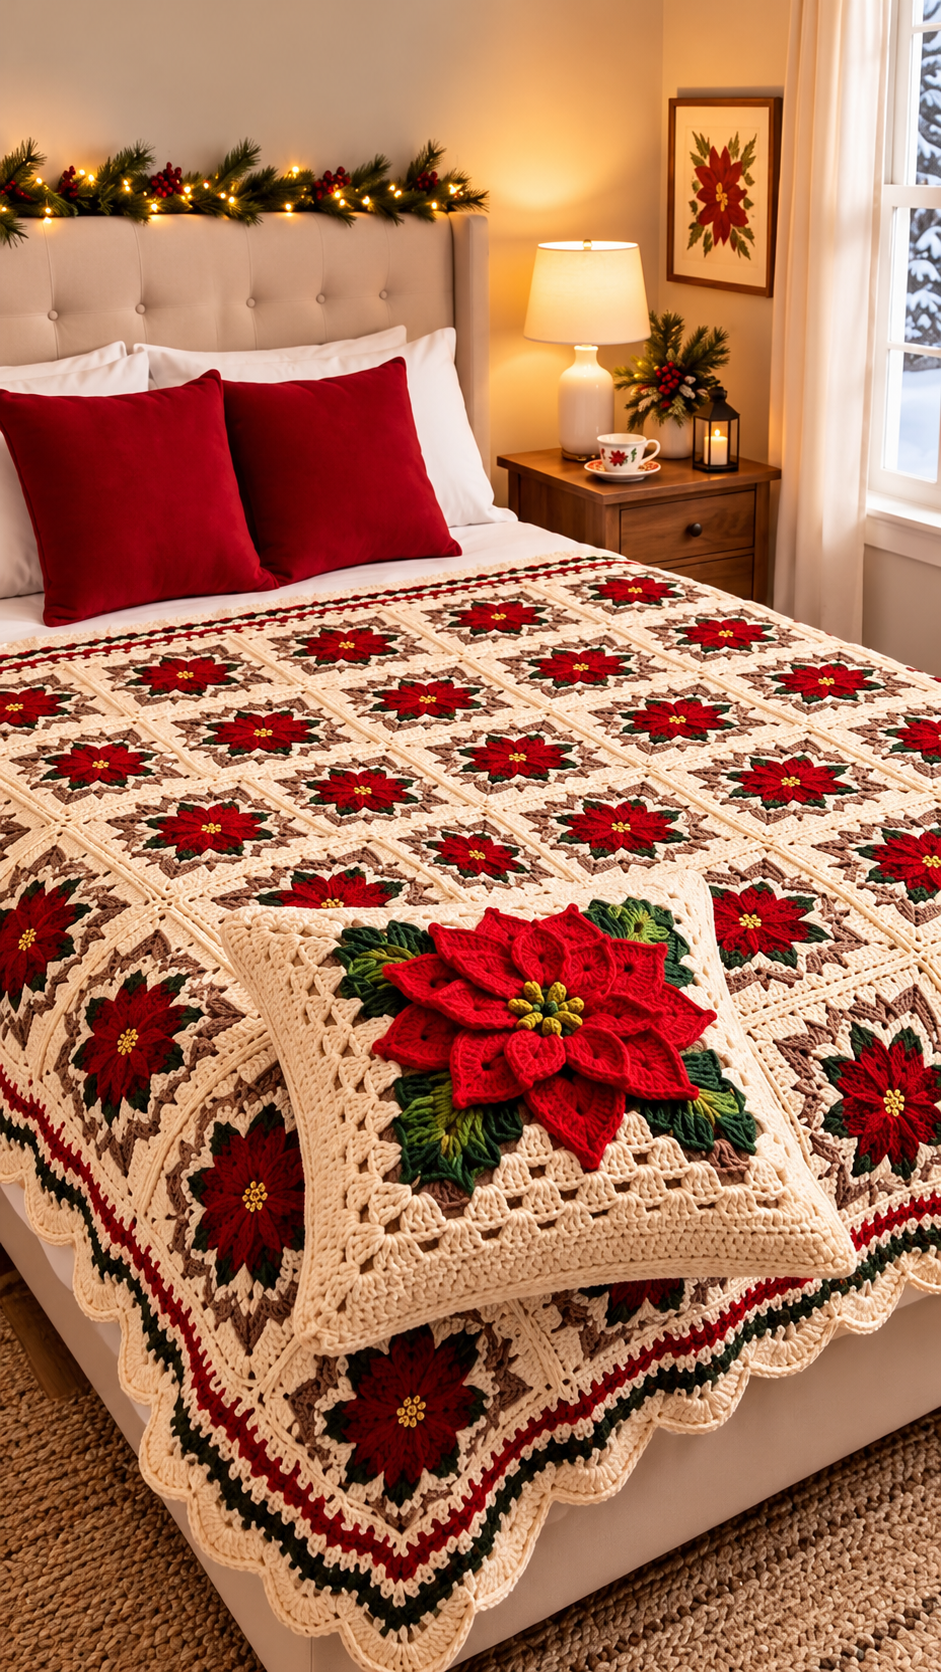

Create a beautiful handmade Christmas bedspread featuring red poinsettia flowers, deep green leaves, elegant ivory granny squares, and a matching decorative pillow with a stunning 3D poinsettia.
Skill Level: Intermediate to Advanced Terminology: US Crochet Terms Finished Blanket Size: Approximately 90 × 100 inches (229 × 254 cm) Pillow Size: Approximately 18 × 18 inches (46 × 46 cm)
This is an original, photo-inspired pattern designed to recreate the look of the reference. The exact original stitch instructions are not available.
1. Materials Needed
Yarn – Worsted Weight (Category 4)
- Ivory or Cream: 3,000–3,500 yards
- Christmas Red: 1,000–1,200 yards
- Forest Green: 700–900 yards
- Dark Brown or Taupe: 400–500 yards
- Golden Yellow: 100 yards
Additional Supplies
- 5.0 mm (H/8) crochet hook
- 4.0 mm crochet hook for flower details
- Yarn needle
- Stitch markers
- Scissors
- Measuring tape
- 18-inch pillow insert
2. Crochet Abbreviations
| Abbreviation | Meaning |
| ch | Chain |
| sl st | Slip Stitch |
| sc | Single Crochet |
| hdc | Half Double Crochet |
| dc | Double Crochet |
| tr | Treble Crochet |
| st | Stitch |
| sp | Space |
| BLO | Back Loop Only |
| rep | Repeat |
| FO | Fasten Off |
3. Christmas Poinsettia Granny Square
Each square features a red poinsettia surrounded by green leaves, a brown decorative outline, and an ivory lace-style square frame.
Target square size: Approximately 10 × 10 inches after blocking.
Round 1 – Yellow Flower Center
Using golden yellow yarn:
- Make a magic ring.
- Ch 2 (does not count as a stitch).
- Work 12 hdc into the ring.
- Pull the ring tightly closed.
- Join with a sl st to the first hdc.
- FO.
You should have 12 stitches.
Round 2 – Red Poinsettia Petal Foundation
Join red yarn to any stitch.
- Ch 1, sc into the same stitch.
- Ch 5, skip 1 stitch, sc into the next stitch.
- Repeat the ch-5 loop sequence around.
- Join with a sl st.
You should have six petal loops.
Round 3 – First Layer of Red Petals
Work into each ch-5 loop:
- Sc.
- Hdc.
- 3 dc.
- Tr.
- Ch 2.
- Tr.
- 3 dc.
- Hdc.
- Sc.
Repeat for all six loops.
This creates six pointed poinsettia petals.
Round 4 – Second Layer of Petals
Working behind the first layer:
- Join red yarn around the base of a petal.
- Ch 7.
- Sl st around the base of the next petal.
- Repeat around to create six larger loops.
Into each ch-7 loop, work:
- 1 sc
- 2 hdc
- 4 dc
- 2 tr
- Ch 2
- 2 tr
- 4 dc
- 2 hdc
- 1 sc
Repeat around and FO.
The flower now has two dimensional layers of red petals.
4. Crochet Green Poinsettia Leaves
Using forest green yarn:
Create eight individual leaves.
Leaf Instructions
- Ch 13.
- Sc into the second chain from the hook.
- Hdc into the next 2 chains.
- Dc into the next 3 chains.
- Tr into the next 3 chains.
- Dc into the next chain.
- Hdc into the next chain.
- Work 3 sc into the final chain.
Continue along the opposite side of the foundation chain, mirroring the stitches.
Sl st to finish.
For a pointed tip, work (sc, ch 2, sc) at the far end instead of a rounded turn if desired.
Sew or crochet the leaves behind the poinsettia, spacing them evenly.
5. Creating the Granny Square Base
The flower is attached to a flat square base so that the motifs can be joined into a blanket.
Round 1 – Brown Foundation
Using dark brown yarn:
- Make a magic ring.
- Ch 3 (counts as first dc).
- Work 2 dc, ch 2.
- Work (3 dc, ch 2) three more times.
- Join to the top of the beginning ch-3.
You now have four corners.
Round 2 – Expanding the Square
- Sl st into the first corner.
- Ch 3, 2 dc, ch 2, 3 dc into the same corner.
- Work 3 dc into each side space.
- In every corner, work (3 dc, ch 2, 3 dc).
- Join.
Rounds 3–5 – Brown and Green Details
Continue using the traditional granny-square construction.
- Work 3 dc into each side space.
- Work (3 dc, ch 2, 3 dc) into each corner.
- Change to forest green for Round 4.
- Return to brown for Round 5.
Rounds 6–9 – Ivory Lace Border
Change to ivory yarn.
Round 6: Work a standard granny-square round.
Round 7: In each side space, work (2 dc, ch 1, 2 dc) to create a decorative openwork texture. Keep the usual corner groups.
Round 8: Work 3 dc into each ch-1 space, with (3 dc, ch 2, 3 dc) at every corner.
Round 9: Work sc around the entire square, placing (sc, ch 2, sc) in each corner.
Continue adding ivory rounds if needed until the square measures approximately 10 inches.
Block the finished square to ensure straight edges.
Assembly: Position one finished poinsettia in the center of each square and sew the flower and leaves securely to the base. Keep the petals slightly raised to preserve their 3D appearance.
6. Making the Complete Christmas Blanket
For a blanket measuring approximately 90 × 100 inches, make:
- 90 poinsettia granny squares
- Arrange them in 9 columns × 10 rows
Each square should measure approximately 10 inches before joining.
Joining the Squares
Using ivory yarn:
- Place two squares right sides together.
- Insert the hook through corresponding edge stitches.
- Join with sc stitches along the entire edge.
- Repeat to connect nine squares into a row.
- Make ten rows.
- Join the rows using the same technique.
Alternatively, use a mattress stitch for flatter, less visible seams.
Keep all poinsettia flowers facing the same direction.
7. Decorative Christmas Blanket Border
The border combines ivory, green, red, and brown stripes with a scalloped finishing edge.
Round 1 – Ivory Foundation
Join ivory yarn to any corner.
Work sc evenly around the blanket.
At each corner, work 3 sc.
Round 2 – Forest Green
Join forest green yarn.
Work dc in every stitch, placing 3 dc into each corner stitch.
Round 3 – Christmas Red
Join red yarn.
Work one round of hdc, increasing at the corners to keep the border flat.
Round 4 – Ivory
Join ivory yarn.
Work dc around, using appropriate corner increases.
Round 5 – Dark Brown Accent
Work a narrow sc border using dark brown yarn.
Round 6 – Ivory Scalloped Edge
Join ivory yarn.
- Skip 2 stitches.
- Work 6 dc into the next stitch.
- Skip 2 stitches.
- Sl st into the next stitch.
- Repeat around the blanket.
Adjust the stitch spacing near corners so that each scallop lies flat.
FO and weave in all ends.
8. Matching 3D Poinsettia Crochet Pillow
The pillow features a large layered poinsettia with green leaves on a textured ivory crochet background.
Pillow Front
Using ivory yarn:
- Ch 65.
- Dc into the fourth chain from the hook.
- Dc across.
- Ch 3 and turn.
- Continue working dc rows until the panel measures 18 × 18 inches.
Adjust the foundation chain and row count to match your gauge.
For a more decorative surface, alternate solid dc rows with openwork rows made from (dc, ch 1, skip 1).
Pillow Back
Make a second ivory panel measuring 18 × 18 inches.
For a removable cover, create two overlapping back panels instead.
9. Large 3D Poinsettia for the Pillow
Use Christmas red yarn and a 4.0 mm crochet hook.
Flower Center
- Make a magic ring.
- Work 12 sc into the ring.
- Join with a sl st.
Inner Petal Layer
Create six ch-6 loops around the center.
Into each loop, work:
- 1 sc
- 2 hdc
- 3 dc
- 1 tr
- Ch 2
- 1 tr
- 3 dc
- 2 hdc
- 1 sc
Middle Petal Layer
Working behind the first layer, create six ch-9 loops.
Into each loop, work:
- 1 sc
- 2 hdc
- 5 dc
- 2 tr
- Ch 2
- 2 tr
- 5 dc
- 2 hdc
- 1 sc
Outer Petal Layer
Create six ch-12 loops behind the middle layer.
Into each loop, work:
- 1 sc
- 3 hdc
- 6 dc
- 3 tr
- Ch 2
- 3 tr
- 6 dc
- 3 hdc
- 1 sc
The flower should now have 18 raised petals arranged in three layers.
Yellow Flower Center
Using golden yellow yarn, make six small bobble stitches.
Attach them in a tight cluster at the center of the flower.
Green Leaves
Make eight to ten large green leaves using the leaf pattern from Section 4, adding extra foundation chains to increase their length.
Arrange the leaves beneath the red flower.
Sew the flower securely onto the pillow front.
10. Pillow Assembly
- Place the front and back panels together with right sides facing.
- Join three sides using sc stitches or a yarn needle.
- Turn the pillow cover right side out.
- Insert the 18-inch pillow form.
- Close the final edge using an invisible seam.
Optional: Add an ivory scalloped border around the pillow edges to match the blanket.
11. Finishing and Blocking
- Weave in all loose yarn ends securely.
- Gently block each granny square before final assembly.
- Steam-block carefully without flattening the raised poinsettia petals.
- Shape the scalloped blanket border by hand.
- Check that every attached flower and leaf is firmly secured.
- Lay the blanket flat and allow it to dry completely.
12. Helpful Tips for a Professional Finish
Consistent tension: Use the same hook size and yarn weight for every granny square to maintain even dimensions.
Dimensional petals: Avoid sewing down the full length of each poinsettia petal. Secure the base while allowing the tips to remain raised.
Color balance: Keep the ivory background dominant so the red flowers and green leaves stand out.
Blanket durability: Use reinforced joins between squares, especially for a large bedspread.
Care: Hand-wash or machine-wash on a gentle cycle if your yarn permits. Dry flat to preserve the raised floral details.
Final Result
The completed project is a luxurious Christmas-inspired crochet bedspread featuring repeating red poinsettia granny squares, delicate ivory openwork, deep green botanical accents, a decorative scalloped border, and a matching 3D poinsettia pillow.
