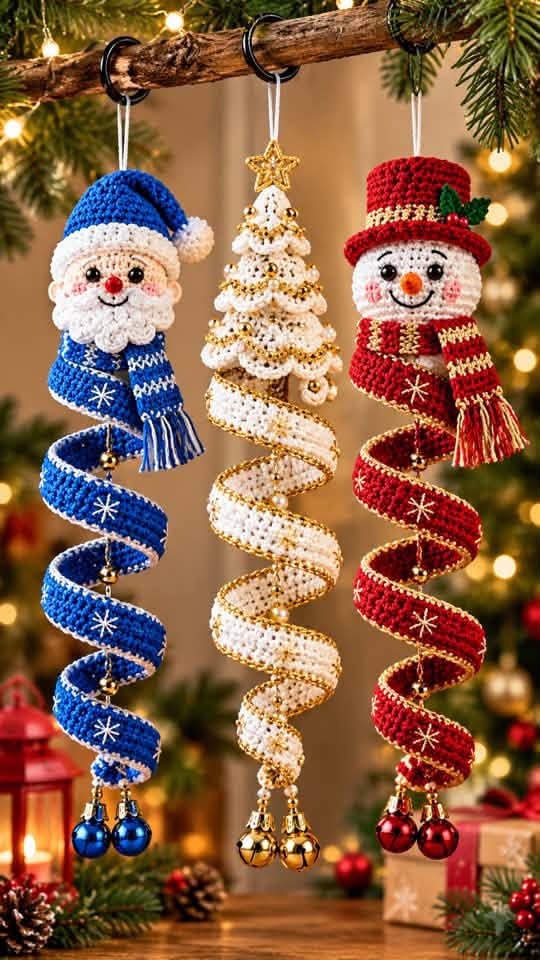

Make the blue Santa, white-and-gold Christmas tree, and red snowman shown in the photo.
This is an original, untested pattern inspired by the image, rather than the exact designer’s pattern. The wide, open spirals are shaped with craft wire.
Materials
- Sport-weight cotton yarn: blue, red, white, cream, green, and brown
- Gold crochet thread for edging and embroidery
- 2.5–3 mm crochet hook
- Polyester stuffing
- Yarn needle and stitch markers
- Black embroidery thread for eyes and mouths
- Thin, flexible craft wire with covered ends
- Hanging cord, small bells, and optional beads
- Optional gold star charm
Finished size: approximately 30–40 cm long, depending on yarn and spiral shaping.
US crochet terms
- ch: chain
- sl st: slip stitch
- sc: single crochet
- hdc: half double crochet
- dc: double crochet
- inc: 2 sc in one stitch
- dec: single crochet 2 stitches together
- BLO: back loop only
- FLO: front loop only
- MR: magic ring
Work rounds in a continuous spiral unless directed otherwise. Turning chains do not count as stitches.
1. Spiral ribbon — make one for each ornament
Use blue for Santa, white for the tree, and red for the snowman.
Ch 101.
Row 1: Sc in second chain from hook and each chain across. Turn. 100 sts
Row 2: Ch 2, dc in each stitch across. Turn. 100 sts
Row 3: Ch 1, sc in each stitch across. Fasten off. 100 sts
For a wider ribbon, add another dc row before Row 3.
Edging and shaping
- Join white yarn to the blue ribbon, or gold thread to the red and white ribbons.
- Work sc evenly around the entire ribbon, placing 3 sc in each corner.
- Along one long edge, crochet over thin craft wire to enclose it. Leave both wire ends slightly short of the ribbon ends.
- Fold the wire ends back into small loops and cover them completely with tightly sewn yarn.
- Wrap the ribbon around a cardboard tube approximately 5–6 cm wide. Arrange it into 4–5 descending turns.
- Remove the tube and gently stretch the spiral until you have open spaces between the turns.
The wire should support the shape without showing through the crochet.
Embroider small white or gold snowflakes on the outward-facing surface: make a cross, add a diagonal cross, then add short branches if desired.
2. Santa and snowman heads — make two
Use cream for Santa and white for the snowman.
Round 1: 6 sc in MR. 6
Round 2: Inc around. 12
Round 3: (Sc, inc) × 6. 18
Round 4: (2 sc, inc) × 6. 24
Round 5: (3 sc, inc) × 6. 30
Rounds 6–10: Sc around. 30
Round 11: (3 sc, dec) × 6. 24
Round 12: (2 sc, dec) × 6. 18
Stuff firmly.
Round 13: (Sc, dec) × 6. 12
Round 14: Dec × 6. 6
Fasten off, thread through the remaining stitches, and pull closed.
Embroider eyes between Rounds 7–8, approximately 5 stitches apart. Add a curved smile and small pink cheek stitches.
3. Blue Santa hat
With blue:
Round 1: 4 sc in MR. 4
Round 2: Sc around. 4
Round 3: Inc around. 8
Round 4: Sc around. 8
Round 5: (Sc, inc) × 4. 12
Round 6: (2 sc, inc) × 4. 16
Round 7: (3 sc, inc) × 4. 20
Round 8: (4 sc, inc) × 4. 24
Round 9: (5 sc, inc) × 4. 28
Round 10: (6 sc, inc) × 4. 32
Rounds 11–12: Sc around. 32
Change to white.
Rounds 13–15: Sc around. 32
Fasten off, leaving a sewing tail. Fit the hat over the head and sew in place. Bend the tip sideways.
For the pompom, work 6 sc in MR, increase to 12, work one round even, lightly stuff, then decrease to 6 and close. Sew to the hat tip.
Santa’s beard
With white, ch 12.
Row 1: Sc in second chain from hook and across. Turn. 11
Row 2: Ch 1, dec, 7 sc, dec. Turn. 9
Row 3: Ch 1, dec, 5 sc, dec. Turn. 7
Row 4: Ch 1, dec, 3 sc, dec. Turn. 5
Ch 1 and sc evenly around the sides and bottom, keeping the top edge flat. Along this edging, repeat (sl st in next stitch, 3 hdc in next stitch) to create a scalloped outline. Adjust the final repeat to fit.
Sew the straight upper edge below the nose and tack the sides to the cheeks.
For a moustache, make two pieces: ch 4, sl st in second chain, hdc in next, sc in last. Sew beneath the nose, with the pointed ends facing outward.
Make a small red nose using several satin stitches.
4. Snowman’s red top hat
With red:
Round 1: 6 sc in MR. 6
Round 2: Inc around. 12
Round 3: (Sc, inc) × 6. 18
Round 4: (2 sc, inc) × 6. 24
Round 5: BLO sc around. 24
Rounds 6–10: Sc around. 24
Work Round 9 in gold or cream for the hatband, then return to red.
Round 11: FLO (sc, inc) × 12. 36
Round 12: (5 sc, inc) × 6. 42
Sl st to finish. Leave a sewing tail. Lightly stuff the crown and sew the base of the crown to the head, leaving the brim free.
Holly leaves — make two
With green, ch 6.
Sc in second chain, hdc in next, dc in next, hdc in next, 3 sc in last chain. Working along the other side: hdc, dc, hdc, sc. Sl st to first sc.
Sew to the hatband and add small red embroidered berries.
Carrot nose
With orange:
Round 1: 4 sc in MR. 4
Round 2: Sc around. 4
Round 3: (Sc, inc) × 2. 6
Fasten off and sew the open end to the face.
5. Scarves — make two
Use blue with white stripes for Santa, and red with gold or cream stripes for the snowman.
Ch 46.
Row 1: Sc in second chain and across. Turn. 45
Rows 2–4: Ch 1, sc across. Turn. 45
Change colors for Row 2 or embroider short stripes afterward. Add yarn fringe to the short ends.
Wrap around the bottom of each head and secure with a few stitches.
6. White Christmas tree
Make a lightly stuffed cone from the tip downward.
With white:
Round 1: 4 sc in MR. 4
Round 2: BLO sc around. 4
Round 3: BLO inc around. 8
Round 4: BLO sc around. 8
Round 5: BLO (sc, inc) × 4. 12
Round 6: BLO sc around. 12
Round 7: BLO (2 sc, inc) × 4. 16
Round 8: BLO sc around. 16
Round 9: BLO (3 sc, inc) × 4. 20
Round 10: BLO sc around. 20
Round 11: BLO (4 sc, inc) × 4. 24
Round 12: BLO sc around. 24
Round 13: BLO (5 sc, inc) × 4. 28
Round 14: BLO sc around. 28
Fasten off.
Tree branches
Hold the cone with its tip upward. Join white yarn to the unused front loops of Round 4.
Repeat (sc in next loop, 3 dc in next loop) around. Join with sl st and fasten off.
Repeat on the unused front loops of Rounds 6, 8, 10, 12, and 14.
Edge each branch tier with gold sl sts, keeping the tension loose enough that the scallops lie flat.
Tree base
With white:
Round 1: 7 sc in MR. 7
Round 2: Inc around. 14
Round 3: (Sc, inc) × 7. 21
Round 4: (2 sc, inc) × 7. 28
Lightly stuff the cone and sew the base to its lower opening.
For a small trunk, work 6 sc in MR with brown, then two rounds of 6 sc. Sew beneath the base.
Add a gold star charm at the tip and sew small beads securely to the branches.
7. Assemble the ornaments
- Sew the top 2–3 cm of each spiral ribbon securely beneath its matching head or tree.
- Attach a hanging loop to the top, anchoring it through several stitches.
- Hang the ornament and adjust the spiral turns until balanced.
- Sew two or three lightweight bells to the bottom.
- For the photo’s central detail, suspend a fine gold cord through the open center of the spiral and attach a few small beads along it.
These are hanging decorations. Keep exposed wire, bells, and small beads away from young children and pets.