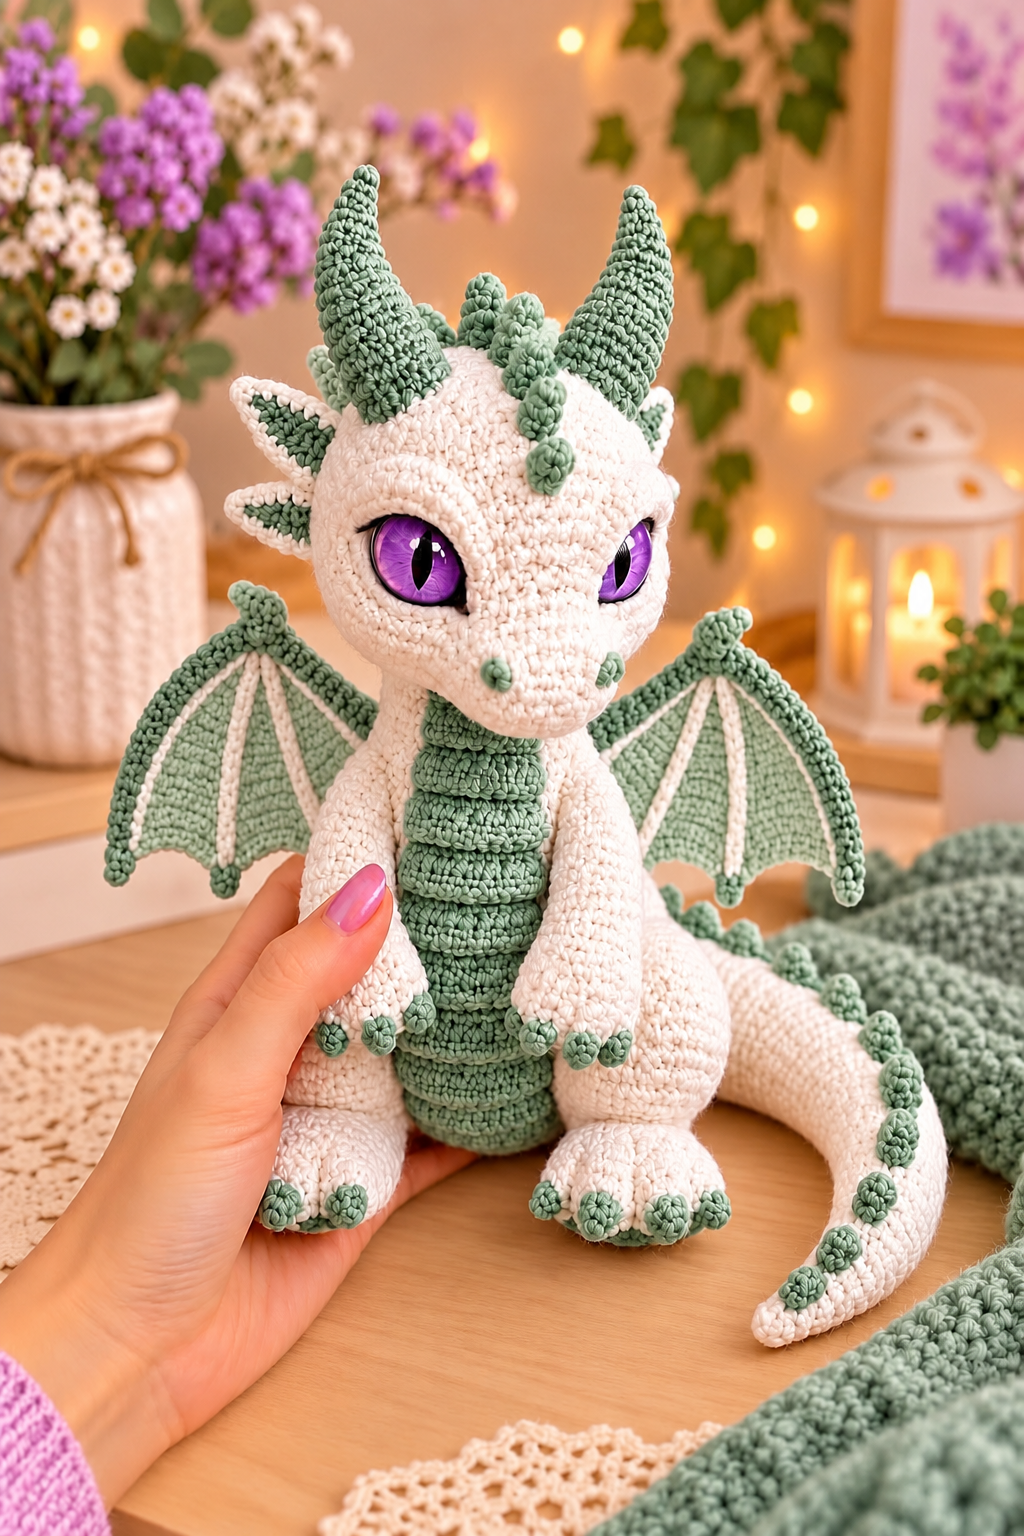

Adorable White & Sage Green Dragon with Wings, Horns and Curled Tail
Create an adorable baby dragon featuring a soft white body, sage green horns, delicate wings, a textured belly, purple eyes, and a long curled tail. This handmade dragon makes a beautiful gift, nursery decoration, or collectible crochet plushie.
This is an original, image-inspired pattern, not the exact pattern used to create the pictured dragon.
Materials
- White cotton or acrylic yarn (worsted weight)
- Sage green yarn for horns, wings, belly, and spikes
- Small amount of dark green yarn for details
- 3.0–3.5 mm crochet hook
- 18–22 mm purple dragon safety eyes
- Polyester fiberfill stuffing
- Yarn needle, scissors, and stitch markers
- Optional: craft wire for posing the tail (display pieces only)
Skill Level: Intermediate
Finished Size: Approximately 28–35 cm (11–14 inches), depending on yarn and tension.
Crochet Abbreviations (US Terms)
| Abbreviation | Meaning |
| MR | Magic ring |
| sc | Single crochet |
| inc | Increase (2 sc in one stitch) |
| dec | Invisible decrease |
| ch | Chain |
| sl st | Slip stitch |
| hdc | Half double crochet |
| dc | Double crochet |
| BLO | Back loop only |
| FO | Fasten off |
All pieces are worked in continuous rounds unless otherwise stated.
Part 1: Dragon Head
Using white yarn:
R1: 6 sc in MR (6)
R2: Inc × 6 (12)
R3: (1 sc, inc) × 6 (18)
R4: (2 sc, inc) × 6 (24)
R5: (3 sc, inc) × 6 (30)
R6: (4 sc, inc) × 6 (36)
R7: (5 sc, inc) × 6 (42)
R8: (6 sc, inc) × 6 (48)
R9–16: Sc around (48)
R17: (6 sc, dec) × 6 (42)
R18: (5 sc, dec) × 6 (36)
R19: (4 sc, dec) × 6 (30)
R20: (3 sc, dec) × 6 (24)
Insert the purple safety eyes between rounds 12 and 13, approximately 10–12 stitches apart.
R21: (2 sc, dec) × 6 (18)
Stuff firmly.
R22: (1 sc, dec) × 6 (12)
R23: Dec × 6 (6)
FO and close.
Part 2: Dragon Body
Using white yarn:
R1: 6 sc in MR (6)
R2: Inc × 6 (12)
R3: (1 sc, inc) × 6 (18)
R4: (2 sc, inc) × 6 (24)
R5: (3 sc, inc) × 6 (30)
R6: (4 sc, inc) × 6 (36)
R7–15: Sc around (36)
R16: (4 sc, dec) × 6 (30)
R17–19: Sc around (30)
R20: (3 sc, dec) × 6 (24)
R21–23: Sc around (24)
R24: (2 sc, dec) × 6 (18)
R25–27: Sc around (18)
Stuff the body firmly. FO, leaving a long tail for sewing.
Part 3: Sage Green Belly Panel
Using sage green yarn:
Ch 9.
Row 1: Sc in second ch from hook and across (8).
Rows 2–22: Ch 1, turn, sc across (8).
For the raised belly texture, work alternating rows of front-loop and back-loop single crochet, or add surface crochet ridges after completing the panel.
FO, leaving a long sewing tail.
Sew the panel vertically onto the front of the body.
Part 4: Dragon Horns (Make 2)
Using sage green yarn:
R1: 4 sc in MR (4)
R2: Sc around (4)
R3: (1 sc, inc) × 2 (6)
R4: Sc around (6)
R5: (2 sc, inc) × 2 (8)
R6: Sc around (8)
R7: (3 sc, inc) × 2 (10)
R8: Sc around (10)
R9: (4 sc, inc) × 2 (12)
R10–12: Sc around (12)
Lightly stuff and sew both horns onto the top of the head.
Part 5: Dragon Arms (Make 2)
Using white yarn:
R1: 6 sc in MR (6)
R2: Inc × 6 (12)
R3–5: Sc around (12)
R6: (2 sc, dec) × 3 (9)
R7–15: Sc around (9)
Lightly stuff the lower half. Flatten the opening and close with sc.
Make three tiny sage green claws for each hand and sew them in place.
Attach the arms to the upper sides of the body.
Part 6: Dragon Legs (Make 2)
Using white yarn:
R1: 6 sc in MR (6)
R2: Inc × 6 (12)
R3: (1 sc, inc) × 6 (18)
R4: (2 sc, inc) × 6 (24)
R5–8: Sc around (24)
R9: (2 sc, dec) × 6 (18)
R10–12: Sc around (18)
Stuff firmly and FO.
Add three or four small sage green claws to the front of each foot.
Sew the legs to the lower sides of the body in a seated position.
Part 7: Dragon Tail
Using white yarn:
R1: 4 sc in MR (4)
R2–3: Sc around (4)
R4: (1 sc, inc) × 2 (6)
R5–7: Sc around (6)
R8: (2 sc, inc) × 2 (8)
R9–12: Sc around (8)
R13: (3 sc, inc) × 2 (10)
R14–17: Sc around (10)
R18: (4 sc, inc) × 2 (12)
R19–22: Sc around (12)
R23: (5 sc, inc) × 2 (14)
R24–28: Sc around (14)
R29: (6 sc, inc) × 2 (16)
R30–34: Sc around (16)
Continue adding 2 stitches approximately every 5 rounds until the tail reaches the desired length.
Stuff lightly as you work, keeping the tail flexible.
Sew small green spikes along the upper surface. Attach the wider end to the back of the body and arrange the tail in a gentle curve.
Part 8: Dragon Wings (Make 2)
Using sage green yarn:
Ch 21.
Row 1: Sc in second ch from hook and across (20).
Row 2: Ch 1, turn, sc across (20).
Row 3: Ch 1, turn, dec, 16 sc, dec (18).
Row 4: Sc across (18).
Row 5: Dec, 14 sc, dec (16).
Row 6: Sc across (16).
Row 7: Dec, 12 sc, dec (14).
Row 8: Sc across (14).
Continue decreasing 2 stitches every other row until 4 stitches remain.
FO.
To create a bat-wing appearance, work a decorative scalloped edge along one side using groups of 3–5 dc.
Use white yarn to surface-crochet three radiating lines across each wing to imitate wing bones.
Make the second wing as a mirrored piece and sew both securely onto the dragon’s back.
Part 9: Decorative Spikes
Using sage green yarn:
R1: 4 sc in MR (4)
R2: Sc around (4)
R3: (1 sc, inc) × 2 (6)
R4: Sc around (6)
FO, leaving a sewing tail.
Make approximately 12–18 small spikes, depending on the desired look.
Attach them from the forehead down the back and along the tail.
Final Assembly
- Sew the head firmly onto the neck.
- Attach both horns symmetrically.
- Sew the arms and legs into position.
- Attach the belly panel to the front.
- Sew the wings onto the upper back.
- Attach the long tail and its decorative spikes.
- Embroider nostrils, a subtle smile, and small facial details.
- Adjust the stuffing and shape the dragon gently.
Helpful Tips
For a soft, cuddly dragon, use plush yarn with a larger hook. For detailed stitches similar to the reference, cotton yarn works particularly well.
Keep the wings lightly structured so they hold their shape without becoming too stiff. You can add a second crocheted layer to each wing for extra stability.
For toys intended for babies or young children, embroider the eyes instead of using plastic safety eyes, avoid wire, and secure all small parts carefully.