
Crochet Butterfly Lace Table Runner Pattern· Post
Save draft
Crochet Butterfly Lace Table Runner Pattern
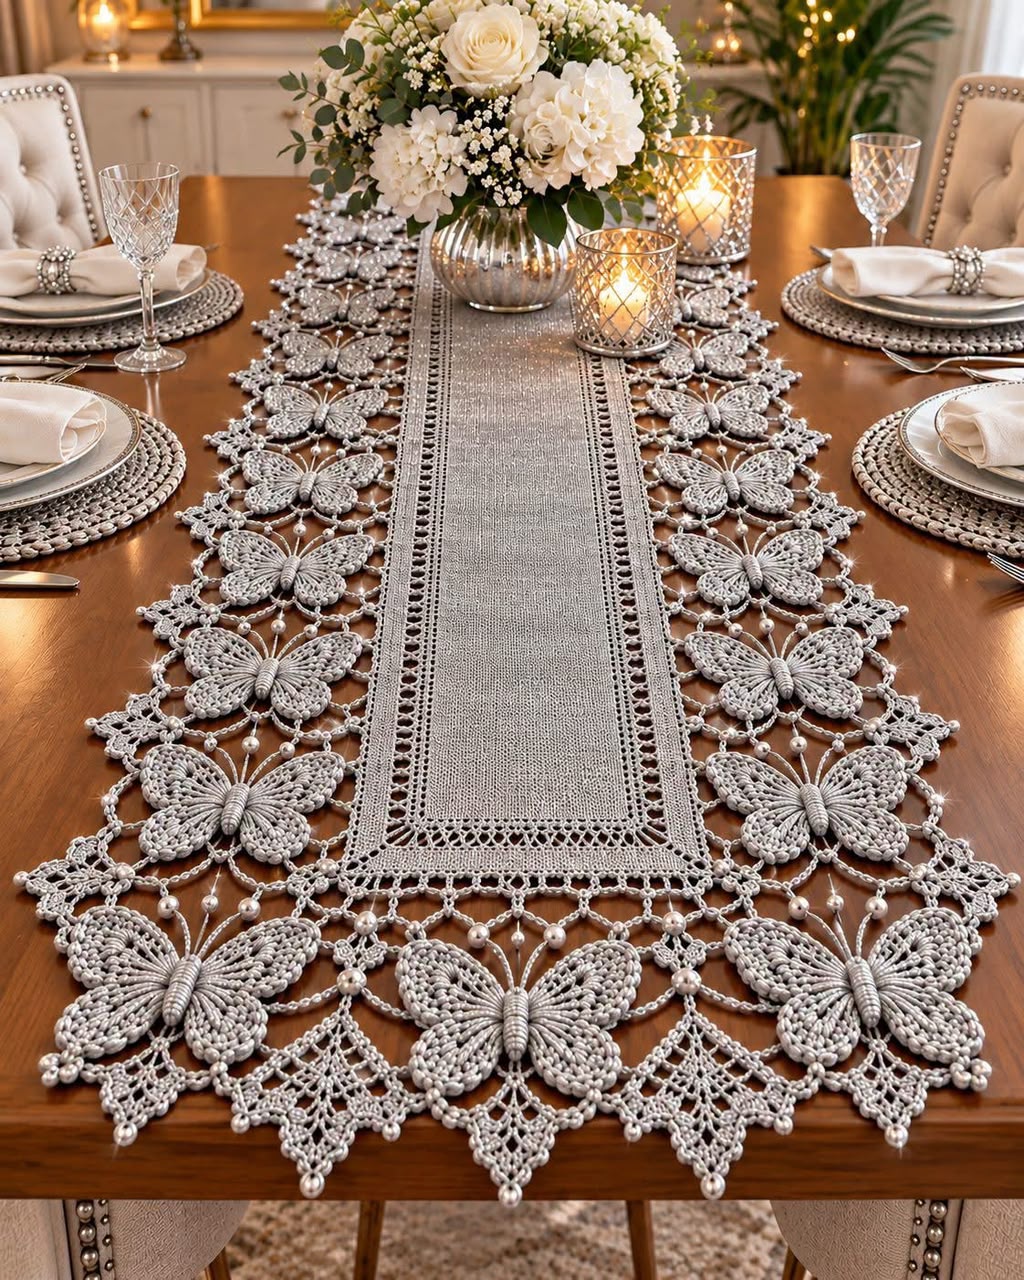
This is a text reconstruction inspired by the uploaded photo. Because the original stitch counts cannot be determined exactly from a photograph, the pattern below is designed to reproduce the same overall look: a long central lace panel, raised butterfly motifs, openwork mesh, scalloped edging, and pearl drops.
Materials
- Fine crochet cotton thread, light silver/gray or ivory
- Crochet hook 1.5–2.0 mm
- Small pearl beads, approximately 4–6 mm
- Sewing needle
- Matching sewing thread
- Scissors
- Blocking pins and blocking mat
Finished Size
Approximately:
- Length: 120–150 cm
- Width: 35–45 cm
The dimensions can easily be adjusted by adding or removing repeats.
Abbreviations
US crochet terms:
- ch = chain
- sl st = slip stitch
- sc = single crochet
- hdc = half double crochet
- dc = double crochet
- tr = treble crochet
- sk = skip
- sp = space
- rep = repeat
- picot = ch 3, sl st in first chain
PART 1 — Central Rectangle
The center is worked as a narrow filet-style lace panel.
Foundation
Chain 61.
Row 1:
Dc in the 4th ch from hook and in each chain across.
Row 2:
Ch 3, turn. Dc across.
Repeat Row 2 until the center panel reaches approximately 75–90 cm, depending on your desired runner length.
Openwork Border
Work around the entire rectangle.
Round 1:
Ch 1, sc evenly around all four sides. Place 3 sc in each corner.
Round 2:
Ch 5, sk 2 sts, sc in next st. Repeat around the rectangle.
Round 3:
Ch 5, sc in next ch-5 space. Repeat around.
Round 4:
In each ch-5 space work:
3 dc, ch 2, 3 dc.
Continue around, placing the same corner arrangement at each corner.
Round 5:
Sc in each dc and 3 sc in each ch-2 space.
This creates the delicate lace frame visible around the central panel.
PART 2 — Butterfly Motif
Make approximately 13 butterflies for the runner, or enough to create the arrangement shown in the photograph.
Each butterfly should measure approximately 10–13 cm wide.
Butterfly Body
Ch 8 and join with a sl st to form a ring.
Round 1:
Ch 3, work 15 dc into the ring. Join with a sl st.
Round 2:
Ch 3, dc in the same stitch, ch 2, 2 dc in the next stitch. Repeat around.
Fasten off.
Butterfly Upper Wings
Attach thread to the top of the body.
Ch 8.
Work into the body area:
3 tr, 4 dc, 3 tr, ch 3, sl st around the body.
Repeat on the opposite side.
For the outer edge, work:
sc, hdc, dc, 3 tr, dc, hdc, sc.
This creates the large upper wings.
Butterfly Lower Wings
Attach thread to the lower section of the body.
Ch 6.
Work:
2 tr, 3 dc, 2 tr, ch 2, sl st.
Repeat on the opposite side.
Finish the outer edge with:
sc, hdc, dc, hdc, sc.
Wing Veins
To reproduce the detailed appearance of the photograph, work thin chains across each wing.
Attach thread at the butterfly body.
Ch 5, sl st into the outer wing edge.
Repeat several times to create approximately 5–7 open lines across each wing.
Repeat for all four wings.
Butterfly Body
Wrap matching thread around the center of the butterfly several times to create a raised body.
Secure firmly at the back.
For antennae:
Ch 8, sl st back along the chain.
Repeat for the second antenna.
PART 3 — Mesh Connection Between Butterflies
The butterflies are connected with delicate diamond-shaped lace.
Attach thread beside a butterfly.
Ch 7, sc into the next butterfly.
Ch 7, sc into the next attachment point.
Continue until a diamond mesh is formed between the motifs.
For each larger diamond:
Ch 9, sc into the next attachment point.
Repeat across the runner.
The butterflies should overlap the outer mesh slightly, creating the layered appearance seen in the photograph.
PART 4 — Connecting the Butterflies to the Center
Place the butterflies approximately 8–10 cm apart along both long sides of the center panel.
Use small chain bridges:
Ch 5, sc into the central border.
Ch 5, sc into the butterfly.
Ch 7, sc into the next butterfly.
Continue along the entire side.
Repeat on the opposite side.
For the end of the runner, arrange three butterflies in a gentle fan shape.
Connect them with chain arches and small lace diamonds.
PART 5 — Decorative Diamond Lace
Between each butterfly, create a diamond motif.
Round 1:
Ch 8, join with sl st.
Round 2:
Ch 3, 2 dc, ch 2, 3 dc, ch 2, 3 dc, ch 2, 3 dc, ch 2.
Join.
Round 3:
In each ch-2 space work:
sc, ch 3, sc.
Repeat around.
Round 4:
In each ch-3 space:
sc, hdc, 3 dc, hdc, sc.
This creates the pointed lace sections visible around the butterflies.
PART 6 — Pearl Drops
For the decorative pearl effect:
Insert the hook through the desired lace space.
Pull up the thread.
Slide one pearl onto the working thread.
Ch 1 to lock the pearl in place.
Continue with:
ch 3, sc into the next lace space.
Place pearls approximately every 3–5 cm along the outer edge.
For the pointed ends, place one larger pearl at the bottom of each lace point.
PART 7 — Outer Scalloped Border
Work around the entire outside edge.
Round 1:
Ch 5, sc in the next space.
Repeat around.
Round 2:
In each ch-5 space work:
sc, hdc, 3 dc, hdc, sc.
Repeat around.
Round 3:
At each scallop point:
sc, ch 3, sl st into the first chain.
This produces the small pointed scallops seen around the runner.
Final Finishing
- Weave in all loose ends.
- Lightly wet the completed runner.
- Lay it flat on a blocking mat.
- Stretch the center rectangle straight.
- Carefully pin every butterfly wing into shape.
- Pin the outer lace points symmetrically.
- Allow the piece to dry completely.
- Remove the pins.
- Adjust the pearls so they hang freely.
Recommended Arrangement
For a look close to the photograph:
- 1 long central rectangular panel
- 5 butterflies along the left side
- 5 butterflies along the right side
- 3 butterflies across the bottom end
- Open diamond mesh between the butterflies
- Small pearls along the mesh
- Larger pearls at the pointed outer edges
- Delicate scalloped lace around the entire runner
Tip: For the very fine, elegant appearance in the photo, use size 10 or size 20 crochet cotton with a 1.5–1.75 mm hook. For a larger and easier-to-work version, use size 5 cotton with a 2.0–2.5 mm hook and increase the chain spaces proportionally.