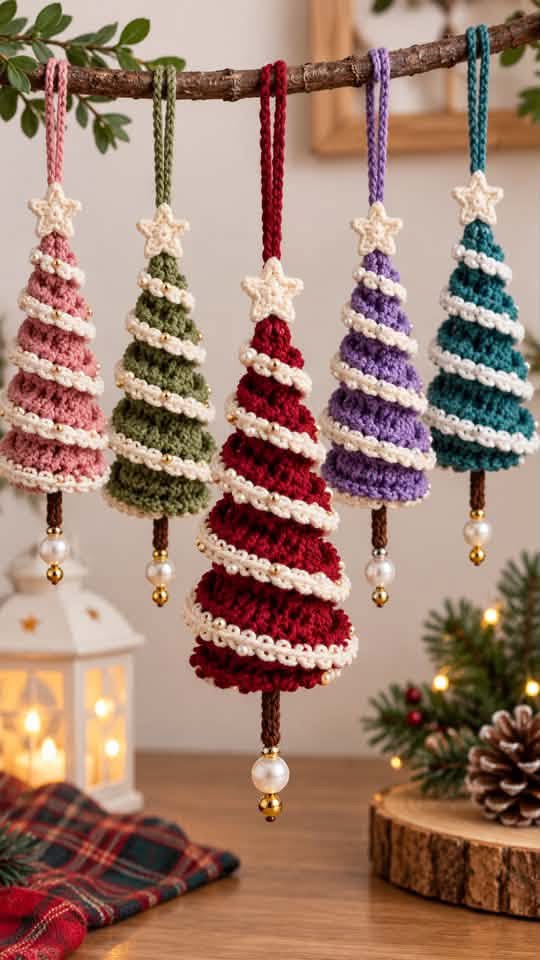

Create beautiful handmade crochet Christmas tree ornaments featuring five festive colors: dusty pink, olive green, burgundy red, lavender purple, and deep teal. Each miniature tree features a textured cone-shaped body, a delicate ivory spiral garland, a small crochet star topper, and elegant pearl decorations.
This beginner-friendly to intermediate crochet project is perfect for Christmas trees, holiday garlands, handmade gifts, and festive home décor.
This is an original pattern inspired by the reference photo. It recreates the overall appearance rather than claiming to be the exact original designer’s pattern.
1. Materials Needed
Skill Level: Easy to Intermediate
Finished Size: Approximately 5–6 inches (13–15 cm) tall, excluding the hanging loop.
Materials:
- DK-weight cotton or acrylic yarn
- Dusty pink yarn
- Olive green yarn
- Burgundy red yarn
- Lavender purple yarn
- Deep teal yarn
- Ivory or cream yarn for garlands and stars
- Dark brown yarn for tree trunks
- 3.0 mm or 3.5 mm crochet hook
- Polyester fiberfill
- Yarn needle
- Scissors
- Stitch markers
- Decorative pearl beads
- Small gold beads
2. Crochet Abbreviations (US Terms)
| Abbreviation | Meaning |
| MR | Magic Ring |
| ch | Chain |
| sl st | Slip Stitch |
| sc | Single Crochet |
| hdc | Half Double Crochet |
| dc | Double Crochet |
| inc | 2 sc in same stitch |
| BLO | Back Loop Only |
| FLO | Front Loop Only |
| st | Stitch |
| rep | Repeat |
| FO | Fasten Off |
Special Stitch – Bobble: Work 4 unfinished double crochets into the same stitch, yarn over, and pull through all loops on the hook.
3. Crochet the Christmas Tree Body
Choose your preferred tree color.
The tree is crocheted from the top downward in continuous spiral rounds.
Use a stitch marker to identify the beginning of each round.
Cone Construction
Round 1: Make a magic ring and work 6 sc into the ring. (6)
Round 2: Sc in each stitch around. (6)
Round 3: (1 sc, inc) repeat 3 times. (9)
Round 4: Sc in each stitch around. (9)
Round 5: (2 sc, inc) repeat 3 times. (12)
Round 6: Sc in each stitch around. (12)
Round 7: (3 sc, inc) repeat 3 times. (15)
Round 8: Sc in each stitch around. (15)
Round 9: (4 sc, inc) repeat 3 times. (18)
Round 10: Sc in each stitch around. (18)
Round 11: (5 sc, inc) repeat 3 times. (21)
Round 12: Sc in each stitch around. (21)
Round 13: (6 sc, inc) repeat 3 times. (24)
Round 14: Sc in each stitch around. (24)
Round 15: (7 sc, inc) repeat 3 times. (27)
Round 16: Sc in each stitch around. (27)
Round 17: (8 sc, inc) repeat 3 times. (30)
Round 18: Sc in each stitch around. (30)
Round 19: (9 sc, inc) repeat 3 times. (33)
Round 20: Sc in each stitch around. (33)
Round 21: (10 sc, inc) repeat 3 times. (36)
Round 22: Sc in each stitch around. (36)
Round 23: (11 sc, inc) repeat 3 times. (39)
Round 24: Sc in each stitch around. (39)
Round 25: (12 sc, inc) repeat 3 times. (42)
Round 26: Sc in each stitch around. (42)
Fasten off, leaving a long tail for assembly.
4. Add the Textured Tree Branches
To create the raised, layered appearance shown in the reference photo, add decorative branch rounds.
Join matching yarn to an available front loop or work surface stitches around the cone.
Branch Round Pattern:
- Ch 1.
- Work 2 hdc in the first stitch.
- Work 1 sl st in the next stitch.
- Repeat around the selected round.
- Join with a sl st.
Add textured branch layers at approximately rounds 8, 12, 16, 20, and 24.
For a fuller appearance, work 3 dc in selected stitches instead of 2 hdc.
These decorative rounds should create small overlapping scallops that resemble Christmas tree branches.
5. Crochet the Ivory Spiral Garland
Using ivory yarn:
Step 1: Ch 90–110, depending on the finished tree size.
Step 2: Starting in the second chain from the hook, work 2 sc in each chain across.
Step 3: Fasten off, leaving a long tail.
The increases will create a naturally curling crochet cord.
Wrap the ivory garland diagonally around the tree from the top to the bottom, forming approximately 4–5 spiral turns.
Secure the garland with small invisible stitches at several points.
For a more delicate garland, use a 2.5 mm crochet hook and lightweight yarn.
6. Crochet the Mini Christmas Star
Using ivory yarn:
Round 1: Make a magic ring and work 10 sc into the ring. Join with a sl st.
Round 2: Repeat the following sequence 5 times:
Ch 4, sl st into the second chain from the hook, sc into the next chain, hdc into the next chain, skip one stitch of the center ring, and sl st into the following stitch.
After completing all five points, fasten off.
Gently shape the star with your fingers.
Attach the star to the top of the Christmas tree using a yarn needle.
7. Crochet the Brown Tree Trunk
Using dark brown yarn:
Round 1: Make a magic ring and work 6 sc into the ring.
Rounds 2–6: Sc in each stitch around. (6)
Fasten off, leaving a long tail.
Lightly stuff the trunk to help maintain its shape.
8. Crochet the Bottom Base
Using the same color as the tree:
Round 1: MR, 6 sc. (6)
Round 2: Inc in every stitch. (12)
Round 3: (1 sc, inc) repeat around. (18)
Round 4: (2 sc, inc) repeat around. (24)
Round 5: (3 sc, inc) repeat around. (30)
Round 6: (4 sc, inc) repeat around. (36)
Round 7: (5 sc, inc) repeat around. (42)
Fasten off, leaving a long tail.
Sew the trunk securely to the center of the base.
Lightly fill the tree cone with polyester fiberfill.
Position the base under the tree and sew the two pieces together using the long yarn tail.
9. Add the Hanging Loop
Using matching yarn:
- Ch 45.
- Sl st into the first chain to create a loop.
- Fasten off, leaving a long tail.
- Attach the loop securely behind the star at the top of the tree.
- Weave in the ends.
The ornament should hang vertically without leaning to one side.
10. Add Decorative Pearl Beads
For the elegant finish shown in the photo:
- Attach one small pearl bead beneath the tree trunk.
- Add a small gold bead below the pearl.
- Sew the beads securely with strong thread.
- Optionally decorate the ivory garland with tiny pearls.
For homes with young children or pets, omit detachable beads and use embroidered decorations instead.
11. Make the Complete Five-Color Collection
Repeat the pattern using these combinations:
| Tree | Body Color | Garland & Star |
| 1 | Dusty Pink | Ivory |
| 2 | Olive Green | Ivory |
| 3 | Burgundy Red | Ivory |
| 4 | Lavender Purple | Ivory |
| 5 | Deep Teal | Ivory |
Make all five trees using the same yarn weight and hook size for a coordinated collection.
12. Finishing Instructions
- Check that every tree is evenly shaped.
- Secure the ivory spiral garlands.
- Straighten the star toppers.
- Attach the hanging loops.
- Weave in all loose yarn ends.
- Gently steam-block the stars if necessary, keeping heat away from acrylic yarn.
- Hang the ornaments from a Christmas tree, decorative branch, or festive garland.
13. Frequently Asked Questions
Can beginners make these crochet Christmas trees?
Yes. The cone uses basic single crochet stitches and simple increases. The decorative garland and star require a little more practice.
How long does one ornament take?
Approximately 1–3 hours, depending on your crochet experience and the amount of decorative detail.
Can I use leftover yarn?
Absolutely. These miniature Christmas trees are a great project for using leftover yarn in different colors.
Can I make larger Christmas trees?
Yes. Use thicker yarn, a larger crochet hook, or continue increasing the cone with additional rounds.
Can I make the trees without stuffing?
Yes, but stuffing helps the ornaments maintain a rounded, three-dimensional shape.
Conclusion
These handmade crochet Christmas tree ornaments combine colorful textured stitches, delicate ivory spiral garlands, miniature star toppers, and elegant pearl decorations.
Whether displayed on a Christmas tree, hung from a rustic wooden branch, or given as handmade holiday gifts, these charming crochet decorations add a cozy and festive touch to any home.
