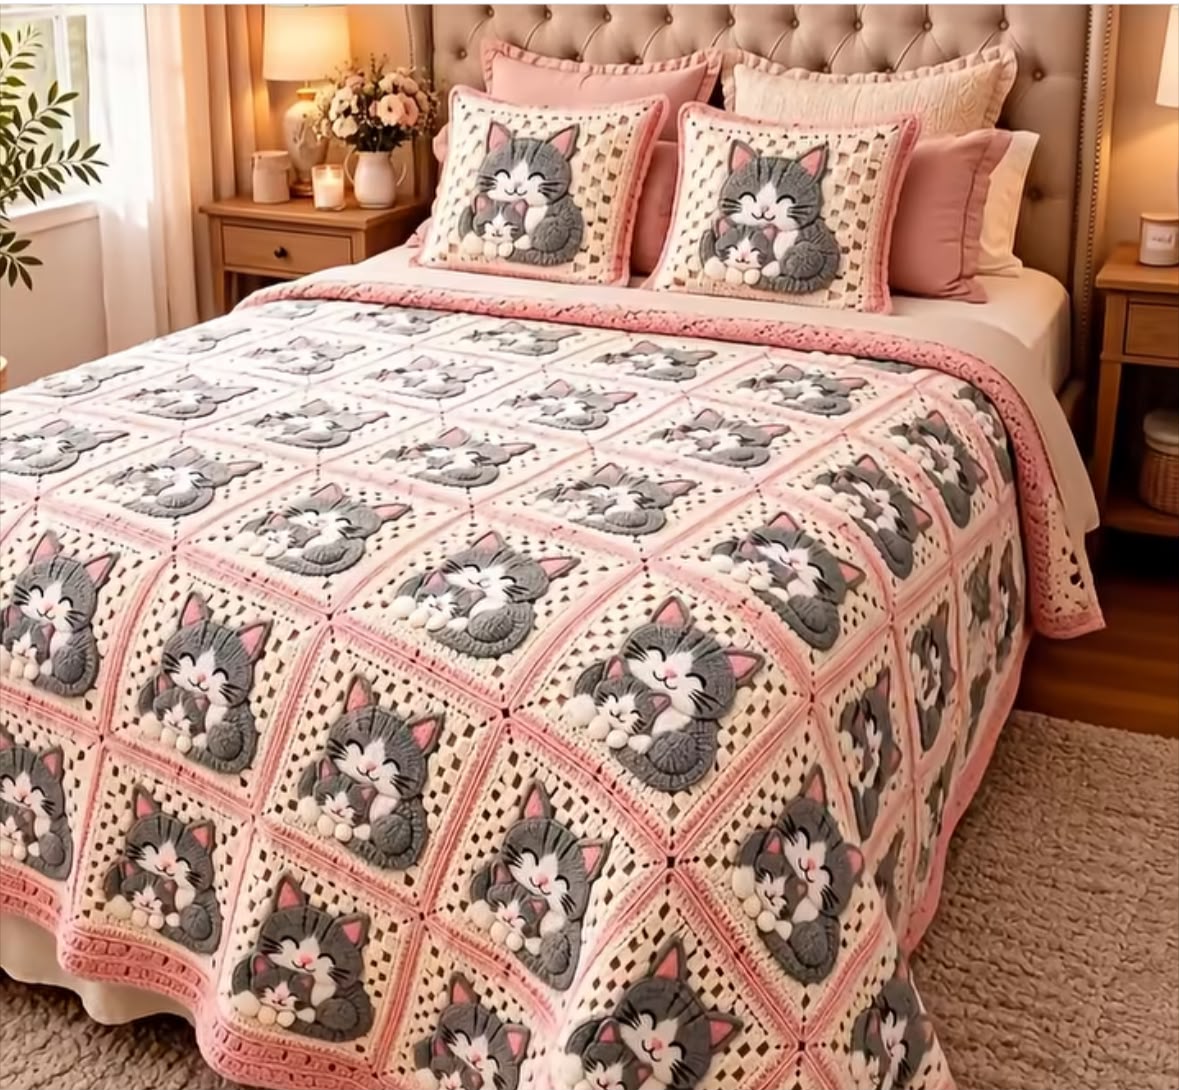

Skill Level: Intermediate to Advanced Technique: Granny squares, tapestry crochet, surface embroidery, appliqué, and joining Finished Size: Approximately 90 × 100 inches (229 × 254 cm), suitable for a queen-size bed Colors: Soft pink, ivory white, charcoal gray, light gray, and blush pink
This adorable handmade crochet bedspread features a mother cat cuddling her kitten, surrounded by delicate ivory granny-square lace and soft pink borders. Matching decorative pillows complete the cozy bedroom look.
Pattern note: The photograph does not reveal the exact stitch construction. This is an original, photo-inspired pattern designed to recreate the appearance, rather than a verified reproduction of the pictured blanket.
1. Materials Needed
Yarn: Worsted weight (Category 4), preferably soft, washable acrylic or cotton-acrylic blend.
Estimated quantities for a queen-size bedspread:
- Ivory white: 3,000–3,500 yards
- Soft pink: 2,000–2,500 yards
- Charcoal gray: 1,200–1,500 yards
- Light gray: 600–800 yards
- Blush pink: 300–400 yards
- Black: Small amount for facial embroidery
- White: Small amount for the cats’ faces and paws
Tools:
- 4.0 mm and 4.5 mm crochet hooks
- Yarn needle
- Stitch markers
- Scissors
- Measuring tape
- Blocking mats and pins
2. Crochet Abbreviations (US Terms)
| Abbreviation | Meaning |
| ch | Chain |
| sc | Single crochet |
| hdc | Half double crochet |
| dc | Double crochet |
| tr | Treble crochet |
| sl st | Slip stitch |
| st | Stitch |
| sp | Space |
| MR | Magic ring |
| inc | Two stitches in one stitch |
| dec | Single crochet decrease |
| FO | Fasten off |
3. Crochet the Ivory Granny Square Base
Each square will contain one mother-and-baby cat motif.
Target square size: 10 × 10 inches (25 × 25 cm), including the pink border.
Round 1 – Center Foundation
Using ivory yarn:
- Make a magic ring.
- Ch 3 (counts as first dc).
- Work 2 dc into the ring.
- Ch 2.
- Repeat (3 dc, ch 2) three more times.
- Join with sl st into the top of the beginning ch 3.
You now have four granny-square corners.
Round 2 – Expanding the Square
- Sl st into the next corner space.
- Ch 3, 2 dc, ch 2, 3 dc in the same corner.
- Ch 1.
- In each remaining corner, work (3 dc, ch 2, 3 dc).
- Ch 1 between corners.
- Join with sl st.
Rounds 3–7 – Open Lace Pattern
Continue expanding the granny square.
At every corner, work:
(3 dc, ch 2, 3 dc)
Between corners, work granny clusters of 3 dc separated by ch 1.
Maintain even tension and keep the corners flat.
Rounds 8–10 – Decorative Ivory Lace
To create the delicate openwork appearance:
Round 8: Work (dc, ch 1) across each side, skipping one stitch or space between dc stitches as needed. In each corner, work (2 dc, ch 2, 2 dc).
Round 9: Work 2 sc into each ch-1 space. At each corner, work (2 sc, ch 2, 2 sc).
Round 10: Work dc stitches evenly around the square, with (2 dc, ch 2, 2 dc) in each corner.
Block the square before adding the decorative cat motif.
4. Crochet the Mother Cat Appliqué
The mother cat is the central decorative feature. Use charcoal gray yarn for the body and head.
Mother Cat Head
Using a 4.0 mm hook:
Round 1: MR, 6 sc. (6)
Round 2: Inc in every stitch. (12)
Round 3: (1 sc, inc) × 6. (18)
Round 4: (2 sc, inc) × 6. (24)
Round 5: (3 sc, inc) × 6. (30)
Round 6: (4 sc, inc) × 6. (36)
Round 7: (5 sc, inc) × 6. (42)
Round 8: (6 sc, inc) × 6. (48)
Round 9: (7 sc, inc) × 6. (54)
Round 10: Sc around. (54)
Fasten off, leaving a long tail for sewing.
Gently flatten the head into a rounded oval when attaching it.
Mother Cat Ears (Make 2)
Using charcoal gray:
Row 1: Ch 2, 2 sc in second chain from hook. (2)
Row 2: Ch 1, turn, inc in each stitch. (4)
Row 3: Ch 1, turn, sc across. (4)
Row 4: Ch 1, turn, inc, 2 sc, inc. (6)
Row 5: Ch 1, turn, sc across. (6)
Fasten off.
Make two smaller pink triangles for the inner ears, or embroider the inner-ear sections with blush pink yarn.
Attach the ears behind the head.
Mother Cat Body
Using charcoal gray:
Round 1: MR, 6 sc. (6)
Round 2: Inc around. (12)
Round 3: (1 sc, inc) × 6. (18)
Round 4: (2 sc, inc) × 6. (24)
Round 5: (3 sc, inc) × 6. (30)
Round 6: (4 sc, inc) × 6. (36)
Round 7: (5 sc, inc) × 6. (42)
Round 8: (6 sc, inc) × 6. (48)
Round 9: (7 sc, inc) × 6. (54)
Fasten off.
Shape the body into a slightly oval silhouette while sewing it beneath the head.
Front Paws (Make 2)
Using gray yarn:
- MR, 6 sc.
- Inc around. (12)
- Sc around. (12)
- Fasten off.
Use white yarn to add tiny embroidered paw details.
Curled Tail
Using charcoal gray:
- Ch 25.
- Starting in the second chain, work 2 hdc in each chain.
- The strip will curl naturally.
- Fasten off and arrange the curled strip beside the cat’s body.
Sew securely into place.
5. Crochet the Baby Kitten
Make a smaller version of the mother cat.
Kitten Head
Using light gray:
- Round 1: MR, 6 sc. (6)
- Round 2: Inc around. (12)
- Round 3: (1 sc, inc) × 6. (18)
- Round 4: (2 sc, inc) × 6. (24)
- Round 5: (3 sc, inc) × 6. (30)
- Round 6: (4 sc, inc) × 6. (36)
- Round 7: Sc around. (36)
Fasten off.
Kitten Ears
Make two small gray triangles.
Row 1: Ch 2, 2 sc in second chain. (2)
Row 2: Ch 1, turn, inc twice. (4)
Row 3: Ch 1, turn, sc across. (4)
Add pink embroidery to the inner ears.
Kitten Body
- Round 1: MR, 6 sc. (6)
- Round 2: Inc around. (12)
- Round 3: (1 sc, inc) × 6. (18)
- Round 4: (2 sc, inc) × 6. (24)
- Round 5: (3 sc, inc) × 6. (30)
- Round 6: (4 sc, inc) × 6. (36)
Fasten off.
Position the kitten partly overlapping the mother cat’s body to create the cuddling appearance.
6. Add the Cat Faces
The embroidered faces give the design its adorable expression.
Mother Cat
Using white yarn, stitch two rounded cheek patches onto the lower face.
Using black embroidery yarn:
- Embroider two gently curved closed eyes.
- Add three short whiskers on each side.
- Make a tiny pink triangular nose.
- Embroider a small curved smile.
- Add delicate gray stripes above the eyes and along the forehead.
Baby Kitten
Repeat the same features on a smaller scale.
Use blush pink yarn for the nose and inner ears.
Important: Sew all facial features securely. Avoid glued decorations or loose plastic eyes, especially for bedding intended for children.
7. Assemble the Cat Motif
Position the pieces on the ivory granny square:
- Place the mother cat near the center, slightly toward the upper half.
- Position the kitten in front of the mother cat.
- Attach the kitten’s body and head.
- Arrange the mother cat’s paws around the kitten.
- Position the curled tail beside the bodies.
- Sew every appliqué piece securely using a yarn needle.
Keep the design as flat as possible so the blanket remains comfortable and washable.
Repeat for every square.
8. Add the Pink Granny Square Border
Using soft pink yarn:
Round 1: Attach yarn at any corner. Work sc evenly around the square, placing (2 sc, ch 2, 2 sc) in each corner.
Round 2: Ch 3 and work dc evenly around, placing (2 dc, ch 2, 2 dc) in each corner.
Round 3: Work (sc, ch 2, skip 2 stitches) around each side. At corners, work (sc, ch 3, sc).
Round 4: Work 2 sc into each ch-2 space, adjusting at corners to keep the square flat.
Fasten off and weave in ends.
Block all completed squares to a uniform 10-inch measurement.
9. Join the Granny Squares
For a queen-size bedspread, make approximately 90 squares, arranged in 9 columns and 10 rows.
Suggested blanket layout — 9 × 10 squares
Each square contains a mother-and-kitten motif. The diagram illustrates the arrangement, not the individual stitches.
Joining Method – Flat Slip Stitch
- Arrange all squares in the desired order.
- Place two squares side by side, right sides facing upward.
- Using soft pink yarn, insert the hook through the corresponding back loops of both squares.
- Work slip stitches across the edge without pulling tightly.
- Continue joining all squares into rows.
- Join the completed rows together.
This creates a neat pink joining line similar to the photograph.
10. Crochet the Outer Bedspread Border
After joining all squares, add a continuous border around the entire blanket.
Round 1 – Foundation
Using ivory yarn, work sc evenly around the blanket. Place 3 sc in each outer corner.
Round 2 – Pink Accent
Switch to soft pink.
Work dc around, with 5 dc in each corner stitch.
Round 3 – Decorative Openwork
Work (sc, ch 3, skip 2 stitches) repeatedly around the edge. Adjust stitch spacing at corners.
Round 4 – Scalloped Edge
In each ch-3 space, work:
(sc, 5 dc, sc)
Repeat around the blanket to form soft decorative scallops.
If the border begins to ripple, reduce the number of stitches or use a smaller hook.
11. Matching Crochet Cat Pillow Covers
Make two matching pillow covers to complete the bedroom set.
Suggested finished size: 18 × 18 inches (46 × 46 cm).
Front Panel
- Crochet one large ivory granny square to approximately 16 × 16 inches.
- Create one mother-and-kitten appliqué motif.
- Attach the motif to the center.
- Add a soft pink border until the panel measures 18 × 18 inches.
Back Panel
Make two plain ivory rectangular crochet panels for an envelope closure.
Each panel should measure approximately 18 inches wide by 12 inches high.
Assembly
- Place the front panel right side down.
- Overlap the two back panels to cover the front.
- Join the outer edges using sc.
- Turn right side out.
- Insert an 18-inch pillow form.
Repeat for the second pillow.
12. Finishing and Care
- Weave in all yarn ends securely.
- Block the completed blanket to straighten the squares.
- Check that every appliqué and embroidered detail is firmly attached.
- Wash gently according to the yarn label.
- Lay flat to dry whenever possible.
- Avoid excessive heat to preserve the shape of the crochet stitches.
Final Result
The finished project is a charming ivory and pink crochet bedspread decorated with repeating gray mother-and-baby cat motifs, delicate openwork squares, soft pink joining seams, and a scalloped border.
The matching cat pillows create a coordinated handmade bedroom set.
Designer’s note: The exact cat imagery in the reference may use a printed, embroidered, or machine-produced technique rather than ordinary crochet stitches. This pattern uses crocheted appliqués and embroidery to achieve a similar three-dimensional look. The estimated yarn quantities and finished dimensions should be checked against a completed sample square before making the full bedspread.
