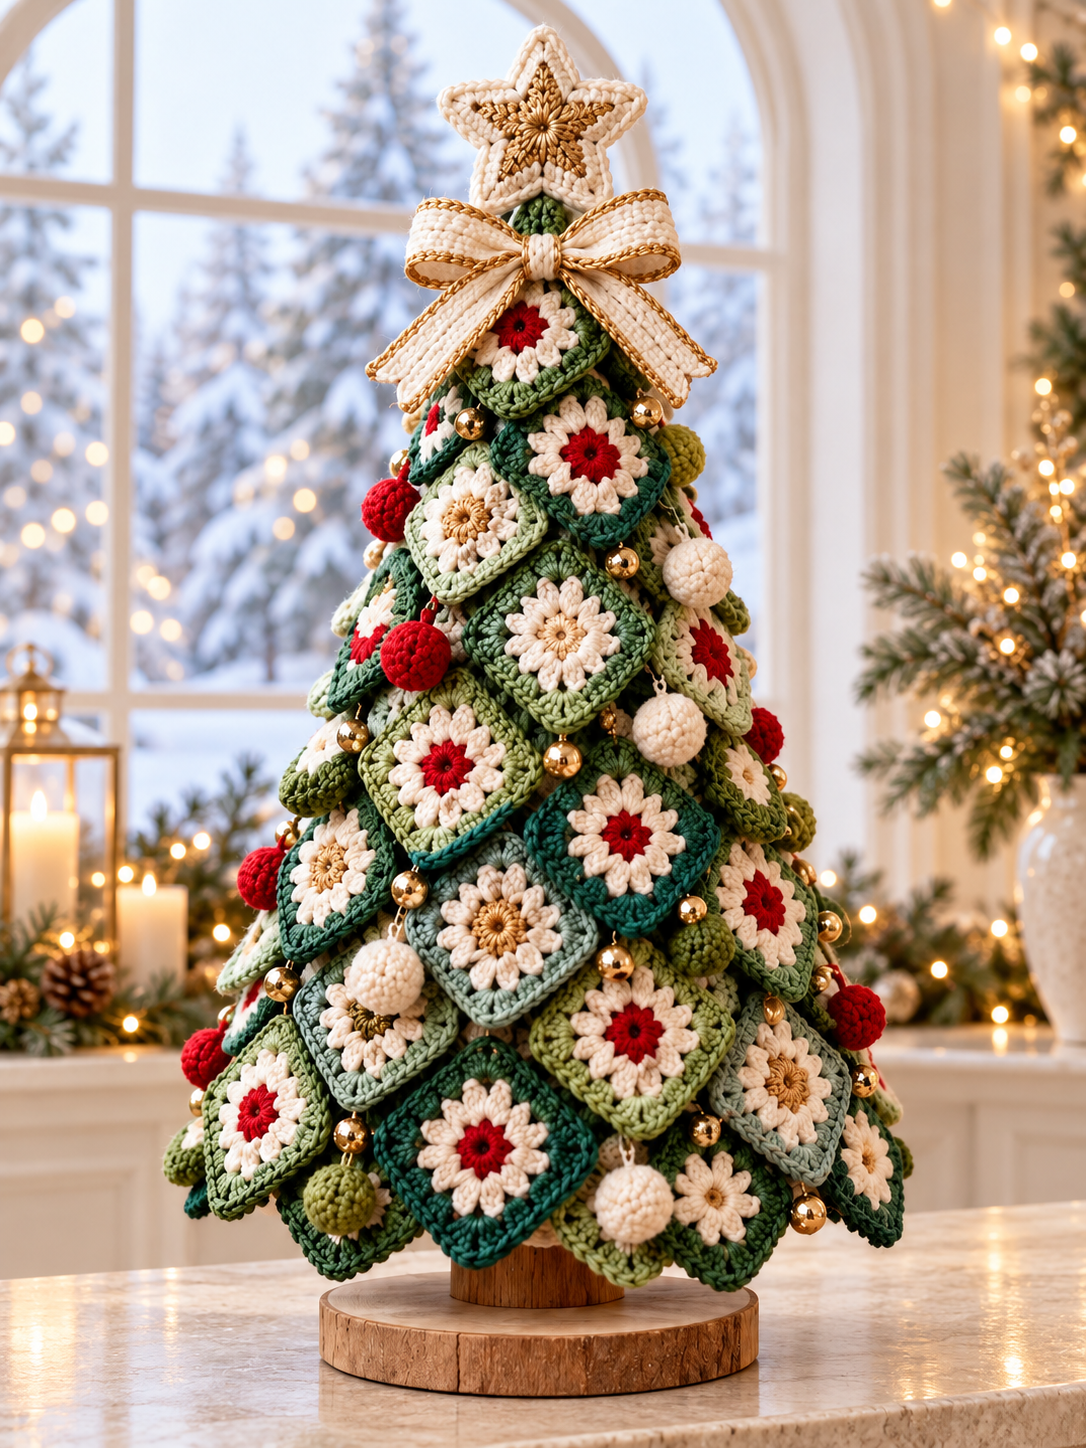

An original, untested pattern inspired by the photo. It recreates the layered flower squares, miniature baubles, cream bow, and star topper.
Materials
- DK cotton yarn: forest green, olive, sage, cream, red, and golden beige
- 3 mm crochet hook; 2.5 mm hook for baubles
- Yarn needle, scissors, stitch markers
- Polyester stuffing
- A craft cone approximately 30 cm tall with a 15 cm base
- Green felt to cover the cone
- Wooden display base, optional
- Small gold beads or bells
- Sewing thread and craft glue suitable for your cone
Use ordinary cotton for the gold-colored crochet pieces; metallic thread can be added to their edges.
US terms
ch = chain; sl st = slip stitch; sc = single crochet; hdc = half double crochet; dc = double crochet; tr = treble crochet; inc = 2 sc in one stitch; dec = single crochet two stitches together.
Petal cluster: Yarn over, insert hook into the indicated stitch, yarn over and pull up a loop, yarn over and pull through two loops. Repeat twice more in the same stitch. Yarn over and pull through all four loops.
1. Daisy granny squares
Make one sample first. Aim for squares approximately 6–7 cm wide. You will need roughly 40–55 squares, depending on their size and overlap. Make them in batches and check coverage against your cone.
Use mixed green borders, cream petals, and red or golden-beige centers.
Round 1 — flower center:
Make a magic ring. Ch 1, work 12 sc into the ring. Tighten and join with a sl st to the first sc. Fasten off. 12 stitches.
Round 2 — cream petals:
Join cream in any stitch. Ch 2; this does not count as a stitch. Work one petal cluster in the same stitch, ch 2. Repeat one petal cluster in the next stitch, ch 2 eleven times. Join to the top of the first cluster. Fasten off. 12 petals and 12 chain spaces.
Round 3 — green square:
Join green in any ch-2 space. Ch 3, counting as the first dc. Work (2 dc, ch 2, 3 dc) in that same space to form the first corner.
Work 3 hdc in each of the next two spaces.
Repeat (3 dc, ch 2, 3 dc) in the next space; 3 hdc in each of the next two spaces three times. Join to the top of the beginning ch-3. Four corners.
Round 4 — border:
Ch 1. Work 1 sc in each stitch around, and (2 sc, ch 2, 2 sc) in each corner space. Join and fasten off, leaving a long sewing tail.
Weave in the other ends. Lightly block the squares so they lie flat without stretching the flowers.
2. Prepare the tree
Cover the cone with green felt and secure it neatly. If using a wooden base, attach the cone securely according to the adhesive instructions and let it dry.
The felt provides a surface for sewing on the squares and hides any small gaps.
3. Attach the layered squares
- Begin at the bottom of the cone.
- Position each square diagonally, with one corner pointing downward.
- Sew its upper corner and upper edges to the felt. Leave the lower corner loose to create the layered branch effect.
- Continue around the cone, slightly overlapping neighboring squares.
- Add the next row above, offsetting its squares so their points cover the gaps below.
- Continue upward, alternating the three green shades and flower-center colors.
Dry-fit each row before sewing. Use fewer squares as the cone narrows. Near the tip, tuck the upper corners beneath neighboring motifs to reduce bulk.
4. Mini crochet baubles
Use red, cream, or olive yarn and the smaller hook. Work in continuous rounds.
- Round 1: 6 sc in a magic ring. 6
- Round 2: Inc in every stitch. 12
- Round 3: Repeat sc, inc six times. 18
- Rounds 4–5: Sc around. 18
- Round 6: Repeat sc, dec six times. 12
- Add a little stuffing.
- Round 7: Dec six times. 6
Fasten off. Thread the tail through the remaining front loops and pull closed. Leave enough yarn to attach the bauble.
Make approximately 10–15, adjusting the number to suit your tree.
5. Star topper — make two panels
Use golden-beige yarn.
Round 1: Work 10 sc into a magic ring. Join. 10
Round 2: Repeat the following five times:
Sc in the next stitch; (hdc, dc, tr, ch 2, tr, dc, hdc) all in the next stitch.
Join to the first sc and fasten off. You have five points.
Cream edging:
Join cream in any stitch. Work 1 sc in each stitch around, with (sc, ch 2, sc) in each point’s ch-2 space. Join and fasten off.
Block both panels into matching stars. Place wrong sides together and sew around the edges. Keep the star flat, or add a very thin layer of stuffing. Sew it firmly to the top of the tree.
6. Cream bow with gold edging
Main bow strip: Ch 37.
- Row 1: Sc in the second chain from the hook and across. 36
- Rows 2–7: Ch 1, turn, sc across. 36
Fasten off. Sew the short ends together to form a loop. Flatten with the seam at the back, then pinch the center.
Two tails: For each, ch 21.
- Sc in the second chain and across. 20
- Work three more rows of sc, chaining 1 and turning before each row.
Edge the bow and tails with golden-beige sc, working 3 sc at each outside corner.
Position the tails behind the pinched bow. Wrap cream yarn firmly around the center and secure with stitches. Sew beneath the star.
7. Finish
Sew the crochet baubles and gold beads or bells between the squares, distributing them evenly. Keep the flowers visible and allow the lower corners of the squares to hang freely.
Weave in loose ends, adjust the layers, and check that the tree stands securely on its base.