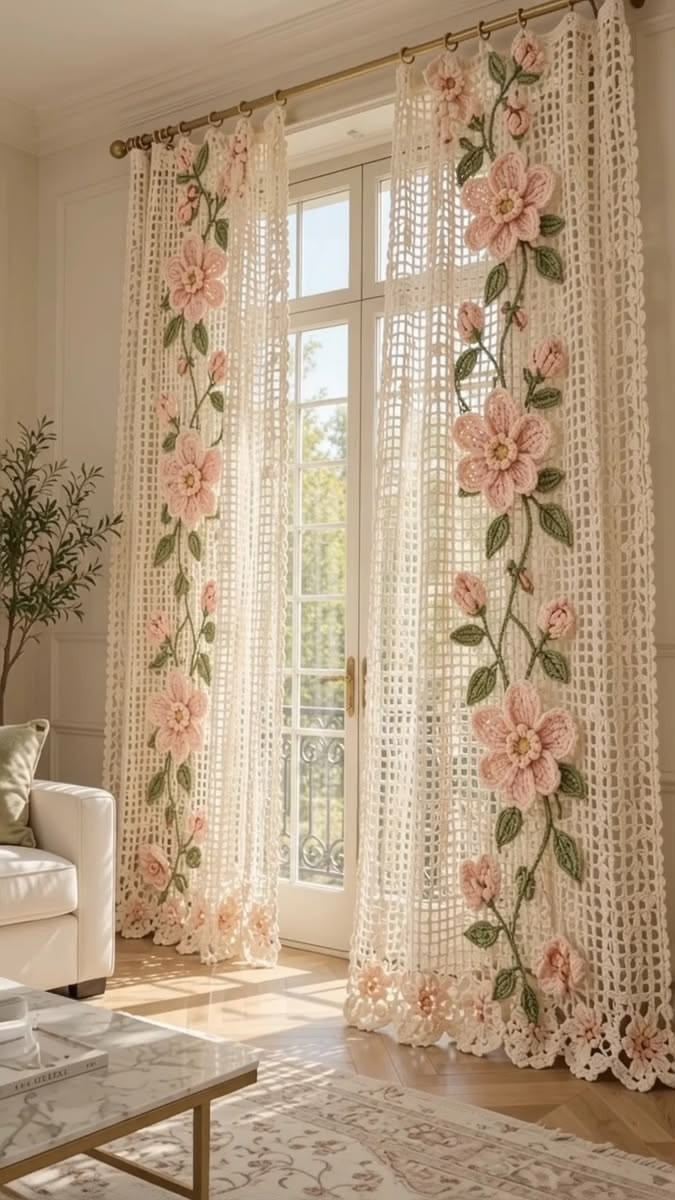

Create these beautiful, romantic crochet curtains featuring an ivory open-mesh background, raised blush-pink flowers, sage-green leaves, delicate climbing vines, and a decorative scalloped lace border.
Skill Level: Intermediate to Advanced
Terminology: US Crochet Terms
Style: Vintage Floral Filet Crochet
Construction: Two curtain panels with separately crocheted floral appliqués.
This is a custom pattern inspired by the photo, not the original designer’s exact instructions.
Materials
- 2,000–3,000 g ivory cotton crochet yarn, depending on curtain dimensions and yarn weight
- Blush-pink cotton yarn for flowers
- Sage-green yarn for leaves
- Dark olive-green yarn for vines
- Pale-yellow yarn for flower centers
- 2.5–3.5 mm crochet hook, depending on yarn
- Yarn needle
- Stitch markers
- Scissors
- Curtain rings or rod
Abbreviations
| Abbreviation | Meaning |
|---|---|
| ch | Chain |
| sc | Single crochet |
| dc | Double crochet |
| tr | Treble crochet |
| sl st | Slip stitch |
| sp | Space |
| st | Stitch |
| rep | Repeat |
| MR | Magic ring |
Part 1: Crochet Mesh Curtain Panels
The curtain uses a delicate open-grid construction to allow sunlight through.
Suggested finished size per panel: 70 cm wide × 220 cm long.
Foundation
- Chain 183 (approximately 60 mesh cells wide).
- Row 1: Dc into the 8th chain from the hook.
- Ch 2, skip 2 chains, dc into the next chain.
- Repeat across the entire foundation.
- Turn.
Mesh Repeat
Row 2: Ch 5 (counts as dc + ch 2). Skip the next ch-2 space, dc into the next dc. Repeat across.
Rows 3 onward: Repeat Row 2 until the panel measures approximately 205 cm, leaving space for the bottom border.
The finished mesh should look light, symmetrical, and evenly spaced.
Make two matching panels.
Part 2: Large 3D Pink Crochet Flowers
Make approximately 8–10 large flowers for the pair of curtains.
Flower Center
Using pale-yellow yarn:
Round 1: Make a magic ring, crochet 10 sc into the ring. Join with sl st.
Round 2: Work 2 sc into each stitch around (20 sc). Fasten off.
Layer 1: Inner Petals
Attach blush-pink yarn.
Round 3: Working into selected stitches around the flower center:
- Ch 3.
- Work 3 dc, 2 tr, 3 dc into the same stitch.
- Ch 3 and sl st into the next stitch.
- Repeat evenly to form five small petals.
Layer 2: Outer Petals
Attach yarn behind the first petal layer.
Round 4: Ch 5 and sl st between petal bases to create five loops.
Round 5: Work into each loop:
- 1 sc
- 2 dc
- 5 tr
- 2 dc
- 1 sc
Repeat for all five petals.
Layer 3: Extra Volume
Create another set of five loops behind the second layer using ch 7 between attachment points.
Into each loop work:
1 sc, 3 dc, 7 tr, 3 dc, 1 sc.
Fasten off and weave in ends.
Gently shape each petal outward to achieve a raised, realistic floral effect.
Part 3: Small Pink Rosebuds
Make approximately 12–16 buds.
- Chain 26 with blush-pink yarn.
- Into the second chain, work 1 sc.
- Work 3 dc into each of the following 12 chains.
- Continue with 2 dc into each remaining chain.
- Fasten off, leaving a long tail.
- Roll the strip into a small rosebud.
- Sew the base securely.
Make smaller and larger buds by changing the starting chain length.
Part 4: Sage-Green Crochet Leaves
Make approximately 35–45 leaves.
Foundation: Ch 13.
Working along one side:
- 1 sc in second chain
- 1 hdc
- 3 dc
- 4 tr
- 2 dc
- 1 sc
Work 3 sc at the tip.
Continue along the opposite side:
- 1 sc
- 2 dc
- 4 tr
- 3 dc
- 1 hdc
- 1 sc
Join with sl st.
For leaf definition, work surface slip stitches through the middle using dark olive-green yarn.
Optional: Add a thin floral wire inside the leaf edging for gentle shaping, keeping wire ends safely covered.
Part 5: Crochet Climbing Vines
Using olive-green cotton yarn:
- Chain 100–180, depending on the vine length required.
- Work sl st along the entire chain to create a slightly thicker stem.
- Fasten off.
Create several winding stems of different lengths.
For smaller branches, crochet chains of 15–35 and attach them to the main vines.
Arrange the stems in flowing, slightly curved lines instead of perfectly straight rows.
Part 6: Decorative Scalloped Lace Border
Attach ivory yarn to the bottom edge.
Round 1: Work sc evenly across the bottom.
Round 2: Ch 5, skip 3 stitches, sc into the next stitch. Repeat.
Round 3: Into each ch-5 loop, work 7 dc followed by 1 sc between loops.
Round 4: Add small picots across the scallops: ch 3, sl st into the first chain.
For a wider decorative border, repeat the shell sequence in multiple rows, increasing the shell size as needed.
Finish with an even, gently scalloped edge.
Part 7: Floral Arrangement and Assembly
The cascading flowers are the main decorative feature.
For each curtain panel, arrange the appliqués vertically in a climbing pattern, with the vines flowing through the flowers and leaves.
Suggested arrangement:
- 4–5 large pink flowers
- 6–8 small rosebuds
- 18–22 green leaves
- 2–3 climbing vines
Sew the flowers securely to the curtain mesh, then attach the leaves and vines. Spread the floral elements naturally across the mesh without pulling the fabric out of shape.
Part 8: Curtain Hanging Loops
Using ivory yarn:
- Chain 20.
- Work 2 rows of sc across the chain.
- Fold the strip to create a loop.
- Sew both ends to the top of the curtain.
Make approximately 8–12 loops per panel, evenly spaced, or use curtain rings as shown in the reference photograph.
Finishing
Soak the curtains gently in lukewarm water, remove excess moisture without twisting, and block flat to the desired dimensions. Shape the petals and leaves individually, and allow everything to dry completely before hanging.
Final result: Two elegant ivory crochet curtain panels decorated with cascading blush-pink 3D flowers, green leaves, winding vines, and a vintage scalloped lace border—ideal for romantic bedrooms, living rooms, or cottage-style home decor.
Note: The stitch counts and flower quantities are adaptable estimates. Make and measure a mesh swatch before starting, as the finished curtain size depends on yarn thickness, hook size, and tension.
