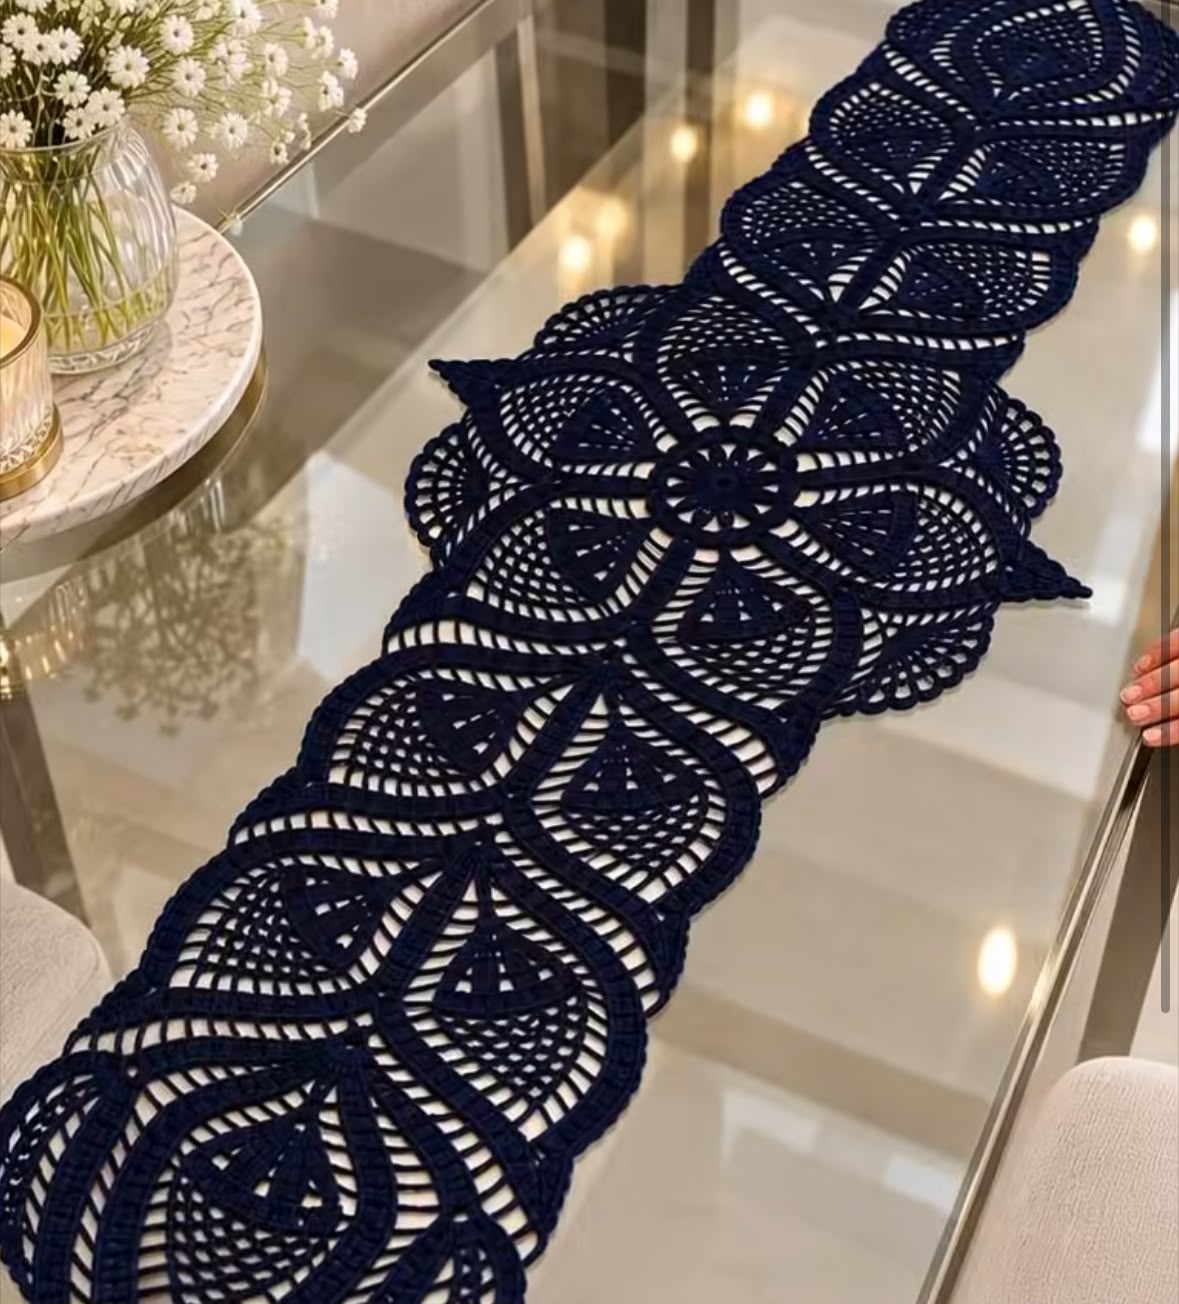

Inspired by the reference photo. This is a reconstructed pattern, not the original designer’s verified instructions. It uses overlapping lace motifs to create a similar elegant floral and leaf-like appearance.
Materials
- 600–800 g navy blue cotton yarn (sport or DK weight)
- 3.0–3.5 mm crochet hook
- Stitch markers
- Yarn needle
- Scissors
- Blocking pins and mat
Finished size: Approximately 35 × 150 cm (14 × 59 inches), adjustable.
Skill level: Advanced intermediate.
Crochet Abbreviations (US Terms)
- MR – Magic ring
- CH – Chain
- SL ST – Slip stitch
- SC – Single crochet
- HDC – Half double crochet
- DC – Double crochet
- TR – Treble crochet
- SP – Space
- REP – Repeat
- PICOT – CH 3, SL ST into first chain
Part 1: Crochet the Central Flower
Round 1 – Foundation
Make a magic ring. CH 3 (counts as first DC), work 15 DC into the ring. Join with SL ST.
Total: 16 DC.
Round 2 – Open Center
CH 5 (counts as DC + CH 2).
Skip 1 stitch, DC in next stitch, CH 2.
Repeat around and join.
You should have 8 open spaces.
Round 3 – Flower Petals
Into each CH-2 space work:
SC, HDC, 3 DC, HDC, SC.
Repeat around to create 8 petals.
Round 4 – Decorative Arches
Attach yarn behind the petals.
CH 7, SC between the next two petals.
Repeat around to form 8 large arches.
Round 5 – Lace Framework
Into each CH-7 arch work:
SC, CH 3, DC, CH 3, TR, CH 3, DC, CH 3, SC.
Repeat around.
Fasten off.
Part 2: Create the Large Leaf-Shaped Motifs
Each large leaf is worked separately and attached to the central floral framework.
Row 1
CH 25.
SC in second chain from hook.
HDC in next 3 stitches.
DC in next 15 stitches.
HDC in next 3 stitches.
Work 3 SC into the final chain.
Continue along the opposite side of the foundation chain with corresponding stitches.
Row 2 – Outer Leaf Shape
CH 3, turn.
Work DC stitches around the leaf, placing 2 DC in the curved end stitches to create a rounded tip.
Row 3 – Open Lace
CH 5, skip 2 stitches, SC in next stitch.
Repeat around both sides.
Row 4 – Raised Outline
Work SC into each stitch and 3 SC into each chain space.
For a stronger raised border, work an additional round of SC.
Row 5 – Decorative Edge
Repeat SC, CH 3, skip 2 stitches around the leaf.
Make 8 large leaves for each main floral motif.
Part 3: Assemble the Floral Medallion
Position the 8 leaves around the central flower.
Arrange them in a circular overlapping pattern, with each leaf angled slightly over the next.
Attach the narrow base of each leaf behind a central flower petal using SL ST or secure sewing stitches.
Join neighboring leaves at two or three points to stabilize the design.
This creates the layered, swirling floral appearance seen in the photograph.
Part 4: Extend the Table Runner
Make approximately 6–8 large floral medallions, depending on your preferred length and yarn gauge.
Arrange the medallions in a straight line with a slight overlap between neighboring motifs.
Join them using SC through corresponding outer arches.
For additional decorative spaces, use:
CH 5, SC into the next connecting arch, CH 5.
Repeat until the motifs are securely joined.
Keep the medallions aligned so the runner remains straight.
Part 5: Decorative Outer Border
Round 1
Join navy blue yarn at any outside edge.
Work SC evenly around the entire runner.
Place additional SC stitches at the pointed ends to prevent curling.
Round 2
Repeat around:
SC, CH 5, skip approximately 3 stitches, SC.
Adjust the skipped stitches where necessary to keep the arches even.
Round 3
Work 7 SC into each CH-5 space.
Continue around the runner.
Round 4 – Final Scalloped Edge
Repeat:
SC, HDC, 3 DC, HDC, SC into each suitable outer arch.
Fasten off and weave in all yarn ends.
Finishing and Blocking
- Gently wash the finished table runner.
- Remove excess water using a clean towel.
- Lay the runner flat on a blocking mat.
- Stretch each leaf and flower into a symmetrical shape.
- Pin the decorative points and scalloped borders.
- Allow it to dry completely before removing the pins.
Tips for a Professional Finish
Use mercerized cotton for clearly defined stitches and elegant lacework. Maintain consistent tension throughout the project, especially when working the long leaf motifs.
For the navy blue design shown in the photo, use one solid yarn color throughout. The openwork spaces, overlapping leaves, and raised borders create the contrast without requiring additional colors.
Important: The photographed runner appears to use an intricate interconnected lace construction. This pattern is a simplified interpretation and will not reproduce the original stitch-for-stitch. Make and block one complete medallion before committing to the full runner, so you can adjust the proportions and joining points.
