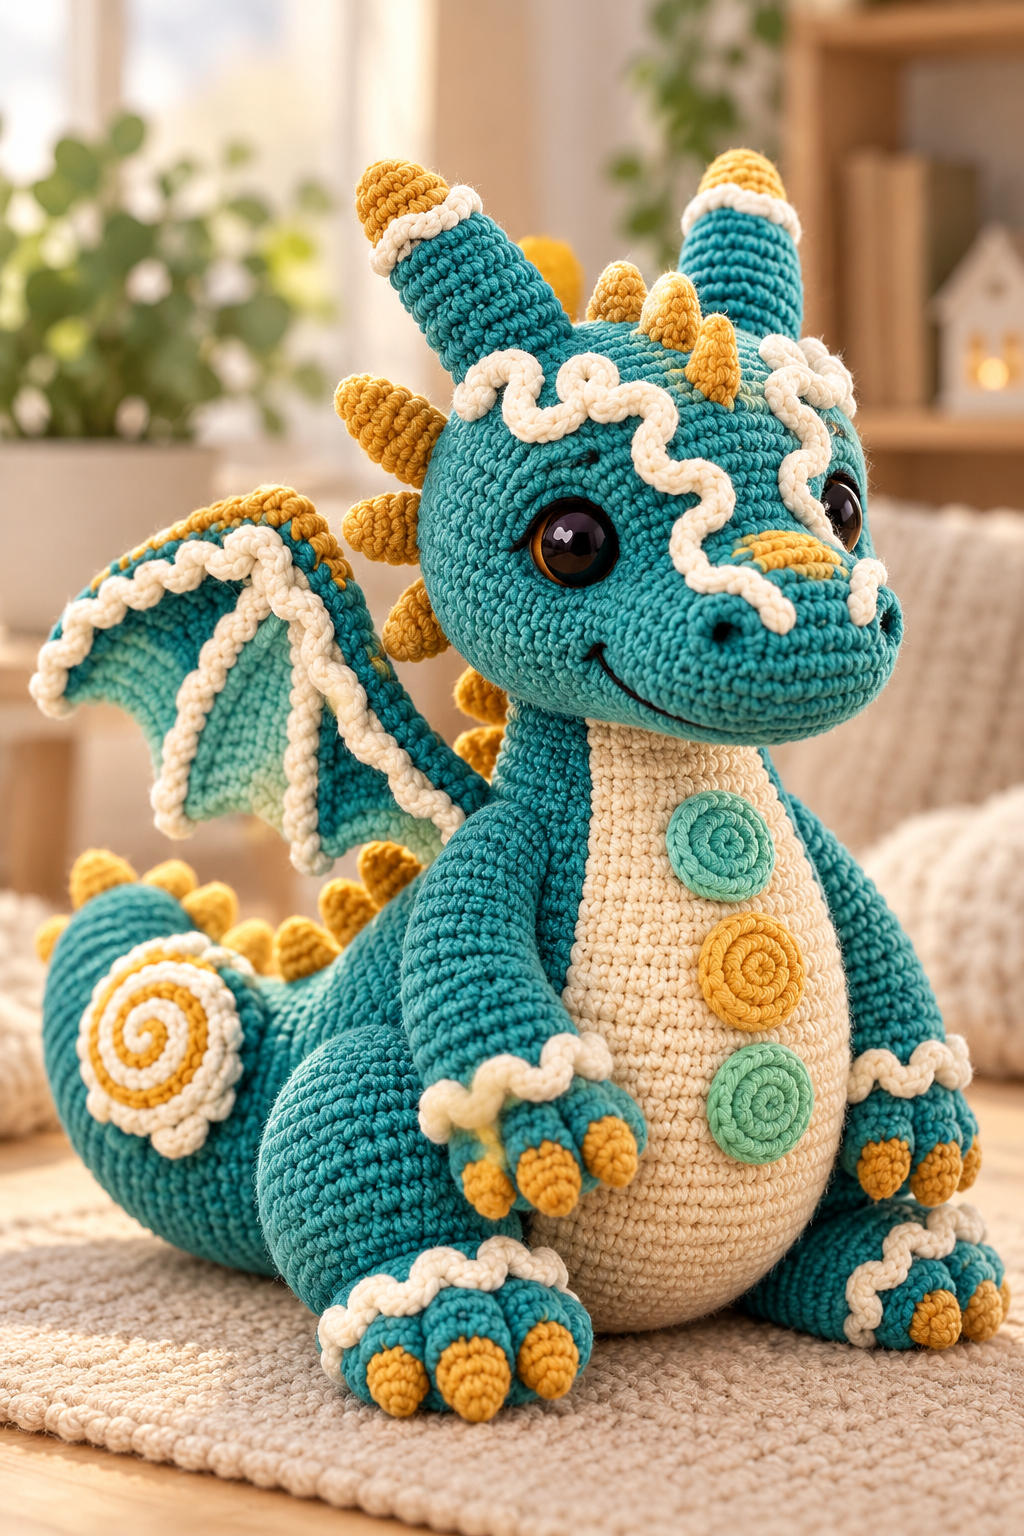

Create an adorable turquoise crochet dragon with a big friendly smile, golden horns, beautiful wings, a cream-colored belly, and colorful candy-inspired decorations.
This is an original crochet pattern inspired by the picture, designed to achieve a similar appearance rather than reproduce an exact designer pattern.
Skill Level: Intermediate Finished Size: Approximately 28–35 cm tall Crochet Terms: US terminology
Materials
- Turquoise cotton or acrylic yarn (main body)
- Cream yarn (belly and decorative icing)
- Golden yellow yarn (horns, claws, and spikes)
- Mint green yarn (wing details and decorations)
- 3.0–3.5 mm crochet hook
- 2 black safety eyes (14–16 mm)
- Polyester fiberfill
- Yarn needle
- Stitch markers
- Scissors
- Black embroidery thread
Abbreviations
- MR – Magic Ring
- CH – Chain
- SC – Single Crochet
- INC – Increase (2 SC in one stitch)
- DEC – Invisible Decrease
- SL ST – Slip Stitch
- HDC – Half Double Crochet
- DC – Double Crochet
- BLO – Back Loop Only
- FO – Fasten Off
Work in continuous spiral rounds unless otherwise indicated.
Part 1: Dragon Body (Turquoise)
Round 1: 6 SC in MR (6)
Round 2: INC around (12)
Round 3: (1 SC, INC) × 6 (18)
Round 4: (2 SC, INC) × 6 (24)
Round 5: (3 SC, INC) × 6 (30)
Round 6: (4 SC, INC) × 6 (36)
Round 7: (5 SC, INC) × 6 (42)
Round 8: (6 SC, INC) × 6 (48)
Round 9: (7 SC, INC) × 6 (54)
Rounds 10–16: SC around (54)
Round 17: (7 SC, DEC) × 6 (48)
Rounds 18–19: SC around (48)
Round 20: (6 SC, DEC) × 6 (42)
Rounds 21–22: SC around (42)
Round 23: (5 SC, DEC) × 6 (36)
Round 24: (4 SC, DEC) × 6 (30)
Rounds 25–26: SC around (30)
Round 27: (3 SC, DEC) × 6 (24)
Round 28: SC around (24)
Stuff firmly, then fasten off, leaving a long tail for sewing.
Part 2: Dragon Head
Using turquoise yarn:
Round 1: 6 SC in MR (6)
Round 2: INC around (12)
Round 3: (SC, INC) × 6 (18)
Round 4: (2 SC, INC) × 6 (24)
Round 5: (3 SC, INC) × 6 (30)
Round 6: (4 SC, INC) × 6 (36)
Round 7: (5 SC, INC) × 6 (42)
Round 8: (6 SC, INC) × 6 (48)
Round 9: (7 SC, INC) × 6 (54)
Round 10: (8 SC, INC) × 6 (60)
Round 11: (9 SC, INC) × 6 (66)
Rounds 12–19: SC around (66)
Round 20: (9 SC, DEC) × 6 (60)
Round 21: SC around (60)
Round 22: (8 SC, DEC) × 6 (54)
Round 23: (7 SC, DEC) × 6 (48)
Round 24: (6 SC, DEC) × 6 (42)
Round 25: (5 SC, DEC) × 6 (36)
Round 26: (4 SC, DEC) × 6 (30)
Round 27: (3 SC, DEC) × 6 (24)
Round 28: (2 SC, DEC) × 6 (18)
Round 29: (SC, DEC) × 6 (12)
Round 30: DEC around (6)
Before closing, place the safety eyes between rounds 14 and 15, approximately 12 stitches apart.
Stuff firmly and close the opening.
Part 3: Cute Dragon Snout
Using turquoise yarn:
Round 1: 6 SC in MR (6)
Round 2: INC around (12)
Round 3: (SC, INC) × 6 (18)
Round 4: (2 SC, INC) × 6 (24)
Round 5: (3 SC, INC) × 6 (30)
Rounds 6–8: SC around (30)
Fasten off, leaving a long sewing tail.
Stuff lightly, flatten into an oval, and sew onto the lower front of the head.
Use black embroidery thread to create a gentle curved smile beneath the snout. Add two tiny nostrils.
Part 4: Cream Belly Panel
Using cream yarn, work in turned rows.
Row 1: CH 13, SC in second CH from hook and across (12)
Row 2: CH 1, turn, INC, 10 SC, INC (14)
Row 3: CH 1, turn, INC, 12 SC, INC (16)
Row 4: CH 1, turn, INC, 14 SC, INC (18)
Rows 5–24: CH 1, turn, SC across (18)
Row 25: CH 1, turn, DEC, 14 SC, DEC (16)
Row 26: CH 1, turn, DEC, 12 SC, DEC (14)
Row 27: CH 1, turn, DEC, 10 SC, DEC (12)
Row 28: CH 1, turn, DEC, 8 SC, DEC (10)
Work SC evenly around the panel for a neat border.
Fasten off and sew to the front of the body.
Part 5: Dragon Arms (Make 2)
Using turquoise yarn:
Round 1: 6 SC in MR (6)
Round 2: INC around (12)
Round 3: (SC, INC) × 6 (18)
Rounds 4–5: SC around (18)
Round 6: (SC, DEC) × 6 (12)
Rounds 7–16: SC around (12)
Stuff lightly, flatten the top, and sew closed.
Attach both arms to the upper sides of the body.
Embroider small golden claws on each hand.
Part 6: Dragon Legs (Make 2)
Using turquoise yarn:
Round 1: 6 SC in MR (6)
Round 2: INC around (12)
Round 3: (SC, INC) × 6 (18)
Round 4: (2 SC, INC) × 6 (24)
Rounds 5–7: SC around (24)
Round 8: (2 SC, DEC) × 6 (18)
Rounds 9–12: SC around (18)
Stuff firmly and fasten off.
Sew the legs to the lower sides of the body.
Use golden yarn to make three small rounded claw details on each foot.
Part 7: Dragon Tail
Using turquoise yarn:
Round 1: 6 SC in MR (6)
Round 2: SC around (6)
Round 3: (SC, INC) × 3 (9)
Rounds 4–6: SC around (9)
Round 7: (2 SC, INC) × 3 (12)
Rounds 8–10: SC around (12)
Round 11: (3 SC, INC) × 3 (15)
Rounds 12–14: SC around (15)
Round 15: (4 SC, INC) × 3 (18)
Rounds 16–20: SC around (18)
Round 21: (5 SC, INC) × 3 (21)
Rounds 22–24: SC around (21)
Stuff gradually and sew the wider end to the back of the dragon.
Curve the tail slightly while sewing for a playful appearance.
Part 8: Crochet Dragon Wings (Make 2)
Using turquoise yarn:
Row 1: CH 3, SC in second CH and next CH (2)
Row 2: CH 1, turn, INC in each stitch (4)
Row 3: CH 1, turn, SC across (4)
Row 4: CH 1, turn, INC, 2 SC, INC (6)
Row 5: SC across (6)
Row 6: INC, 4 SC, INC (8)
Row 7: SC across (8)
Row 8: INC, 6 SC, INC (10)
Row 9: SC across (10)
Row 10: INC, 8 SC, INC (12)
Row 11: SC across (12)
Row 12: INC, 10 SC, INC (14)
Row 13: SC across (14)
Fasten off.
Crochet a cream border around the wing edges.
Use mint yarn to embroider wing veins and cream yarn for decorative raised lines.
Make a second wing, reversing the side facing outward.
Sew both wings securely to the back of the body.
Part 9: Golden Dragon Horns (Make 2)
Using golden yarn:
Round 1: 4 SC in MR (4)
Round 2: SC around (4)
Round 3: (SC, INC) × 2 (6)
Round 4: SC around (6)
Round 5: (2 SC, INC) × 2 (8)
Round 6: SC around (8)
Round 7: (3 SC, INC) × 2 (10)
Round 8: SC around (10)
Round 9: (4 SC, INC) × 2 (12)
Rounds 10–12: SC around (12)
Stuff lightly, fasten off, and attach the horns to the top of the head.
Add small golden spikes down the dragon’s back using the same method with fewer rounds.
Part 10: Candy Spiral Decorations
Make three decorative spirals for the belly.
Using mint green or golden yellow yarn:
Round 1: 6 SC in MR (6)
Round 2: INC around (12)
Round 3: (SC, INC) × 6 (18)
Fasten off.
Use contrasting yarn to embroider a spiral pattern on the surface of each circle.
Make two mint spirals and one golden spiral.
Sew vertically down the cream belly panel.
Make one additional spiral for the tail.
Part 11: Decorative Cream Icing
Using cream yarn:
CH 60–90, depending on the desired length.
Work 1 SL ST into each chain to make a slightly raised cord.
Create several cords and sew them in wavy patterns around:
- The forehead and horns
- The wings
- The wrists
- The ankles
- The tail
Arrange the cords in gentle curves to resemble decorative icing.
Part 12: Final Assembly
- Sew the head securely onto the stuffed body.
- Attach the cream belly panel.
- Sew the arms and legs into position.
- Attach both wings behind the shoulders.
- Sew the tail to the lower back.
- Position the golden horns and back spikes.
- Attach the crochet spiral decorations.
- Add the cream icing details.
- Embroider the dragon’s friendly smile.
- Adjust the stuffing and shape the finished dragon.
For a toy intended for children under three, use embroidered eyes instead of plastic safety eyes and secure all small decorations carefully.
Finished Result
A large, adorable turquoise crochet dragon featuring a smiling face, oversized expressive eyes, golden horns, soft cream belly, decorative spirals, detailed wings, and a curled tail.
Perfect for: Handmade gifts, nursery decoration, crochet collections, and adorable amigurumi projects.
Pattern note: The finished size and proportions will vary with yarn weight, tension, and stuffing.
