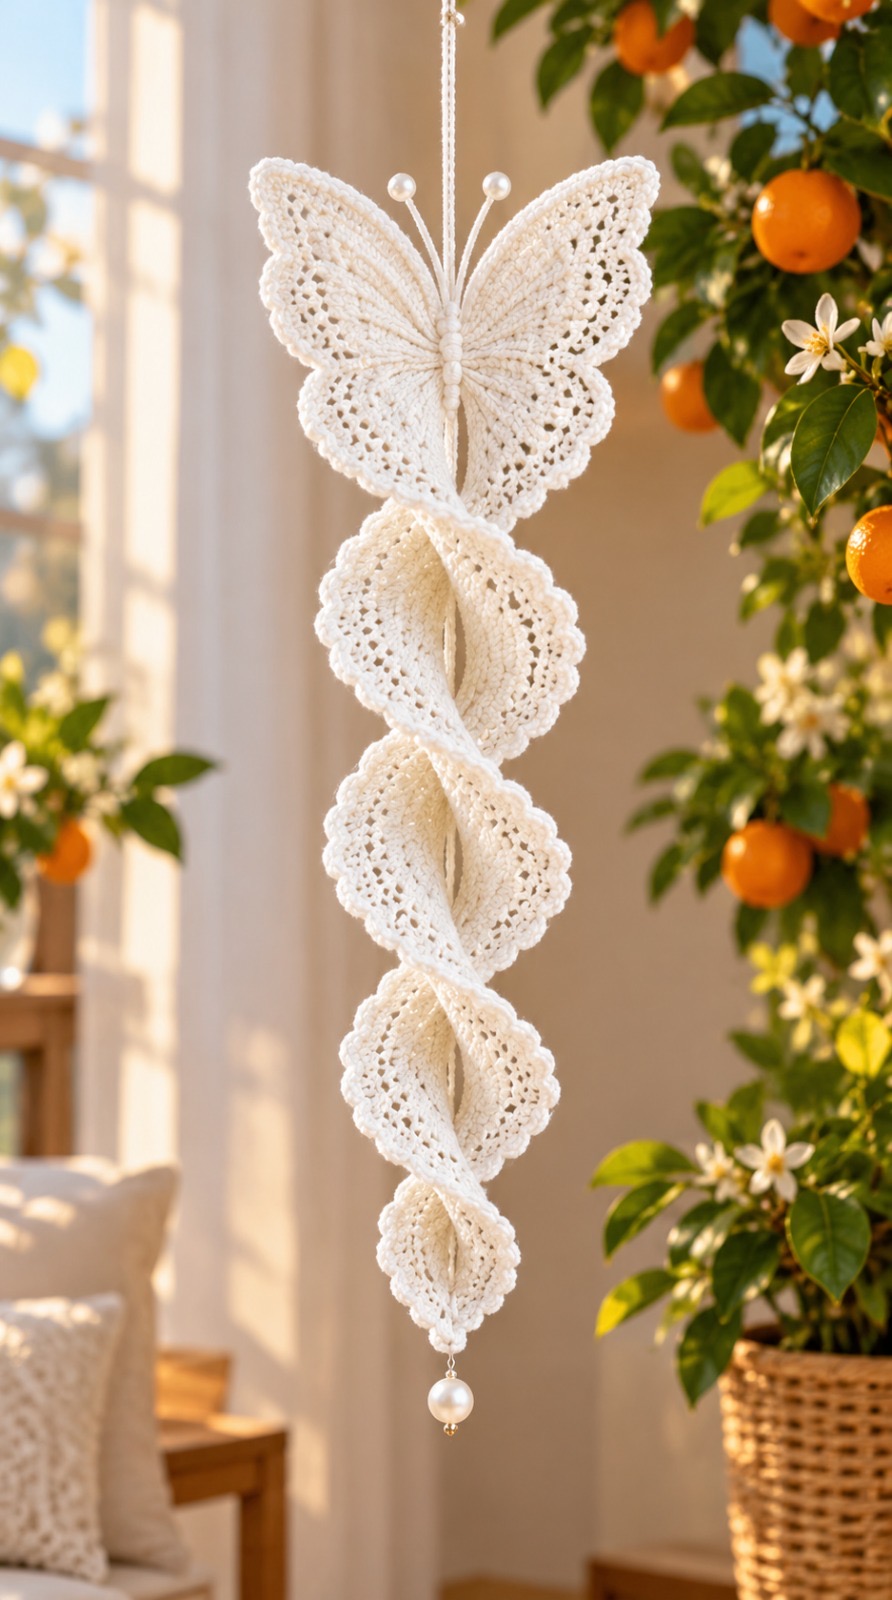

This is an original, untested pattern inspired by your image. It recreates the butterfly and twisting lace shapes; it is not the exact pattern used in the photograph.
Skill level: Intermediate
Terms: US crochet
Approximate length: 45–60 cm, depending on yarn, blocking, and assembly.
Materials
- Fine cotton yarn in ivory, approximately 150–200 m
- 1.75–2.25 mm crochet hook suitable for your yarn
- Tapestry needle
- Blocking mat and pins
- Fabric stiffener
- Two small pearl beads for antennae
- One larger pearl bead for the bottom
- Strong matching sewing thread
Abbreviations
- ch — chain
- sc — single crochet
- hdc — half double crochet
- dc — double crochet
- sl st — slip stitch
- inc — 2 sc in one stitch
- dec — single crochet two stitches together
Ch 1 at the start of a row does not count as a stitch.
Construction
Make a butterfly for the top and four pairs of lace leaves below it. Each pair forms an open, twisted shape. A central cord supports the ornament.
1. Basic pointed leaf
This leaf is worked from one tip to the other in rows.
Row 1: Ch 2, work 2 sc in the second ch from the hook. Turn. 2 sts
Row 2: Ch 1, inc in both stitches. Turn. 4 sts
Row 3: Ch 1, inc in the first stitch, sc across to the last stitch, inc in the last stitch. Turn. 6 sts
Repeat Row 3 until you reach the required maximum width:
| Leaf size | Maximum width | Final increase row |
| Large | 16 sts | Row 8 |
| Medium | 14 sts | Row 7 |
| Small | 12 sts | Row 6 |
| Extra small | 10 sts | Row 5 |
Center row: Ch 1, sc in every stitch. Turn.
Decrease row: Ch 1, dec over the first two stitches, sc across to the last two stitches, dec over the last two stitches. Turn.
Repeat the decrease row until 2 stitches remain.
Final row: Ch 1, dec. Do not fasten off.
Foundation edging
Ch 1 and sc evenly around the entire leaf, placing approximately one sc in each row end. Work 3 sc at each pointed tip. Join with a sl st.
Keep this round flat. Add or omit a stitch if the edge pulls or ripples.
Lace round
Ch 1, sc in the joining stitch.
Repeat (ch 3, skip 1 stitch, sc in the next stitch) around. At each pointed tip, work (sc, ch 3, sc) into the middle tip stitch.
Adjust the final repeat to fit and join with a sl st.
Scallop round
In each ch-3 space, work:
(sc, hdc, 3 dc, hdc, sc).
Join and fasten off, leaving a sewing tail.
Make both leaves in each pair with the same stitch placement and number of scallops.
2. Make the hanging sections
Make:
- 2 large leaves
- 2 medium leaves
- 2 small leaves
- 2 extra-small leaves
Block all eight leaves before assembly. Gently stretch them lengthwise to soften the diamond shape into an elongated leaf.
Form each open section
- Place two matching leaves together.
- Sew their upper tips together with a few secure stitches.
- Sew their lower tips together.
- Leave both long sides open.
- Separate the leaves at their centers to create a hollow shape.
- Rotate the lower joined tips approximately a quarter-turn relative to the upper tips.
Apply stiffener and support the leaves in this twisted position while they dry. Keep any shaping supports covered with plastic so they release easily.
The finished sections should remain open rather than collapsing flat.
3. Butterfly wings
Use the basic leaf pattern to make:
- Two upper wings: increase to 16 stitches.
- Two lower wings: increase to 10 stitches.
Work the same foundation edging, lace round, and scallop round on all four wings.
Block the upper wings long and narrow. Block the lower wings shorter and rounder.
Arrange one narrow tip of each wing at the center, with the larger wings pointing upward and outward and the smaller wings downward and outward. Stitch the four bases together securely.
4. Butterfly body
Row 1: Ch 15, sc in the second ch from the hook and in each remaining ch. Turn. 14 sc
Rows 2–3: Ch 1, sc across. Turn. 14 sc
Fasten off with a long tail.
Roll the strip lengthwise into a narrow tube and stitch the long edges together. Wrap a separate length of ivory yarn around it at close intervals to create the ribbed appearance.
Sew the body over the wing joins.
Antennae: Make two chains of approximately 10–12 stitches. Secure a small pearl to one end of each chain with sewing thread, then attach the other ends behind the upper body. Lightly stiffen and shape.
5. Central hanging cord
Make a chain approximately 60–75 cm long, then sl st back along it for strength. Alternatively, use a sturdy twisted cotton cord.
Leave a hanging loop above the butterfly.
Run the cord behind the butterfly body and through the center of each open section. Arrange them in descending order:
Butterfly → large → medium → small → extra small.
Sew both joined tips of every section to the central cord. Attach neighboring sections closely, with their tips almost touching.
Rotate successive sections slightly to create a continuous spiral effect. Secure each position with sewing thread.
6. Bottom pearl and finishing
Sew the large pearl to the bottom cord using several passes of strong thread. Secure and hide all ends.
Hang the ornament and check its balance. Adjust the wing angles and the rotation of each section before applying any final stiffener.
Let everything dry completely while supported in its finished shape. The sculpted twist comes mainly from shaping, stiffening, and assembly.
