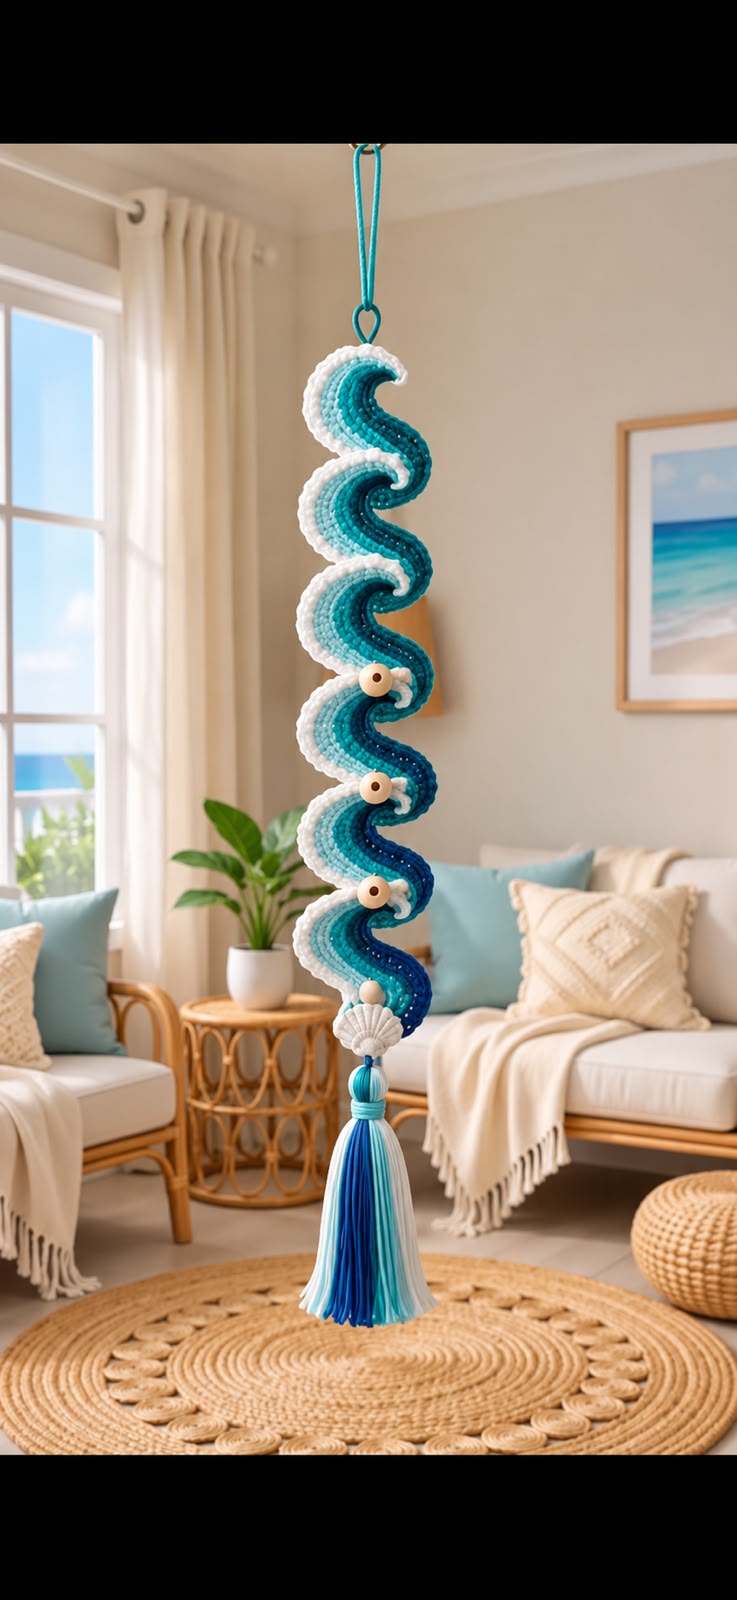

This beautiful ocean-inspired crochet wall hanging features flowing S-shaped waves in shades of turquoise, aqua, deep blue, and white, decorated with wooden beads, a seashell, and a long tassel.
Skill Level: Intermediate
Finished Length: Approximately 65–80 cm, including the hanging loop and tassel.
This is an original pattern inspired by the photo, not the exact designer’s pattern. The sculpted waves are approximated using crochet increases, color changes, and shaping.
Materials
- Cotton yarn (DK weight):
- White – 50 g
- Light aqua – 50 g
- Turquoise – 50 g
- Deep teal – 50 g
- Royal blue – 30 g
- 3.5 mm crochet hook
- 3 small wooden beads
- 1 decorative seashell or crocheted shell
- Yarn needle
- Scissors
- Fabric stiffener (optional)
- Tassel-making cardboard
Abbreviations (US Terms)
CH – Chain
SC – Single Crochet
HDC – Half Double Crochet
DC – Double Crochet
SL ST – Slip Stitch
INC – 2 stitches in the same stitch
BLO – Back Loop Only
FO – Fasten Off
Part 1: Crochet the Spiral Wave
The hanging consists of one long, layered S-shaped wave with approximately five curves.
Row 1 – Foundation
Using deep teal yarn:
CH 95.
Starting in the second chain from the hook, work 1 SC into each chain.
CH 1, turn.
Row 2 – First Wave Shaping
Work:
- 8 SC
- 8 HDC
- 12 DC
- 8 HDC
- 8 SC
- 8 HDC
- 12 DC
- 8 HDC
- 8 SC
Continue in SC across any remaining stitches.
CH 1, turn.
Row 3 – Deep Blue Wave
Join royal blue yarn.
Work 1 SC in each stitch, placing 2 SC in every sixth stitch.
This creates additional fabric needed for the curves.
CH 1, turn.
Row 4 – Turquoise Layer
Join turquoise yarn.
Work 1 HDC in each stitch.
At the outer edges of the intended curves, work 2 HDC in every fourth stitch.
On the inner edges, use SL ST or SC to keep them tighter.
CH 1, turn.
Row 5 – Aqua Layer
Join light aqua yarn.
Work 1 SC in each stitch, adding increases around the outside of each curve.
Keep the stitches even to create a smooth gradient effect.
CH 1, turn.
Row 6 – White Wave Border
Join white yarn.
Work 1 SC along the entire outer edge.
For the softly scalloped appearance, repeat:
1 SC, 1 HDC, 2 DC in the same stitch, 1 HDC, 1 SC.
Space the scallops evenly along the edge.
FO and weave in ends.
Part 2: Shape the Flowing Waves
Lay the crocheted strip flat.
Gently bend the strip into alternating S-shaped curves, creating approximately five flowing ocean waves.
To preserve the decorative shape:
- Pin the strip into its desired S-shaped position on a blocking mat.
- Lightly steam-block or wet-block, according to the yarn type.
- Let it dry completely.
- Secure the inner folds with small hidden stitches where necessary.
For a firmer hanging decoration, apply a small amount of fabric stiffener to the back.
Important: A straight strip worked with the increases above will not automatically form the exact sculptural S-shape in the photograph. Blocking and hidden securing stitches are needed, and the precise curve may require adjustments.
Part 3: Wooden Bead Decorations
Thread 3 natural wooden beads onto short strands of white or turquoise yarn.
Attach one bead near the middle of three separate wave curves.
Secure each bead firmly on the back with a knot and a few stitches.
Part 4: Crochet the Seashell
Using white yarn:
Round 1: Make a magic ring and work 6 SC into the ring.
Round 2: Work 2 SC into each stitch (12 stitches).
Round 3: Repeat (1 SC, INC) around (18 stitches).
Round 4: Work 5 SC, 5 HDC, 5 DC, 3 SC.
Fasten off.
Shape the shell into a fan by gently spreading its outer edge. Embroider a few radiating lines to create shell ridges.
Attach the shell to the bottom of the wave.
Part 5: Make the Ocean Tassel
Cut approximately 40–50 strands of yarn, each 30–35 cm long.
Use white, turquoise, aqua, and royal blue yarn in equal or graduated amounts.
Fold all strands in half.
Tie firmly at the folded top and wrap a short piece of turquoise yarn around the bundle approximately 3 cm below the top.
Trim the ends evenly.
Attach the tassel beneath the crocheted seashell.
Part 6: Hanging Loop
Using turquoise yarn:
CH 55–65, depending on the preferred hanging length.
SL ST back along the chain to reinforce it.
Fold the cord into a loop and securely sew both ends to the top of the spiral.
Finishing
Weave in all loose yarn ends. Arrange the S-shaped curves so the waves appear to flow naturally downward.
Check the attachment points, beads, shell, and tassel for security.
Hang the finished decoration near a window, in a coastal-themed living room, or on a bedroom wall.
Finished result: A decorative ocean wave crochet hanging with five flowing curves, white scalloped edges, turquoise-blue color transitions, natural wooden beads, a white seashell, and a long multicolored tassel.
