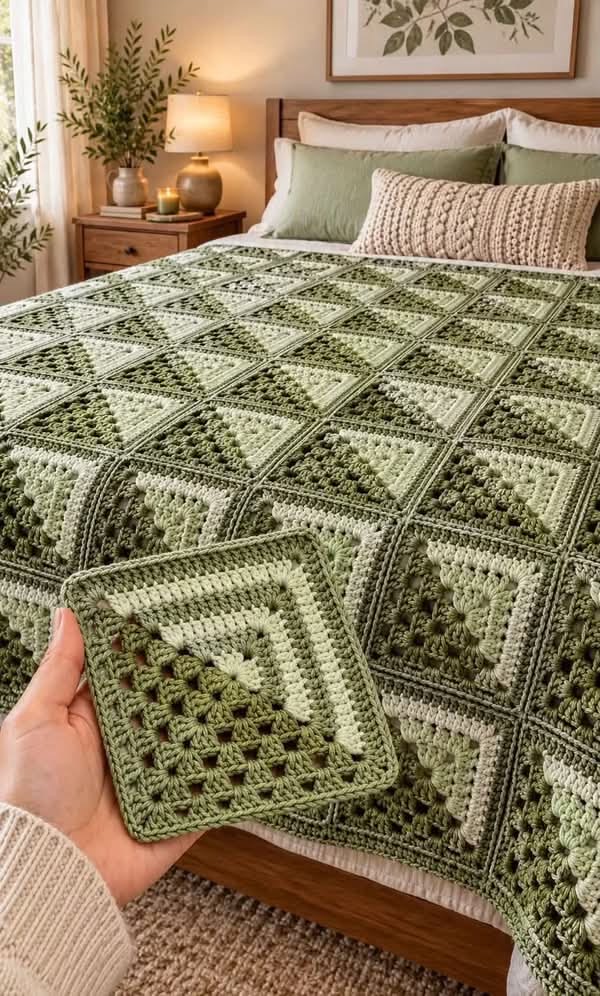

Create a beautiful, cozy crochet bedspread featuring textured granny squares in soft sage green, olive green, and light cream-green. This handmade blanket combines classic granny square construction with raised floral clusters, decorative borders, and matching pillow covers.
This is an original photo-inspired pattern designed to recreate a similar appearance. The exact stitch instructions used to make the pictured blanket are not available.
1. Materials Needed
Skill Level: Intermediate
Finished Size: Approximately 90 × 100 inches (229 × 254 cm), suitable for a queen-size bed with some drape.
Materials:
- Worsted-weight yarn (Category 4)
- Sage green yarn: approximately 3,000 yards
- Olive green yarn: approximately 2,500 yards
- Light cream-green yarn: approximately 2,000 yards
- 5.0 mm crochet hook
- Yarn needle
- Stitch markers
- Scissors
- Measuring tape
Yarn quantities are estimates and will vary depending on gauge, stitch density, and final dimensions.
2. Crochet Abbreviations (US Terms)
| Abbreviation | Meaning |
| MR | Magic Ring |
| ch | Chain |
| sl st | Slip Stitch |
| sc | Single Crochet |
| hdc | Half Double Crochet |
| dc | Double Crochet |
| tr | Treble Crochet |
| sp | Space |
| st | Stitch |
| rep | Repeat |
| FO | Fasten Off |
Special Stitch – Bobble (BO): Work 5 unfinished dc into the same stitch, yarn over, and pull through all 6 loops on the hook. Ch 1 to secure.
3. Crochet the Floral Granny Square
Each square is approximately 9 × 9 inches after blocking.
Round 1 – Floral Center
Using olive green yarn:
- Make a magic ring.
- Ch 3 (counts as first dc).
- Work 11 dc into the ring.
- Pull the ring tight.
- Join with a sl st into the top of the beginning ch 3.
You should have 12 dc stitches.
Round 2 – Raised Flower Clusters
Continue with olive green yarn.
- Ch 1.
- Work 1 bobble into the first stitch.
- Ch 1.
- Repeat (bobble in next stitch, ch 1) around.
- Join with a sl st.
You should have 12 raised bobbles.
Round 3 – Open Granny Texture
Join sage green yarn in any chain space.
- Ch 3, work 2 dc in the same space.
- Ch 1.
- Work 3 dc in the next chain space.
- Ch 1.
- Repeat around.
- Join with a sl st.
This creates 12 granny clusters.
Round 4 – Shape the Square
Join light cream-green yarn in any ch-1 space.
Work the following sequence around the 12 spaces:
- First space: (3 dc, ch 2, 3 dc) to form a corner.
- Next two spaces: 3 dc in each space, with ch 1 between groups.
- Repeat this three-space sequence around.
At each corner, work (3 dc, ch 2, 3 dc).
Join with a sl st.
You now have four defined corners.
Round 5 – Expand the Granny Square
Continue with cream-green yarn.
- Sl st into the next corner space.
- Ch 3, work 2 dc, ch 2, 3 dc in the same corner.
- Ch 1.
- Work 3 dc in each side space, separated by ch 1.
- At every corner, work (3 dc, ch 2, 3 dc).
- Repeat around and join.
Round 6 – Textured Olive Border
Join olive green yarn at any corner.
- Ch 1.
- Work 3 sc into the corner space.
- Work 1 sc in each stitch and chain space along the side.
- Work 3 sc into each remaining corner.
- Join with a sl st.
Round 7 – Decorative Raised Border
Continue with olive green yarn.
- Ch 1.
- Work sc evenly around the square.
- At each corner, work 3 sc into the center corner stitch.
- For additional texture, work selected side stitches in the back loops only.
- Join and fasten off.
Block the square to achieve straight edges and uniform dimensions.
4. Make the Full Bedspread
For a queen-size bedspread, make approximately 110 granny squares, arranged in 10 columns and 11 rows.
If each square measures 9 inches after blocking, the joined panel will be approximately 90 × 99 inches before any additional edging.
Arrange the squares on a large flat surface, alternating their orientation to create a beautiful geometric pattern.
Joining Method
Use olive green yarn.
- Place two squares with right sides facing.
- Insert the hook through the corresponding outer loops of both squares.
- Work slip stitches along the entire edge.
- Repeat to join squares into rows.
- Join the completed rows together.
- Weave in loose ends securely.
Alternatively, use mattress stitch for a flatter, less visible seam.
5. Add the Bedspread Border
Round 1
Join olive green yarn in any corner.
Work sc evenly around the blanket, placing 3 sc into each corner.
Round 2
Ch 3, then work dc in each stitch around.
At each corner, work (2 dc, ch 2, 2 dc).
Round 3
Work sc around the entire blanket, placing 3 sc into each corner space.
Fasten off and weave in all ends.
6. Matching Crochet Pillow Covers
To coordinate with the bedspread, create matching decorative pillow covers using the same granny square design.
Suggested pillow size: 18 × 18 inches.
Front Panel
- Crochet 4 granny squares.
- Arrange them in a 2 × 2 layout.
- Join the squares using olive green yarn.
- Block the panel to approximately 18 × 18 inches.
Back Panel
Make a solid crochet panel using double crochet rows, or create a second panel from four granny squares.
Assembly
- Place the front and back panels with right sides together.
- Sew or crochet along three sides.
- Insert the pillow form.
- Close the final side using a yarn needle.
For removable covers, create an overlapping envelope-style back.
7. Finishing and Blocking
For the best professional result:
- Weave in all loose yarn ends.
- Lightly dampen the finished blanket.
- Lay it flat on a clean surface.
- Gently straighten each granny square.
- Allow the blanket to dry completely.
- Arrange the finished blanket neatly across the bed.
- Add the matching crochet pillows for a coordinated look.
8. Helpful Crochet Tips
- Keep your tension consistent so all granny squares are the same size.
- Crochet one sample square first to check your gauge.
- Use stitch markers to identify the corners.
- Alternate the green shades for a rich, layered appearance.
- Block individual squares before joining them.
- For a thicker, warmer blanket, use soft acrylic or wool-blend yarn.
- For more defined stitches, choose cotton or cotton-blend yarn.
9. Frequently Asked Questions
Can beginners make this bedspread?
Yes, beginners familiar with basic crochet stitches can learn this pattern. The joining process and textured stitches require some practice.
How many granny squares do I need?
Approximately 110 squares for the suggested queen-size version. Adjust the quantity according to your square measurements and desired blanket size.
Can I use different colors?
Absolutely. Cream and beige, dusty pink and white, lavender and ivory, or forest green and gold are beautiful alternatives.
How long does this project take?
Depending on experience and crochet speed, a full bedspread may take several weeks of regular crocheting.
Conclusion
This sage green granny square crochet bedspread is a beautiful combination of classic crochet techniques, textured floral motifs, and elegant handmade design. With its matching pillows and soft earthy colors, it creates a warm and inviting bedroom atmosphere.
