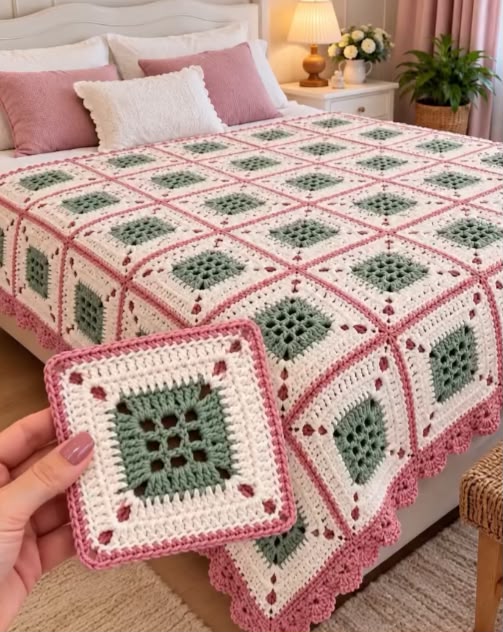

Create a beautiful handmade crochet bedspread featuring sage green granny square centers, creamy white borders, dusty rose edging, and a delicate scalloped finish. This romantic, vintage-inspired blanket is perfect for queen-size beds, farmhouse bedrooms, and cozy home décor.
Note: This is a reconstructed pattern inspired by the photo, not the original designer’s verified instructions.
Materials
- Sage green yarn (square centers)
- Cream or ivory yarn (main borders)
- Dusty rose pink yarn (joining and edging)
- Small amount of dark rose yarn (decorative accents)
- DK or light worsted-weight cotton/acrylic yarn
- 4.0 mm or 4.5 mm crochet hook
- Yarn needle
- Scissors
- Stitch markers
Skill Level: Intermediate
Finished Size: Approximately 90 × 100 inches (229 × 254 cm), depending on yarn, tension, and the number of squares.
Crochet Abbreviations (US Terms)
- ch – Chain
- sl st – Slip stitch
- sc – Single crochet
- hdc – Half double crochet
- dc – Double crochet
- tr – Treble crochet
- sp – Space
- st – Stitch
- rep – Repeat
Part 1: Sage Green Granny Square Center
Round 1: With sage green yarn, make a magic ring. Ch 3 (counts as first dc), work 2 dc into ring, ch 2. Repeat (3 dc, ch 2) three more times. Join with sl st. You should have four granny clusters.
Round 2: Sl st into first corner space. Ch 3, 2 dc, ch 2, 3 dc into same corner. Ch 1. In each remaining corner, work (3 dc, ch 2, 3 dc), ch 1. Join.
Round 3: In each corner, work (3 dc, ch 2, 3 dc). Work 3 dc into each ch-1 space along the sides, separating clusters with ch 1. Join.
Round 4: Repeat Round 3, adding one extra granny cluster along each side.
Round 5: Continue the granny square pattern until the green center measures approximately 4–5 inches.
Fasten off and weave in ends.
Part 2: Cream White Decorative Border
Round 6: Join cream yarn in any corner. Work (3 dc, ch 2, 3 dc) into each corner. Work granny clusters into the spaces along each side, with ch 1 between clusters. Join.
Round 7: Ch 1, work sc evenly around the square, placing 3 sc into each corner space. Join.
Round 8: Ch 3, work dc in each stitch around, placing (2 dc, ch 2, 2 dc) in each corner.
Round 9: Ch 1, work sc around. For a delicate openwork effect, replace selected groups of stitches with (ch 2, skip 2 stitches), keeping the openings symmetrical on all four sides. Work 3 sc in each corner.
Round 10: Work another round of dc with (2 dc, ch 2, 2 dc) in every corner.
Part 3: Dusty Rose Pink Border
Round 11: Join dusty rose yarn in a corner space. Ch 1, work sc evenly along each side, placing (sc, ch 2, sc) into each corner.
Round 12: Work one round of hdc around the square, placing (2 hdc, ch 2, 2 hdc) in the corners.
Round 13: For a decorative textured finish, work sc in next stitch, skip next stitch, 3 dc in next stitch, skip next stitch along the edges, adjusting near each corner to keep the border flat.
Fasten off.
Each finished square should measure approximately 8–10 inches.
Part 4: Joining the Granny Squares
Make approximately 90–110 squares, depending on the desired bedspread size.
- Arrange the squares in straight rows with all motifs facing the same direction.
- Use dusty rose yarn to join two squares with wrong sides together.
- Work a slip-stitch seam or single-crochet seam through the corresponding edge stitches.
- Continue joining squares into rows.
- Join the completed rows together to create a rectangular blanket.
- Keep the seams neat and slightly raised for the pink lattice effect seen in the photo.
For a 90 × 100-inch blanket using 10-inch squares, make 90 squares arranged 9 across × 10 down, before adding the final outer border.
Part 5: Romantic Scalloped Bedspread Edging
Round 1: Join dusty rose yarn to the outer edge of the assembled blanket. Work sc evenly around the perimeter. Place 3 sc at each corner.
Round 2: Work dc in every stitch, increasing as needed at the corners to keep the blanket flat.
Round 3: Ch 1, sc in first stitch. Skip 2 stitches, work 5 dc into next stitch, skip 2 stitches, sc into next stitch. Repeat around the entire blanket, adjusting the spacing at corners.
Round 4: Work a delicate finishing round of sc along the scallops if desired.
Fasten off and weave in all ends.
Part 6: Finishing
- Weave in all remaining yarn tails securely.
- Gently wash the blanket according to the yarn manufacturer’s instructions.
- Block the granny squares and edges to even out the shape.
- Allow the blanket to dry completely.
- Spread the finished bedspread across the mattress, letting the scalloped pink border drape over the sides.
Optional Matching Pillow Covers
Create matching decorative pillows using the same sage green, cream, and rose granny square motifs.
Make four squares for a small pillow front, join them in a 2 × 2 arrangement, and attach a matching fabric or crocheted backing.
Helpful Tips
- Keep the same hook size and yarn weight throughout.
- Make one complete sample square before starting the bedspread.
- Measure the finished sample to calculate exactly how many squares you need.
- Use stitch markers at corners to keep motifs symmetrical.
- Block individual squares before joining for a professional finish.
Final Result: A soft, romantic granny square bedspread with textured sage green centers, ivory openwork borders, dusty pink joining seams, and beautiful scalloped edges — inspired by the elegant crochet blanket shown in your photo.
The reference photo includes some decorative details that cannot be counted reliably from the image alone, so this pattern produces a similar design rather than an exact stitch-for-stitch replica.
