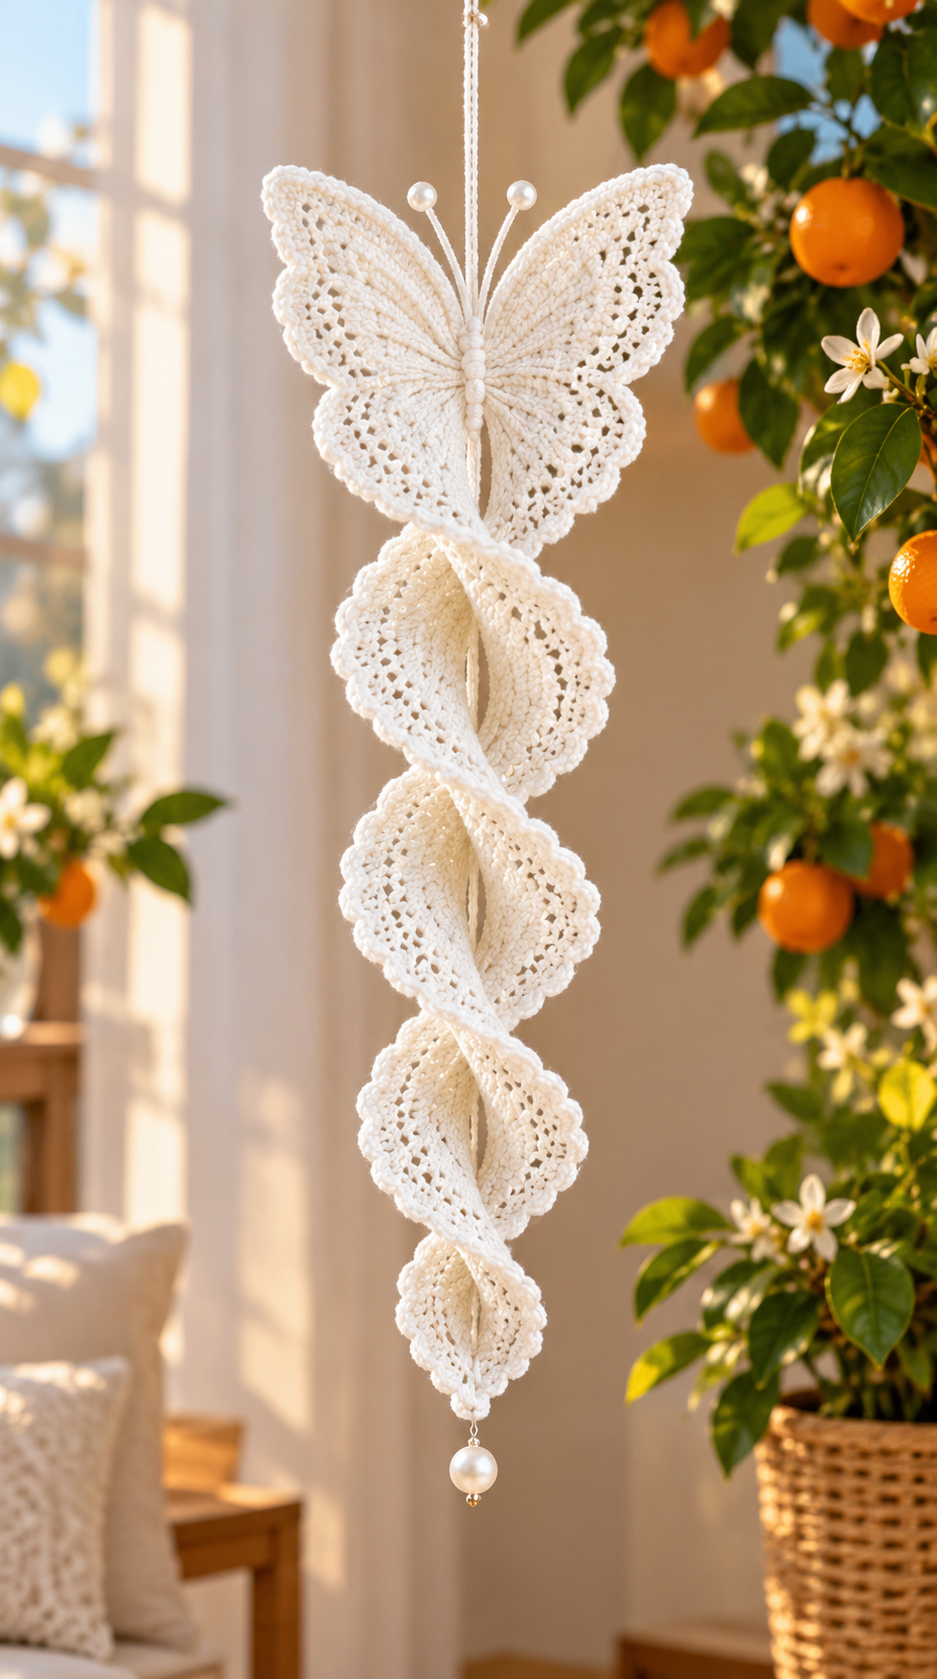

Beginner-friendly inspired recreation of the reference design, not the original designer’s exact pattern.
Materials
- White cotton yarn (DK/light worsted)
- 3.0 mm crochet hook
- Yarn needle and scissors
- Small white pearl beads
- White cord for hanging
- Stitch markers (optional)
Finished size: Approximately 50–65 cm long, depending on yarn and spacing.
Crochet Abbreviations (US Terms)
| Abbreviation | Meaning |
|---|---|
| ch | Chain |
| sc | Single crochet |
| hdc | Half double crochet |
| dc | Double crochet |
| tr | Treble crochet |
| sl st | Slip stitch |
| st | Stitch |
| MR | Magic ring |
Part 1: Crochet Butterfly
Step 1 – Upper Wings
Make a magic ring.
Upper right wing: Ch 5, work 6 tr into the ring, ch 4, sl st into the ring.
Upper left wing: Repeat the same sequence on the opposite side.
Step 2 – Lower Wings
Lower right wing: Ch 3, work 5 dc into the ring, ch 2, sl st into the ring.
Lower left wing: Repeat the same sequence.
Tighten the magic ring and shape all four wings symmetrically.
Step 3 – Wing Border
Work sc stitches evenly around each wing, adding extra sc stitches at the outer curves to help shape the wings. Finish with a delicate picot edging for a lace-like effect.
Sew small pearl beads down the center of the butterfly. Create two antennae using short lengths of stiffened white yarn, adding a pearl to each tip.
Part 2: Crochet Cascading Spiral
Make five spiral sections, gradually decreasing in size.
| Section | Foundation chain |
|---|---|
| Spiral 1 (largest) | Ch 32 |
| Spiral 2 | Ch 28 |
| Spiral 3 | Ch 24 |
| Spiral 4 | Ch 20 |
| Spiral 5 (smallest) | Ch 16 |
Use the following instructions for every section.
Row 1 – Foundation
Sc in the second chain from the hook and in every chain across. Turn.
Row 2 – Creating the Curl
Ch 2 (does not count as a stitch). Work 2 dc into every sc across. Turn.
The fabric begins to curl as the stitch count doubles.
Row 3 – Building the Spiral
Ch 2. Repeat (1 dc in next stitch, 2 dc in next stitch) across the row.
The extra increases create fuller, naturally curling ruffles.
Row 4 – Decorative White Border
Ch 1. Work sc evenly along the outer edge, making a small picot (ch 3, sl st into the first chain) approximately every 6 stitches.
Fasten off and weave in the ends.
Repeat the process for all five sections. Gently shape the completed ruffles by hand.
Part 3: Assembly
Cut a long white hanging cord.
Attach the butterfly securely at the top. Fold each spiral section loosely into a cascading loop, bringing its short ends near the central cord.
Sew the largest spiral beneath the butterfly, then attach the remaining sections in descending size order. Rotate each section slightly in the opposite direction to create the flowing, alternating spiral appearance shown in the reference.
Space the sections approximately 1–2 cm apart, adjusting the gaps until the decoration hangs naturally. Secure each joining point with white yarn.
Attach a large pearl bead at the bottom.
Part 4: Finishing
Lightly steam-block the decoration without pressing the ruffles flat. Shape the butterfly wings and open the spiral loops to emphasize their three-dimensional appearance.
Hang the decoration vertically and adjust the sections until they form a balanced cascading spiral.
Final result: A beautiful all-white crocheted butterfly with delicate pearl details, flowing textured spiral sections, and an elegant hanging finish.
