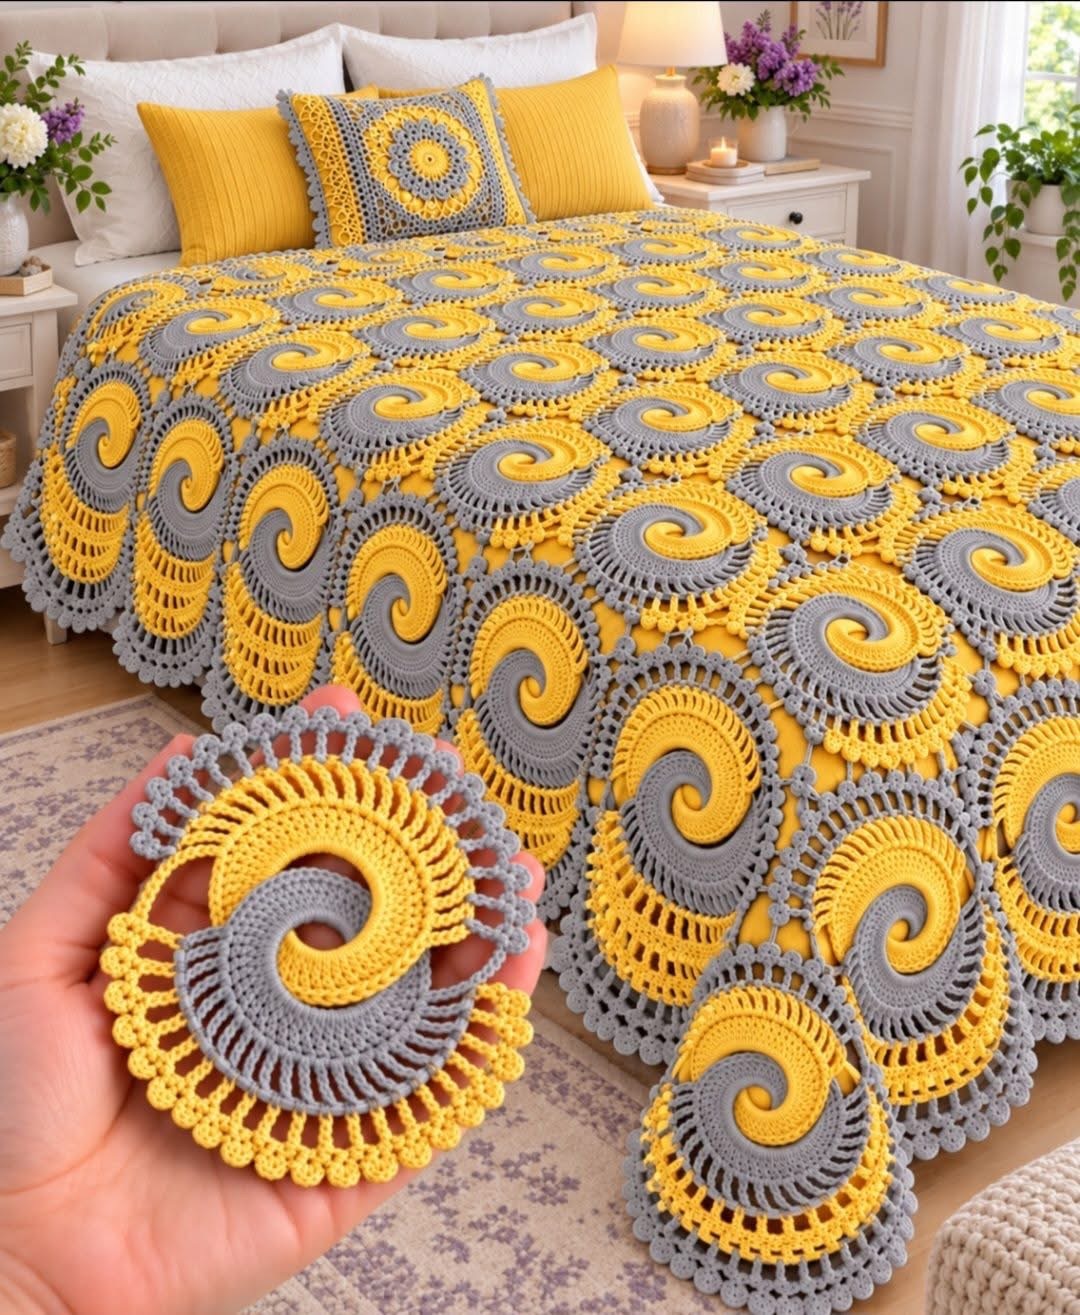

Create a stunning handmade crochet bedspread featuring raised spiral motifs in sunshine yellow and soft gray. Each motif combines a beautiful two-color swirl, openwork lace, and decorative scalloped edging. The finished motifs are joined to create a luxurious bedspread with a coordinating crochet pillow.
Skill Level: Intermediate to Advanced Crochet Terms: US Terminology Finished Size: Queen bedspread, approximately 90 × 100 inches (229 × 254 cm) Style: Two-Color Spiral Crochet, 3D Textured Lace
Important: This is an original, reconstructed pattern inspired by the photograph, not the designer’s verified pattern. The exact spiral shaping and joins cannot be determined from the image alone.
Materials Needed
- 1,800–2,200 g sunshine yellow yarn
- 1,800–2,200 g soft gray yarn
- 4.0 mm crochet hook
- Stitch markers
- Yarn needle
- Scissors
- Measuring tape
- Two separate yarn bobbins
- Optional yellow fabric backing for the bedspread
- One 18 × 18 inch pillow insert
Choose lightweight DK cotton or a soft cotton-acrylic blend for good stitch definition.
Crochet Abbreviations
- MR – Magic Ring
- CH – Chain
- SL ST – Slip Stitch
- SC – Single Crochet
- HDC – Half Double Crochet
- DC – Double Crochet
- TR – Treble Crochet
- BLO – Back Loop Only
- FLO – Front Loop Only
- ST – Stitch
- SP – Space
- REP – Repeat
Part 1: Creating the Two-Color Spiral Center
The spiral is worked continuously using two active yarn colors. Do not join rounds unless instructed.
Round 1: Magic Ring
- Make a magic ring with yellow yarn.
- CH 1, work 1 SC, 1 HDC, and 2 DC into the ring.
- Pull up a long loop and secure the yellow yarn temporarily.
- Attach gray yarn into the same magic ring.
- Work 1 SC, 1 HDC, and 2 DC into the ring.
- Tighten the magic ring carefully.
You now have two separate colored sections.
Round 2: Beginning the Spiral
With yellow yarn:
- Work 2 DC into each of the four gray stitches.
- Pull up the working loop and temporarily secure it.
With gray yarn:
- Work 2 DC into each of the four yellow stitches.
- Secure the working loop.
Both colors should begin curving around the center.
Round 3: Expanding the Spiral
Using yellow yarn, work:
(1 DC in next ST, 2 DC in next ST) four times.
Repeat the same sequence with gray yarn across its next eight available stitches.
Keep both colors moving in the same direction.
Round 4: Continuing the Swirl
With each color separately:
(1 DC in each of the next 2 ST, 2 DC in next ST) four times.
Keep the yarn strands untangled and maintain consistent tension.
Round 5: Building the Outer Spiral
With each color:
(1 DC in each of the next 3 ST, 2 DC in next ST) four times.
Continue alternating between yellow and gray sections.
Round 6: Final Spiral Expansion
With each color:
(1 DC in each of the next 4 ST, 2 DC in next ST) four times.
The motif should now show a clearly defined two-color spiral.
To create a more raised appearance, work the last round of each spiral arm in BLO, keeping the tension slightly firm.
Shaping note: This is an experimental spiral construction. Check the piece after each round and adjust increases if it begins to cup or ripple. The pictured motif has more elaborate shaping than a standard flat two-color spiral.
Part 2: Creating the Decorative Lace Ring
The openwork ring surrounds the spiral and gives the motif its delicate appearance.
Round 7: Open Lace Foundation
Using yellow yarn:
- Attach yarn to the outer edge of the spiral.
- CH 4.
- Skip 1 ST.
- DC in the next ST.
- CH 2.
- Skip 1 ST.
- Repeat around the entire outer edge.
- Join with SL ST.
Distribute the spaces evenly, adjusting the spacing where necessary.
Round 8: Lace Arches
- CH 3.
- Work 2 DC into the first chain space.
- CH 2.
- Work 2 DC into the next chain space.
- Continue around.
- Join with SL ST.
Round 9: Gray Decorative Border
Attach gray yarn.
- SC into the first chain space.
- CH 5.
- SC into the next chain space.
- Repeat around.
- Join with SL ST.
This creates the outer gray lace arches visible around the motifs.
Part 3: Scalloped Picot Edging
Round 10: Decorative Outer Edge
Work the following into each chain-5 loop:
1 SC, 1 HDC, 3 DC, CH 3, SL ST into the top of the last DC, 1 HDC, 1 SC.
Repeat around the entire motif.
Fasten off and weave in the ends.
The finished motif should have a spiral center, an openwork lace ring, and a softly scalloped edge.
Part 4: Joining the Spiral Motifs
The bedspread is assembled from individual spiral motifs.
Layout
Arrange the motifs in straight or slightly offset rows, alternating their orientation to create a flowing spiral effect.
Joining Instructions
- Place two motifs side by side.
- Align the outer lace arches.
- Attach gray yarn to one outer arch.
- CH 2.
- SL ST into the corresponding arch of the second motif.
- CH 2.
- Secure into the first motif.
- Repeat at several evenly spaced points.
Continue joining motifs horizontally to create rows.
Then join the completed rows vertically using the same method.
For a stronger bedspread, use a continuous slip-stitch or single-crochet joining method along multiple matching arches.
Part 5: Bedspread Sizing
The required number of motifs depends on the size of each finished spiral.
| Bed Size | Approximate Finished Size |
| Twin | 66 × 90 inches |
| Full | 80 × 90 inches |
| Queen | 90 × 100 inches |
| King | 108 × 100 inches |
For example, if each joined motif measures approximately 8 inches across, a queen-size bedspread may require roughly 12 motifs across and 13 rows, or 156 motifs.
Because the motifs have scalloped edges and may overlap visually, make a sample of four joined motifs and measure the actual width and height before calculating your final quantity.
Part 6: Matching Spiral Crochet Pillow
The matching pillow uses the same yellow and gray spiral design.
Front Panel
- Crochet one large two-color spiral motif.
- Add the yellow lace ring.
- Work a gray border around the motif.
- Continue adding crochet rounds or small joining motifs until the panel measures approximately 18 × 18 inches.
- Use corner increases to convert the circular motif into a square pillow panel.
Back Panel
- CH enough stitches to measure approximately 18 inches.
- Work HDC in each stitch.
- Continue until the back panel measures 18 inches.
- Fasten off.
Assembly
Place both panels together with the right sides facing outward.
Join around three sides using SC stitches.
Insert the pillow and close the remaining side.
For a removable cover, make an overlapping envelope-style back instead.
Part 7: Final Bedspread Border
Once all spiral motifs are joined, crochet a continuous border around the blanket.
Round 1: Work SC evenly around the perimeter, using chains to bridge gaps between motifs.
Round 2: Work DC around the blanket, adding increases where needed to keep the edge flat.
Round 3: Work gray scallops using 5 DC in a space, followed by 1 SC in the next suitable space.
Fasten off and weave in all ends.
Professional Finishing Tips
- Keep spiral tension consistent: Both colors should form smooth, evenly curved sections.
- Use stitch markers: Mark the beginning of each colored spiral arm.
- Avoid twisting the yarn: Keep the two working yarn balls on opposite sides.
- Block every motif: Light blocking helps the lace arches and scallops maintain their shape.
- Join carefully: Check that all motifs face the same direction unless you intentionally want alternating spirals.
- Add a backing: A lightweight yellow fabric lining can emphasize the lace openings, similar to the photograph.
Frequently Asked Questions
Can beginners make this bedspread?
The project is better suited to intermediate crocheters familiar with continuous rounds, color changes, and joining motifs.
Can I change the colors?
Yes. Beautiful combinations include lavender and ivory, dusty rose and cream, sage green and white, or navy blue and silver.
How can I make the spiral more three-dimensional?
Use firm tension, raised surface stitches, or a separate spiral overlay. Test the shaping on a single motif before making the full blanket.
Can I make a smaller blanket?
Absolutely. Reduce the number of motifs to create a baby blanket, throw, or sofa cover.
How long does this project take?
A full bedspread can require many weeks of work, depending on motif size, yarn weight, and experience.
Conclusion
This Yellow & Gray Spiral Crochet Bedspread combines elegant swirling motifs, delicate lacework, and decorative scalloped edges to create a striking handmade bedroom accessory.
The bright yellow adds warmth and cheerful color, while the soft gray provides a beautiful contrast. Matching crochet pillows complete the coordinated design.
With careful motif construction, consistent joining, and proper finishing, you can create a personalized spiral crochet bedspread inspired by this beautiful design.
